A DIY tutorial on how to install concrete landscape edging to improve your home’s curb appeal.
Fluffy peonies, sunny daffodils, and cool hydrangeas…isn’t it great to plant these gorgeous blooms just once and see them reappear in your garden year after year?
Everyone dreams of a well-kept garden that doesn’t need a lot of effort to maintain.
And when you’ve finally created your perennial flower bed design, how do you define the space and accentuate it?
If you’re looking for information on an easy but decorative landscaping edging option, you’ve come to the right place.
This tutorial will show you how to install a simple concrete landscape edging.

How much does it cost to install concrete edging?
This will depend on how wide the edging will be and how long the border is.
My best estimate for concrete is around $3.75 per square foot.
Simple Concrete Borders
Disclosure: This post contains some affiliate links or referral links for your convenience. It is a way for this site to earn advertising commissions by advertising or linking to specific products and/or services. Click here to read my full disclosure policy.
Materials
- concrete
- gravel
- water
- 1/4″ bender board (plywood) or 1/2″ plywood (or 2×4’s)
- 12″ wood stakes
- 1″ screws (or 1-1/4″)

Tools
- hammer
- drill
- circular saw (or table saw)
- wheelbarrow
- trenching shovel
- margin trowel
- concrete edging tool
- rubber float
- clamps (6″ or 12″)
- safety glasses
- face mask (for dust)
- ear protection
SIDE NOTE: This is my first time doing any concrete work. There are probably techniques to make the process even easier. I am also completing this project with the least amount of tools needed to help save on the cost.
STEP 1: LAY OUT THE PLAN
To start your concrete edging project, draw a plan of exactly where the edging will be in your garden.
You can set the design by using your garden hose or string. We used string with wooden stakes.
After you have placed one side of the layout, add a gap and lay out the other side of the border. This gap will represent the width of your edging.
TIP: Have your edging a minimum of 4″.
You also need to factor in the width of the material you will use to hold the wet concrete together. Take the width of the edging and add 2″ (if you’re using 2×4’s, add 4.5″). This is how wide you need the gap between your border and the dirt.
STEP 2: DIG OUT THE BORDER
Once you have the shape and length you want for your concrete border, use a trenching shovel to dig along with the design, on both the inside and outside of the border.

After you have dug along with the layout, excavate the dirt and grass inside this area until you have a 4″ deep trench.
SIDE NOTE: This is when a tarp and wheelbarrow come in handy to collect and cart off the dirt and grass.
TIP: Try to make the sides of the trench as vertical as you can, not angled.
STEP 3: CREATE CONCRETE EDGING FORM
Now that the trench is dug, you can build your concrete form to hold the concrete until it is set. The boards that you will use to create the form will also need a place to anchor to (wooden stakes).
Start by cutting a 1/4″ or 1/2″ sheet into 3-7/8″ strips. You will get twelve 8-foot strips per sheet.
SIDE NOTE: The 3-7/8″ is factoring in a 1/8″ blade cut.
TIP: If you are using a circular saw to cut the sheet, use a ‘rip-cut’ to make the process easier. If you’re not sure what that is, see my post about how to use a rip-cut for a circular saw.
And while you have the saw out, prepare a spacing template to ensure a uniform gap, I used one of the wood stakes. This template should be the width of the edging plus the size of your wood material (1/4″ or 1/2″). For example, if you want your edging to be 4” and you are using a 1/2” material, your template would be 4-1/2”. Cut a board to this measurement.
SIDE NOTE: Use a stake if you do not have a scrap board.
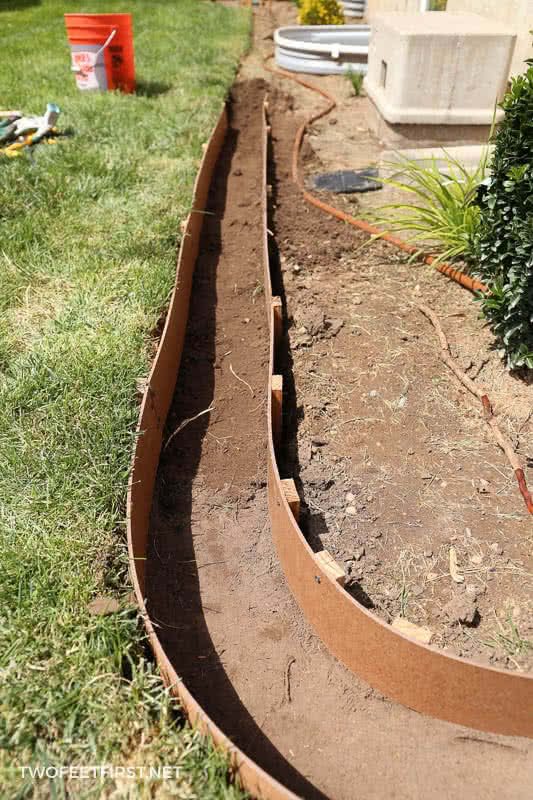
Once the strips are cut, you can start assembling your form.
Place a 12″ stake at the beginning of one side of the trench. You will hammer the stake into the ground so that the top of the stake is level with the ground.
Then, place the first strip of wood into the trench. Clamp the wood to the stake, making sure the end of the board hits the beginning of where you want the edging and the top of the board is level with the top of the stake.
Secure the board to the stake using two screws, one toward the bottom and one toward the top. You will need to remove the clamp for one screw.
TIP: You may need to use a 90-degree drill attachment.
The length of your strips will determine how far apart you will space the stakes. If you are using a 1/4″ strip, you will want a stake about every foot; for 1/2″ material, about every two feet.
You should place as many as needed to keep the form within the layout.
SIDE NOTE: You should use more stakes around turns to properly secure the form.
Continue placing stakes along the layout and secure the board to the stake.
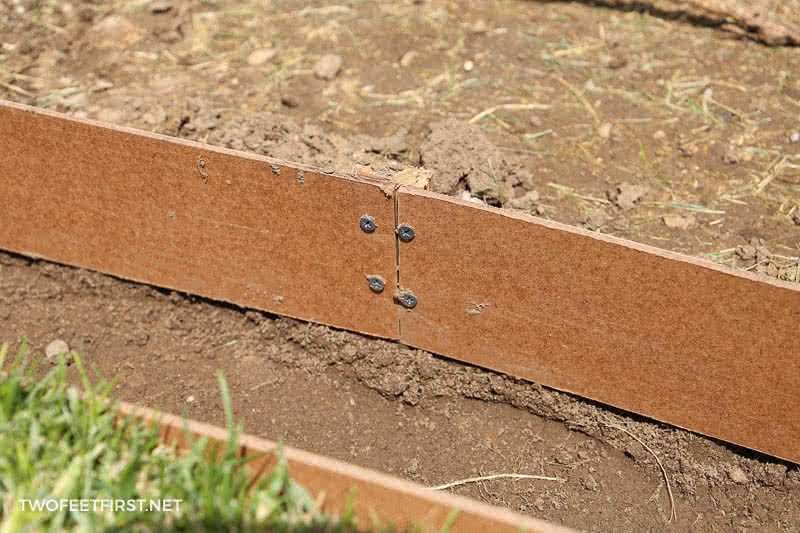
When you are at the end of a board, place a stake where the board will be in the middle of the stake. This way, you can install another board on the same stake.
Now you are ready to place the form for the other side of the layout. Begin by using your spacing template (a board the size of the desired concrete border plus the size of your form material, 1/4″ or 1/2″).
Place the spacing template against the already installed form; then, place a stake where the template ends. Continue installing stakes in the same way for the length of one strip of board.
Then, attach the board to the stakes using clamps and screws.
Repeat this process until the form is complete.
SIDE NOTE: If you have issues with a board staying in place, you can cut spacers to help the boards from bowing together.
SIDE NOTE 2: You may notice that my concrete edging is not the straightest – there are two reasons why. First, I did not add enough stakes to keep the form straight and second, I should have used 1/2″ for the straight sections. So, please learn from my mistakes!
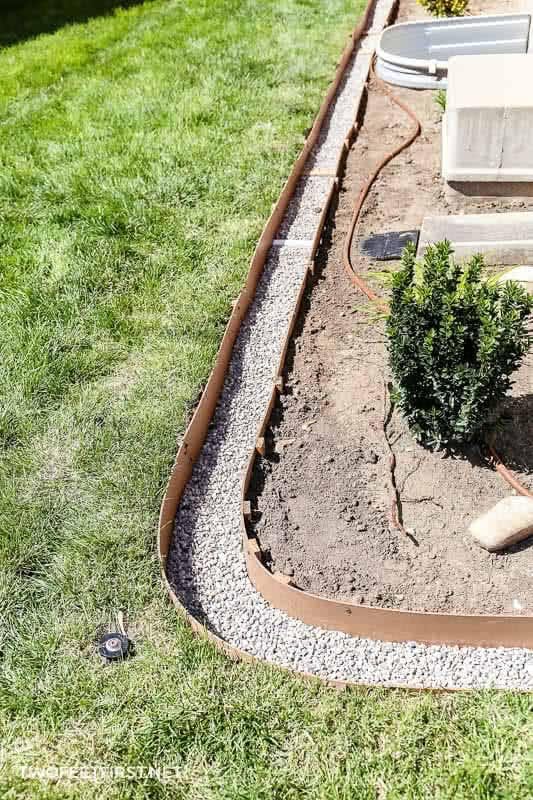
STEP 4: ADD GRAVEL INTO THE FORM
Now that your form is done, you need to pack down the dirt inside the form.
Next, add a 1/2″ layer of gravel into the form.
STEP 5: POUR CONCRETE INTO THE FORMS
You are now ready to mix your concrete and pour it into your form.
You may want to use a mixer, depending on the amount of concrete you need (most concrete companies have a calculator, like the Concrete Calculator from Quikrete). If you’re not using a ton of bags, mix it in a wheelbarrow or plastic tub according to the instructions on the bag.
Once you have the consistency you need, pour the concrete into the form.
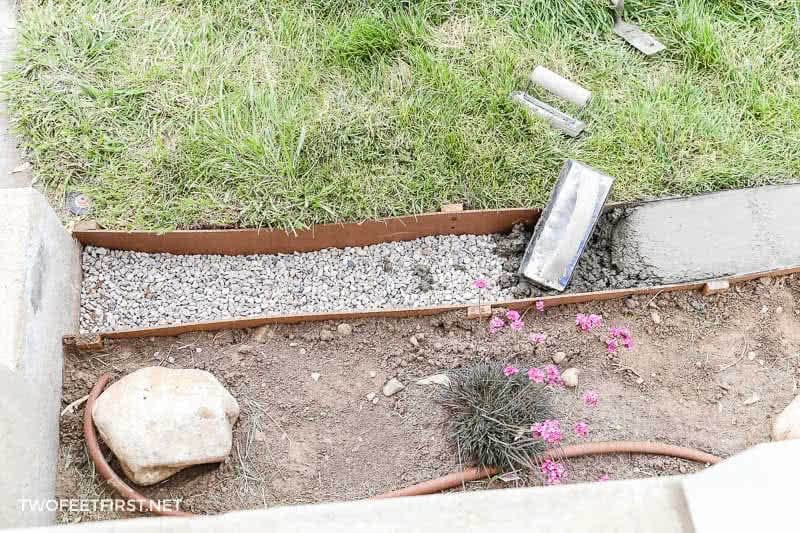
Work the concrete into the edges and make it level with the form.
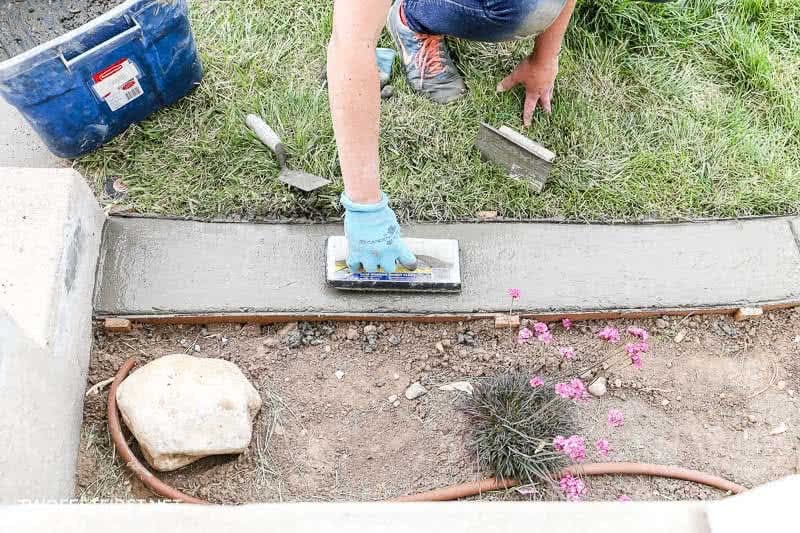
Then, use the concrete edging tool to give you a slightly rounded edge.

About every three to four feet add a joint about 1″ deep. This is a controlled joint so that the concrete will crack on this line if needed.
Work the concrete to give you the finish you want.

Continue this process until you have added concrete to the whole length of the form.
STEP 6: CURE THE CONCRETE EDGING
Once the concrete is in place, it needs to cure. Make sure to follow the instructions on your concrete bag by either applying a sealer or keeping the concrete slightly damp for a couple of days.
Remember that you should not allow a lot of water (rain or sprinklers) to hit the curing concrete, so be sure to cover the concrete with tarps if needed.
STEP 7: REMOVE THE FORM
After the concrete has cured, around three days, you can remove the form.
I found I had to use a pair of pliers to clamp the stakes to pull up.
STEP 8: FILL IN AROUND THE CONCRETE EDGING
Once the form is discarded, fill in around the concrete edging with the dirt you removed before.

And now, your flower bed is trimmed with classic, durable concrete edging! Mowing around your landscaping will be simple and this edging will last a long time!
Interested in more Landscaping projects? Here’s more posts you might enjoy:
- Sprinkler System Installation
- Install Underground Gutter Drainage
- Automatic Watering System For Plants
- Build a simple hose sprinkler
- Install a rain barrel

DIY Concrete Edging
Create division in your landscaping by creating DIY concrete edging. Makes mowing and weeding so much easier!
Materials
- concrete
- gravel
- water
- 1/4" bender board (or plywood)
- 1/2" plywood (or 2×4's)
- 12" wood stakes
- 1" screws (or 1-1/4")
Tools
- hammer
- drill
- circular saw (or table saw)
- wheel barrel
- trenching shovel
- concrete margin towel
- concrete edging tool
- rubber float
- clamps
Instructions
- Create your plan of where the edging will be in your landscaping and layout your plan with string.
- Remove the dirt from your layout 4" deep.
- Create your concrete form using a 1/4" or 1/2" board and wooden stakes.
- Pour 1/2" of gravel into the form.
- Place concrete into forms.
- Let the concrete cure for about 3 days.
- Remove the forms and fill in the gaps with dirt. Enjoy!


