The process to install underground gutter drainage, also known as a french drain, to safely direct water flow away from the home.
There’s something so peaceful about falling asleep to the sound of the rain drops on your roof.
Especially after a tiring day mowing your lawn, cleaning the gutters and ripping naughty weeds from your flower beds.
But would you sleep soundly if you knew what damage the downpour is causing to your foundation?
Clearing out your clogged gutters of leaves and other debris is not enough preventative maintenance.
Gutters protect by moving rainwater away from the house so the heavy rains don’t erode the soil or worse yet, collect around your foundation.
The problem is that gutter downspouts are usually right near the side of the house, releasing the water too close to your foundation.
Over time, water-logged soil pushes against the side of your house, creating cracks for water to leak into your basement.
One way to prevent this kind of damage is to install an underground gutter drainage system, such as a french drain.

Years ago, we tried to fix this problem by connecting an extension directly to the gutter downspout and burying the hose underground.
Later, we realized we had no way of cleaning debris out the pipe.
You can see how to bury a downspout just like we did before – it moved the water further away but it’s not a long-term solution.
We highly recommend the french drain instead. There is more work involved but it’s easy and affordable.
How much does it cost to install underground gutter drainage?
The cost may be different for every home and every location. It depends on the size of the catch basin you need, and the distance you want to move the water away.
If you use a standard size catch basin (9″) and move the water 10 ft away, the estimated price for completing this project yourself would only be about $105. This includes a filter, which costs about $25.
Disclosure: This post contains some affiliate links or referral links for your convenience. It is a way for this site to earn advertising commissions by advertising or linking to specific products and/or services. Click here to read my full disclosure policy.
INSTALL UNDERGROUND GUTTER DRAINAGE
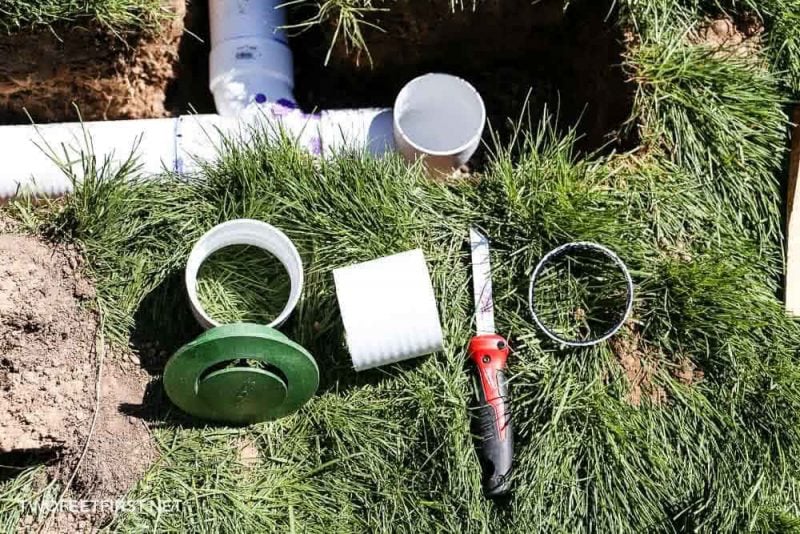
MATERIALS:
- catch basin kit (9″ basin we used)
- filter for catch basin
- pop-up drainage emitter
- 4″ drain pipe (comes in 10ft)
- 4″ coupling fitting
- silicone
- gravel
- glue and primer
TOOLS:
- trench shovel
- wheelbarrow (optional)
- tarp (somewhere to store dirt)
- drill with a 1/8″ bit
- caulk gun
- level
- hacksaw to cut pipe
- safety glasses
- face mask (for dust)
- ear protection
Before gathering your supplies, you need to determine what size of catch basin you need. An excellent resource for this is NDS Home Drainage Center.
After researching, we decided we would need two 9×9 catch basins and one 6″ Speed-D catch basin for the areas we would be installing the underground gutter drain.


STEP 1: DIG TRENCHES FOR DRAINAGE PIPE
BEFORE digging, CALL 811 to have utility lines marked.
The easiest way to dig the path of the drain is to lay out the materials (catch basin and pipe) next to where you want them to go.
Then, using a shovel, dig your trench.
SIDE NOTE: To ensure a straight line, use wood stakes and string to mark where you should dig.
For the french drain to work, the pipe needs to slope away from the starting point. You should have a 1-1/2″ downward slope for every 10 feet of pipe.
SIDE NOTE: We gave ours a bigger slope.
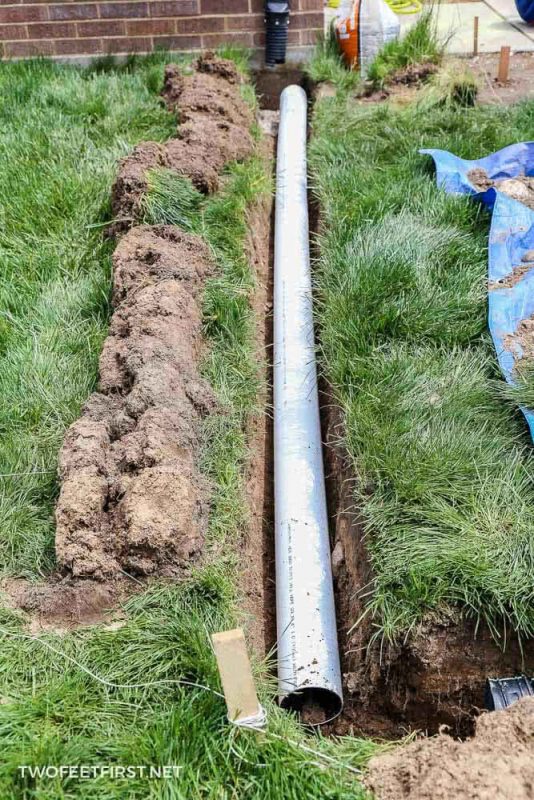
SIDE NOTE: You should lead a gutter drain at least 10 feet away from your house.
Also, the catch basin and emitter will need 4″ to 6″ of gravel under the base, so dig a deep enough hole at both of these places to hold both the basin and 4″ to 6″ of gravel.
SIDE NOTE: In the next few steps, you will be checking the slope of the pipe and making sure all the materials fit together. The trench does not need to be perfect in this step – you will probably do some adjusting later.
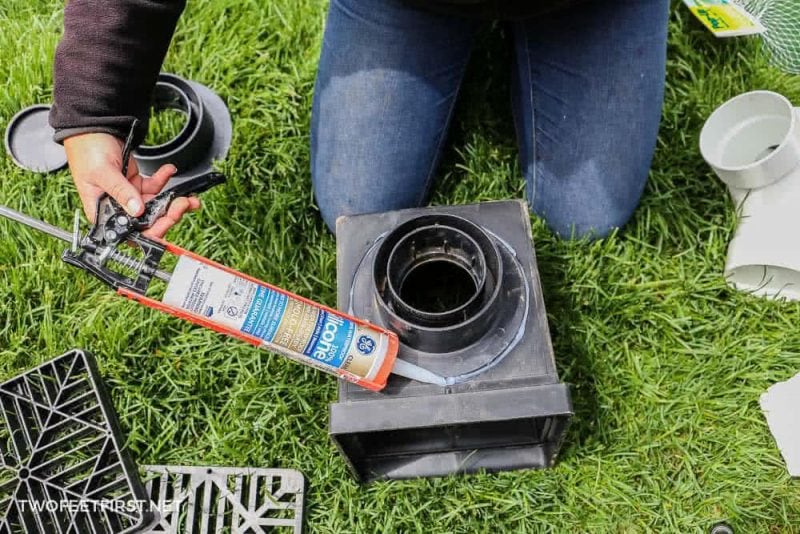
STEP 2: ASSEMBLE AND PLACE THE CATCH BASIN
Now that the trench is dug, you can assemble the catch basin.
- Start by removing all the pieces from inside the basin.
- Place the catch basin on a flat surface with one of the holes facing up.
- Apply silicone around the edge of the opening hole.

- Then, take the adapter and lock it into place, over the hole.
- Now, apply more silicone around the edge of the adapter. Smooth the silicone with a finger to give you a sealed seam.
- Complete this for the other side of the basin, the other opening.
- Once the other side has been assembled, apply silicone to the end cap.
- Now, push into place on one of the sides.
- SIDE NOTE: I am assuming you are only using one opening. Sometimes you could use both if you are connecting basins to drain water.
- To make sure you will not have water sitting at the bottom of the basin, drill one or two 1/8″ holes into the basin bottom. These holes should be as close to where the 4″ pipe will be attached. This way, the holes are not right next to the foundation.
- Let the silicone dry completely before moving forward to give you the best seal.
- SIDE NOTE: You can assemble the catch basin before digging to allow it to dry.
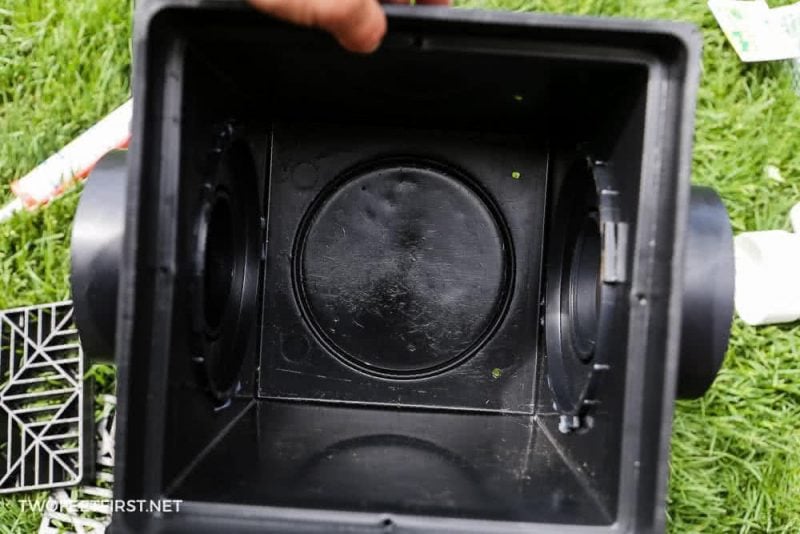
- Once the silicone has dried, test the fit of the basin into the trench. Remove any dirt if needed.
- SIDE Note: You will want the basin to be level with the ground.
- When the basin fits, remove from the hole and pour 4″ to 6″ of gravel into the hole.
- Finally, place the catch basin onto the gravel.


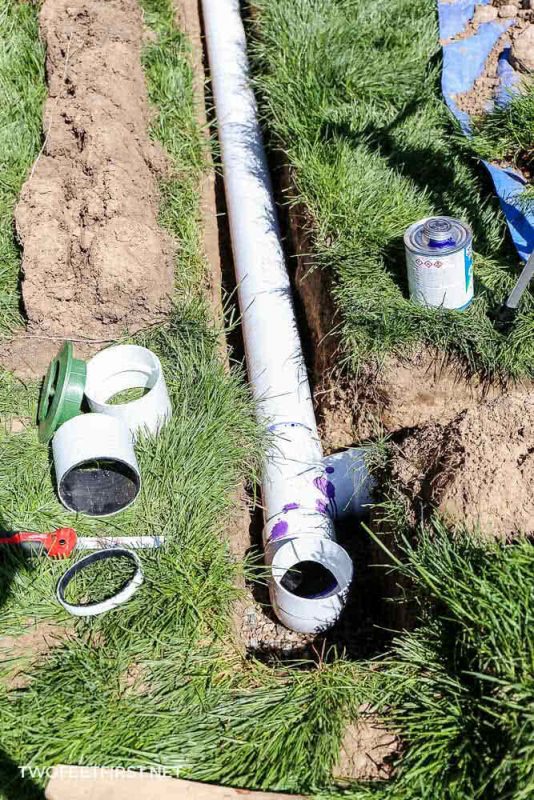
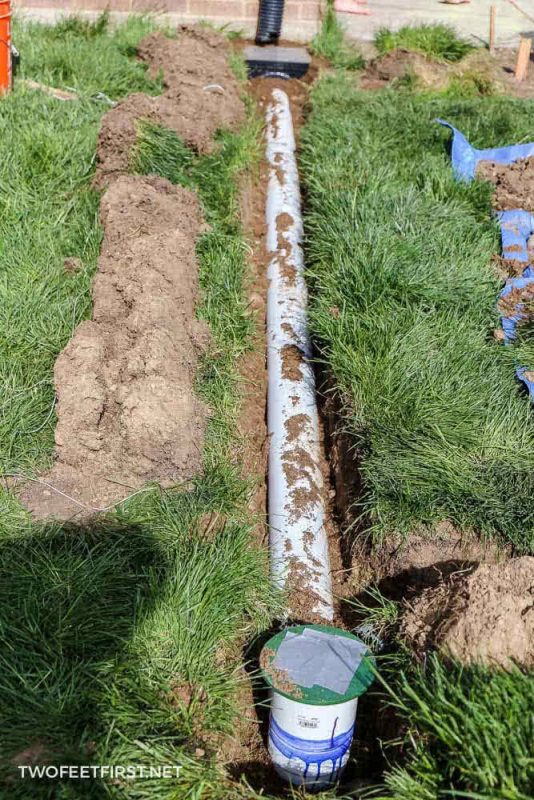
STEP 3: LAY THE DRAINPIPE
Now that the catch basin is in place, lay the drainpipe into the trench.
Check to make sure the pipe is sloping 1-1/2″ every 10 feet (the bubble on a level should be sloping down).
Once the pipe has the correct slope, connect it to the catch basin by adding silicone to the area where the 4″ pipe is inserted.
Then, adjust the catch basin and again, make sure the pipe is sloped correctly.
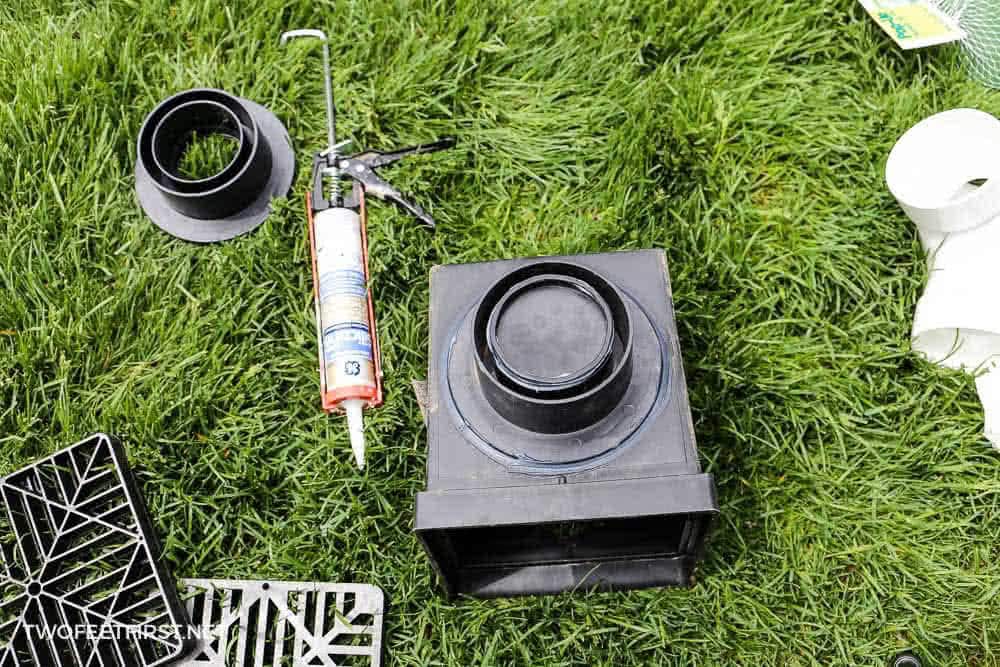
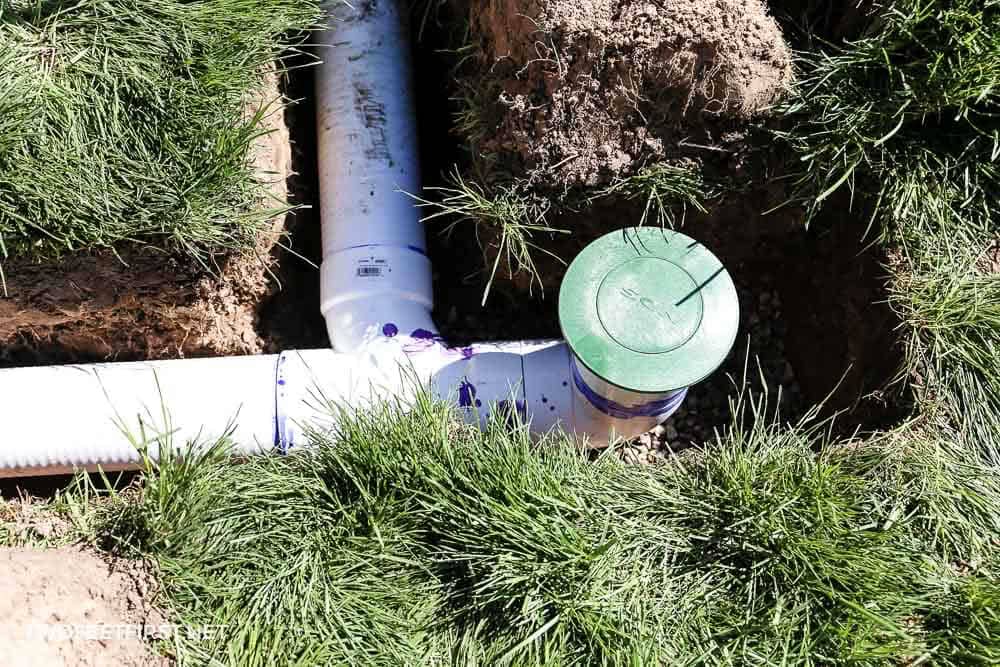
STEP 4: ATTACH THE DRAINAGE POP-UP EMITTER
With this tutorial, we are moving the water 10 feet away from the house and it will be released above-ground at a safe distance through a pop-up emitter.
SIDE NOTE: It would be ideal if you have a retaining wall or some type of drop-off for the open pipe to drain (without needing an emitter). This way, the pipe can be accessed easily for cleaning. However, because of the way our yard is, our best option was the pop-up emitter.
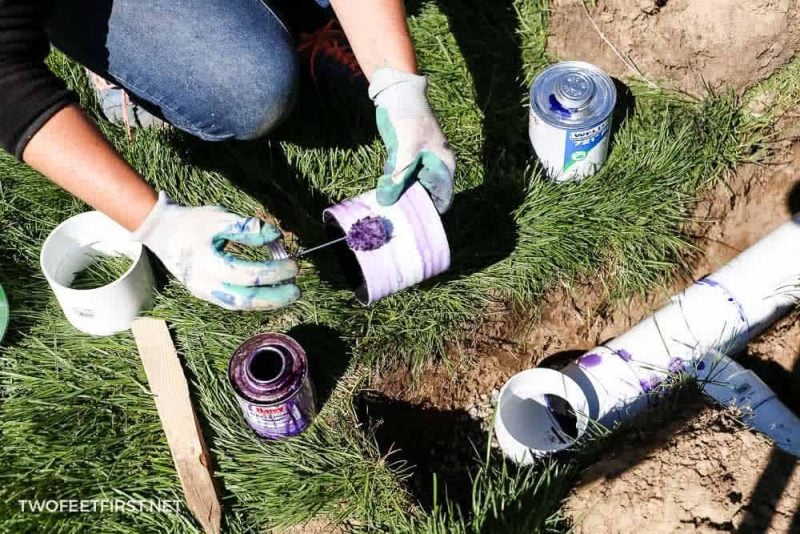
TIP: If your pipe has a bell end, you will want to remove it so that the 90-degree elbow can be installed. You can cut the pipe using some type of hacksaw.
Now, let’s install the emitter.
First, pour 4″ to 6″ of gravel where the 90-degree fitting will be placed.
TIP: The 90-degree elbow has a hole on one side. The side that has the hole should fall toward the ground. This hole is to allow water to drain into the dirt slowly.
You may need an extra pipe to be able to install the pop-up top so that it will be level with the ground. Cut a piece from the 4″ pipe, so that it will be long enough to extend the coupling fitting and pop-up to the desired height.
Place this piece inside the 90-degree elbow. Then, place the coupling fitting and the pop-up onto that. See if the pop-up is level with the ground or slightly above, adjusting the extra 4″ pipe if needed.
Once everything looks good, remove the 90-degree, straight coupling fitting, extra pipe, and pop-up.
Then using primer and glue, attach the pieces into place.
SIDE NOTE: You will notice in the pictures that we are attaching two drains together using a tee to allow us to use one pop-up emitter. If you get a lot of rain, I would not recommend using a tee to connect two pipes together. I would recommend using a pop-up emitter for each pipe, this way you will not have a backup of rainwater.

sTEP 5: BURY THE DOWNSPOUT WITH DIRT
Now that the drain is properly installed, it needs to be buried with dirt.
TIP: Cover the catch basin cover and pop-up with tape to keep dirt from falling in while you are filling the trench.
Using the dirt that was previously removed, pack the soil around the drain until the ground is level again.
Once you’re done, remove the tape from the basin cover and pop-up; then, place the filter into the basin. This filter will help to keep the drain from getting clogged from debris from the gutter.
And that’s how to install underground gutter drainage or a french drain.
Next time it rains, the only thing you need to worry about is those pesky weeds on the lawn!

Interested in More? You will love these other landscaping projects of ours:
- Sprinkler System Installation
- DIY Concrete Landscape Edging
- Automatic Watering System For Plants
- Build a simple hose sprinkler
- Install a rain barrel

Underground Gutter Drainage | DIY French Drain
Gutters help protect homes by moving rainwater away from the house but this water collects close to the foundation of a home.
The best way to prevent damage to the foundation is to install an underground gutter drainage system, such as a french drain.
Materials
- catch basin kit
- filter for catch basin
- pop-up drainage emitter
- 4″ drain pipe (comes in 10ft lengths)
- 4″ coupling fitting
- silicone
- gravel
- glue and primer
Tools
- trench shovel
- wheelbarrow (optional)
- tarp (somewhere to store dirt)
- drill with a 1/8″ bit
- caulk gun
- level
- hacksaw to cut pipe
Instructions
- Have the utility lines marked in the area, it's 811 in my area.
- Dig trenches for drainage pipe with a trench shovel.

- Assemble and place the catch basin

- Attach the drainage pop-up emitter
- Burry the downspout with dirt


Notes
See the article for detailed instructions on each step.


