A step-by-step tutorial on how to build a DIY pendant light for above the kitchen sink.
One of the things I disliked about my kitchen was the outdated fluorescent lighting above the sink. It did nothing to improve our mood as we cleared away pots and dishes after meals.
To kick off our kitchen remodel, we searched all over for the perfect light fixture to replace this outdated look.
Sadly, we came back with nothing – not a single light we liked or that would work in this window space.
Luckily, we had some ideas on making our own pendant light.
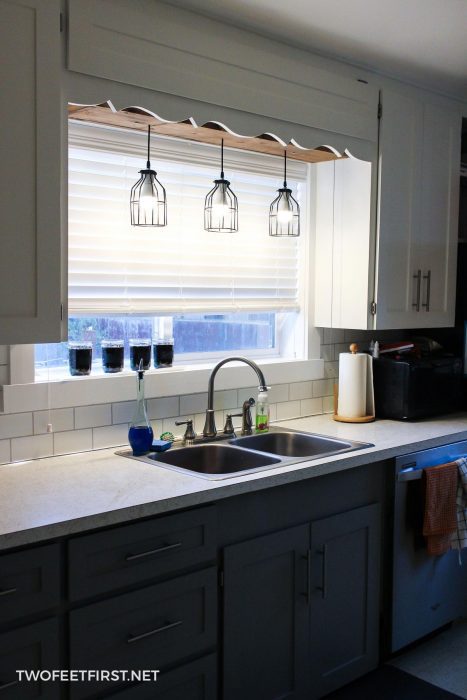
With a little planning, we finished our DIY pendant light and installed above the sink – and it completely transformed this space!
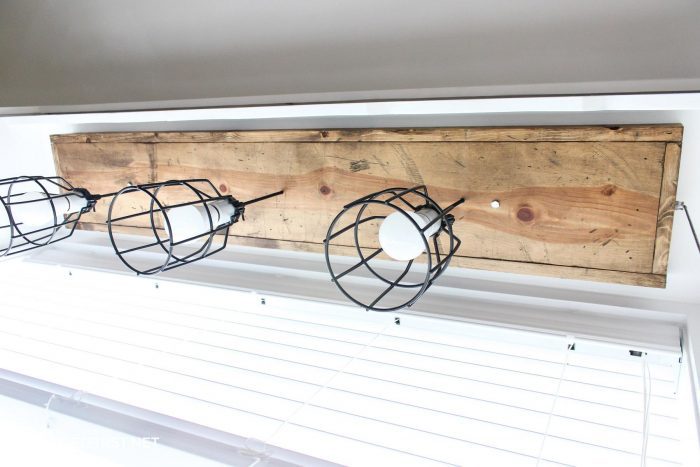
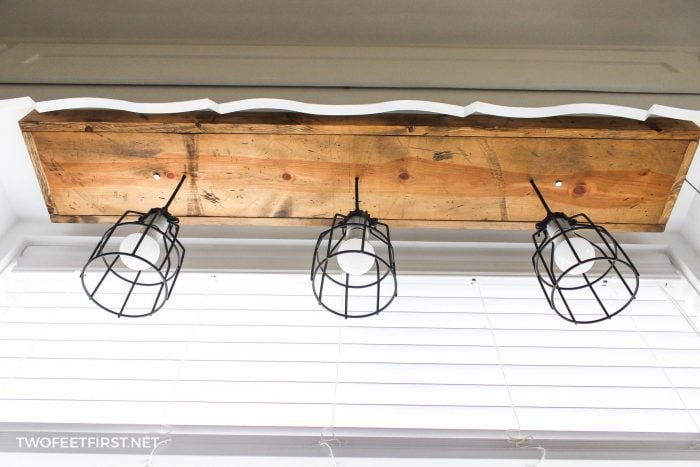
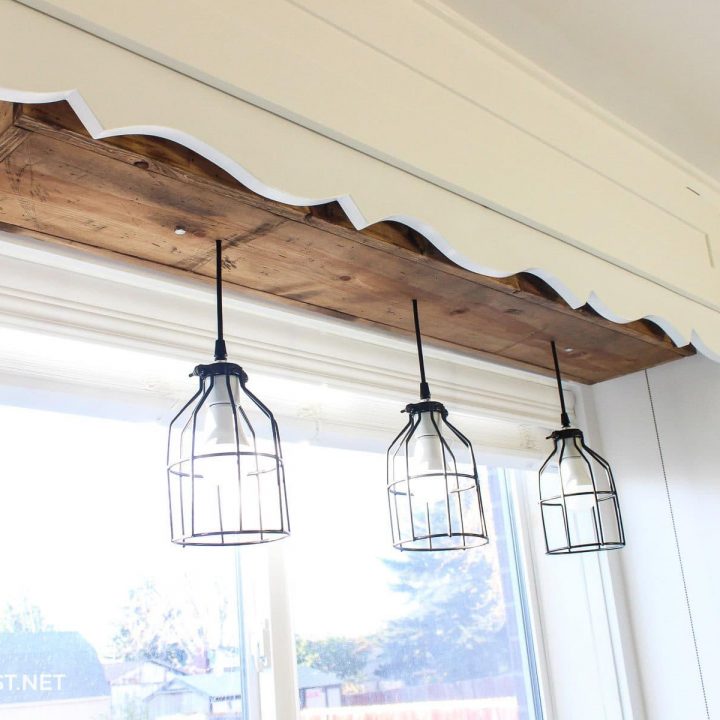
Here is our new lighting design:

Here’s another view at nighttime:
What do you think? We are LOVING the new lights.
But how fun would it be if I just showed a picture without a tutorial?
SO, without further ado, here is how to make a pendant cage light with a wooden box.
Disclosure: This post contains some affiliate links or referral links for your convenience. It is a way for this site to earn advertising commissions by advertising or linking to specific products and/or services. Click here to read my full disclosure policy.
DIY Pendant LIght
MATERIALS:
- lamp bulb guard
- keyless light socket
- antique cloth wire (we got 8ft but used about 5ft)
- wire cord grip
- 14-2 or 12-2 wire (about 3 ft)
- wire staples
- electrical tape
- wire caps
- spray paint
- light bulb (we used 40 watts LED light)
- pull-chain switch (optional if you do not have a light switch)
- lamp nipple (for pull-chain)
- tube coupling (for pull-chain)
- extra chain (for pull-chain)
- one: 1″x8″x4ft wood board
- two: 1″x3″x8ft wood boards
- 1.25″ finishing nails
- 1/4″x3.5″-4″ bolt with nut
TOOLS:
- drill
- screwdriver
- wire stripper
- voltage tester
- hammer or air compressor w/nail gun
- razor blade
- safety glasses
- face mask (for dust)
- ear protection
*Please Note that we are not electricians and you should be aware that there are dangers in doing this project yourself. Please be careful and do your research so you do not get electrocuted or burn down your house!*

Now that we have the supplies, let’s begin the process.
PREP THE METAL GUARDS:
First, I decided to paint the light bulb guard a different color because I did not like how black they were.
I placed them in a box and spray painted them with Oil Rubbed Bronze.

QUICK TIP: To make your can of spray paint easier to use, get a spray gun to keep the paint off your fingers. I love this thing and it’s less than $3!
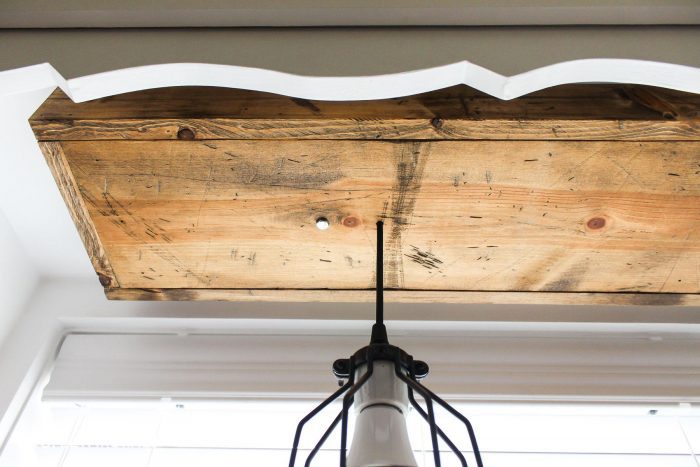
CREATE WOODEN LIGHTBOX:
Next, I built the wood box frame.
To do this, cut the 1″x3″ boards to the width of the 4 ft board (twice).Then measure the width of the 4 ft board (it will be about 7.25”), add 1.5″ to this measurement. Cut two pieces of the 1”x3” to this measurement.
SIDE NOTE: I would give the measurements but to make sure the boards fits your 1”x8”x4 ft board perfectly, you will want to measure your board.
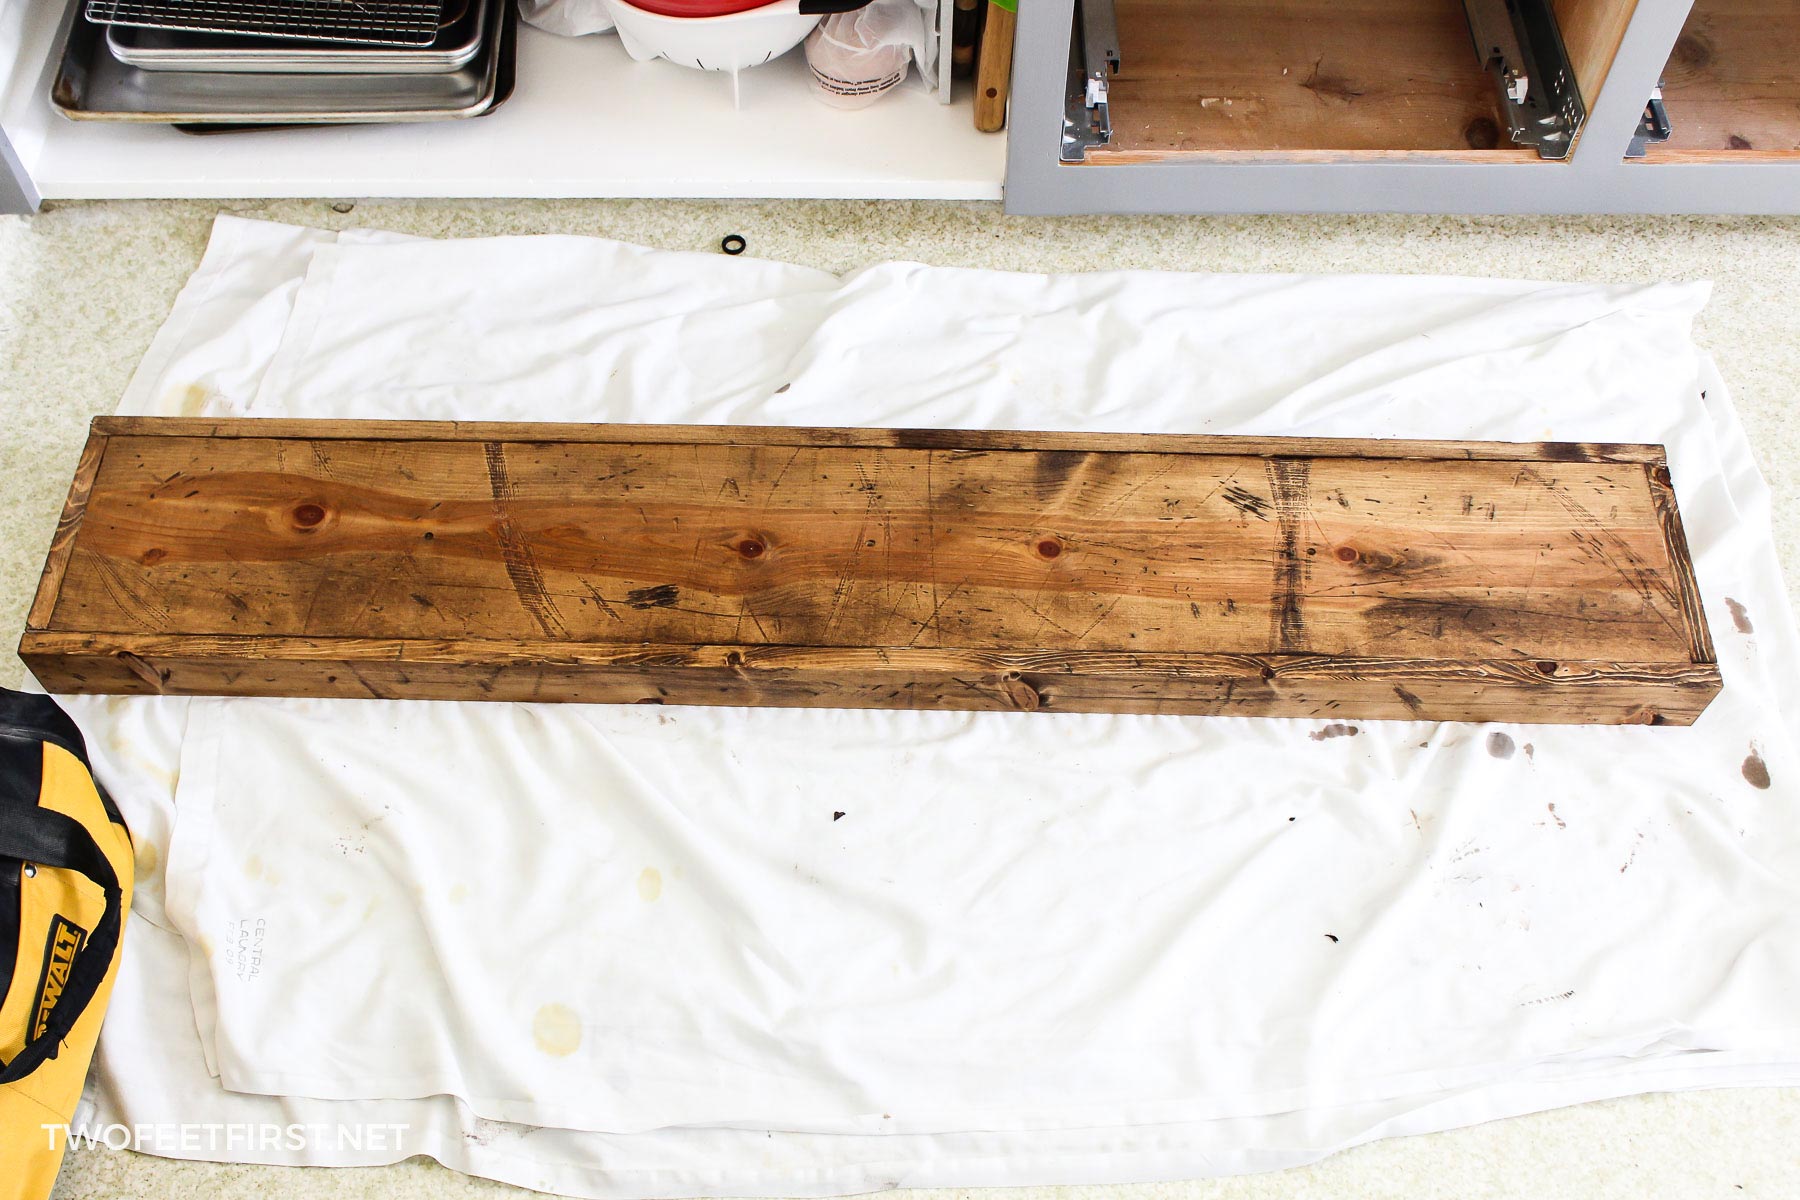
Then, I made the new wood look old by using this process in the link.
After, I assembled the box by placing the smaller cut boards along the side (width) of the 4 ft board, nailing the board in place.
TIP: Make sure the sides you want showing are on the outside, not the inside of the box you are creating.
After nailing the smaller boards, place the longer boards along the side (length) and nail into place also.
At this point, you should have a completed box.
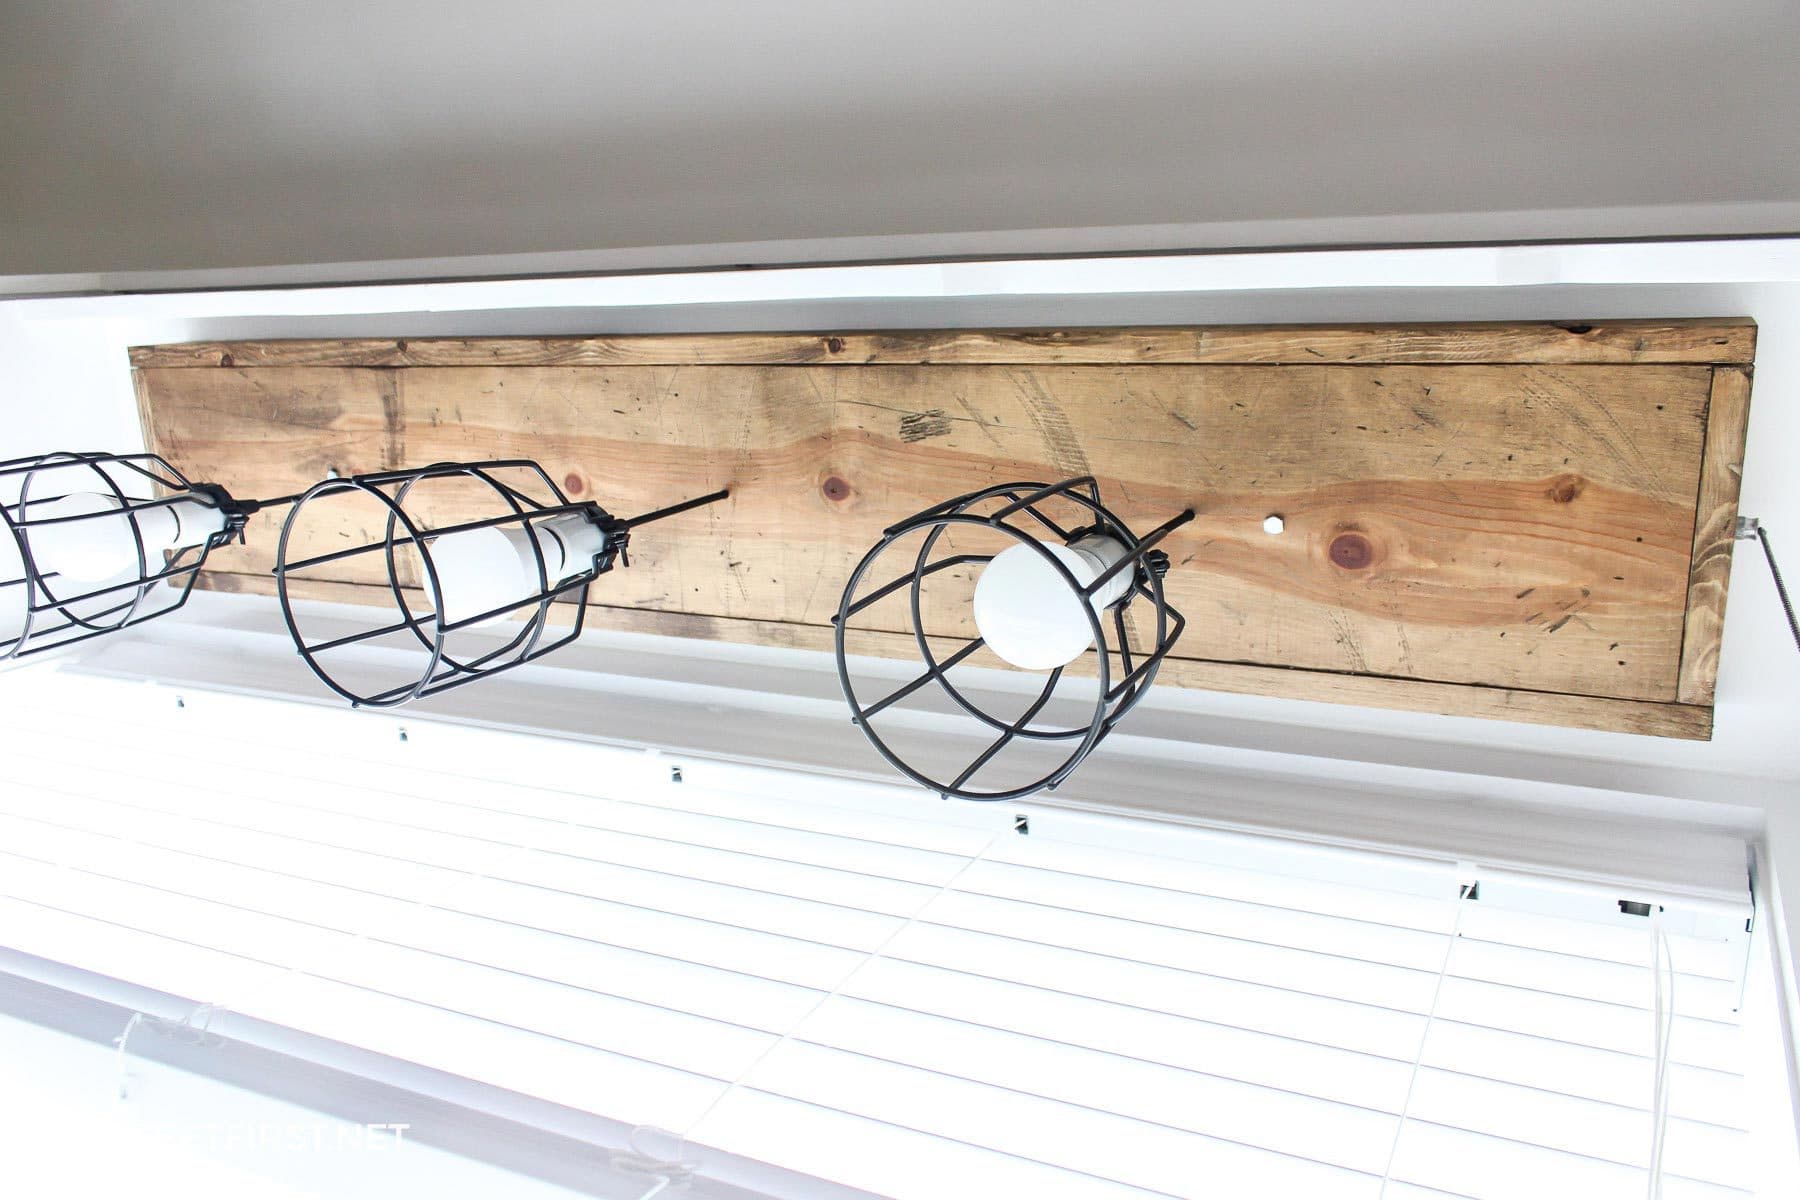
I then drilled 1/4″ holes into the wood where we wanted our pendant lights, centered in the middle of the wood (I placed ours so they would be centered in the window above our sink). Although I did this step before assembling the box, it can also be done after.

Now, depending on how you will be mounting the lights to the desired area and if you already have a light switch, you can skip the next couple of drill holes.
Because we are mounting our lights to the cabinet above the sink, we decided to bolt them together. We placed two more 1/4″ holes into the box and it looked like this after it was finished.
Another thing we had to do was drill a hole inside the box for the pull-chain because we have NO light switch. Yes, we will show you the basics of wiring a pull-chain to any light.
Now, we could take a damp cloth and wipe the wood. Then, we added the stain, my new favorite color, Provincial by Minwax.
SIDE NOTE: You may have noticed I used a damp cloth to wipe the wood before staining. This is another way to condition your wood before staining. You can see my test on if you really need a wood conditioner, if you still question it or want to see the difference.

WIRING THE LIGHT SOCKETS:
Time to start wiring the light – please remember I’m not an electrician and I do not know the technical names.
We decided to use an antique round cloth wire but you could also use a twisted antique cloth wire. Another option is colored wire.
We purchased 8 ft of the wire but actually used around 5 ft because we used 14-2 wire we had on hand to connect the lights together.
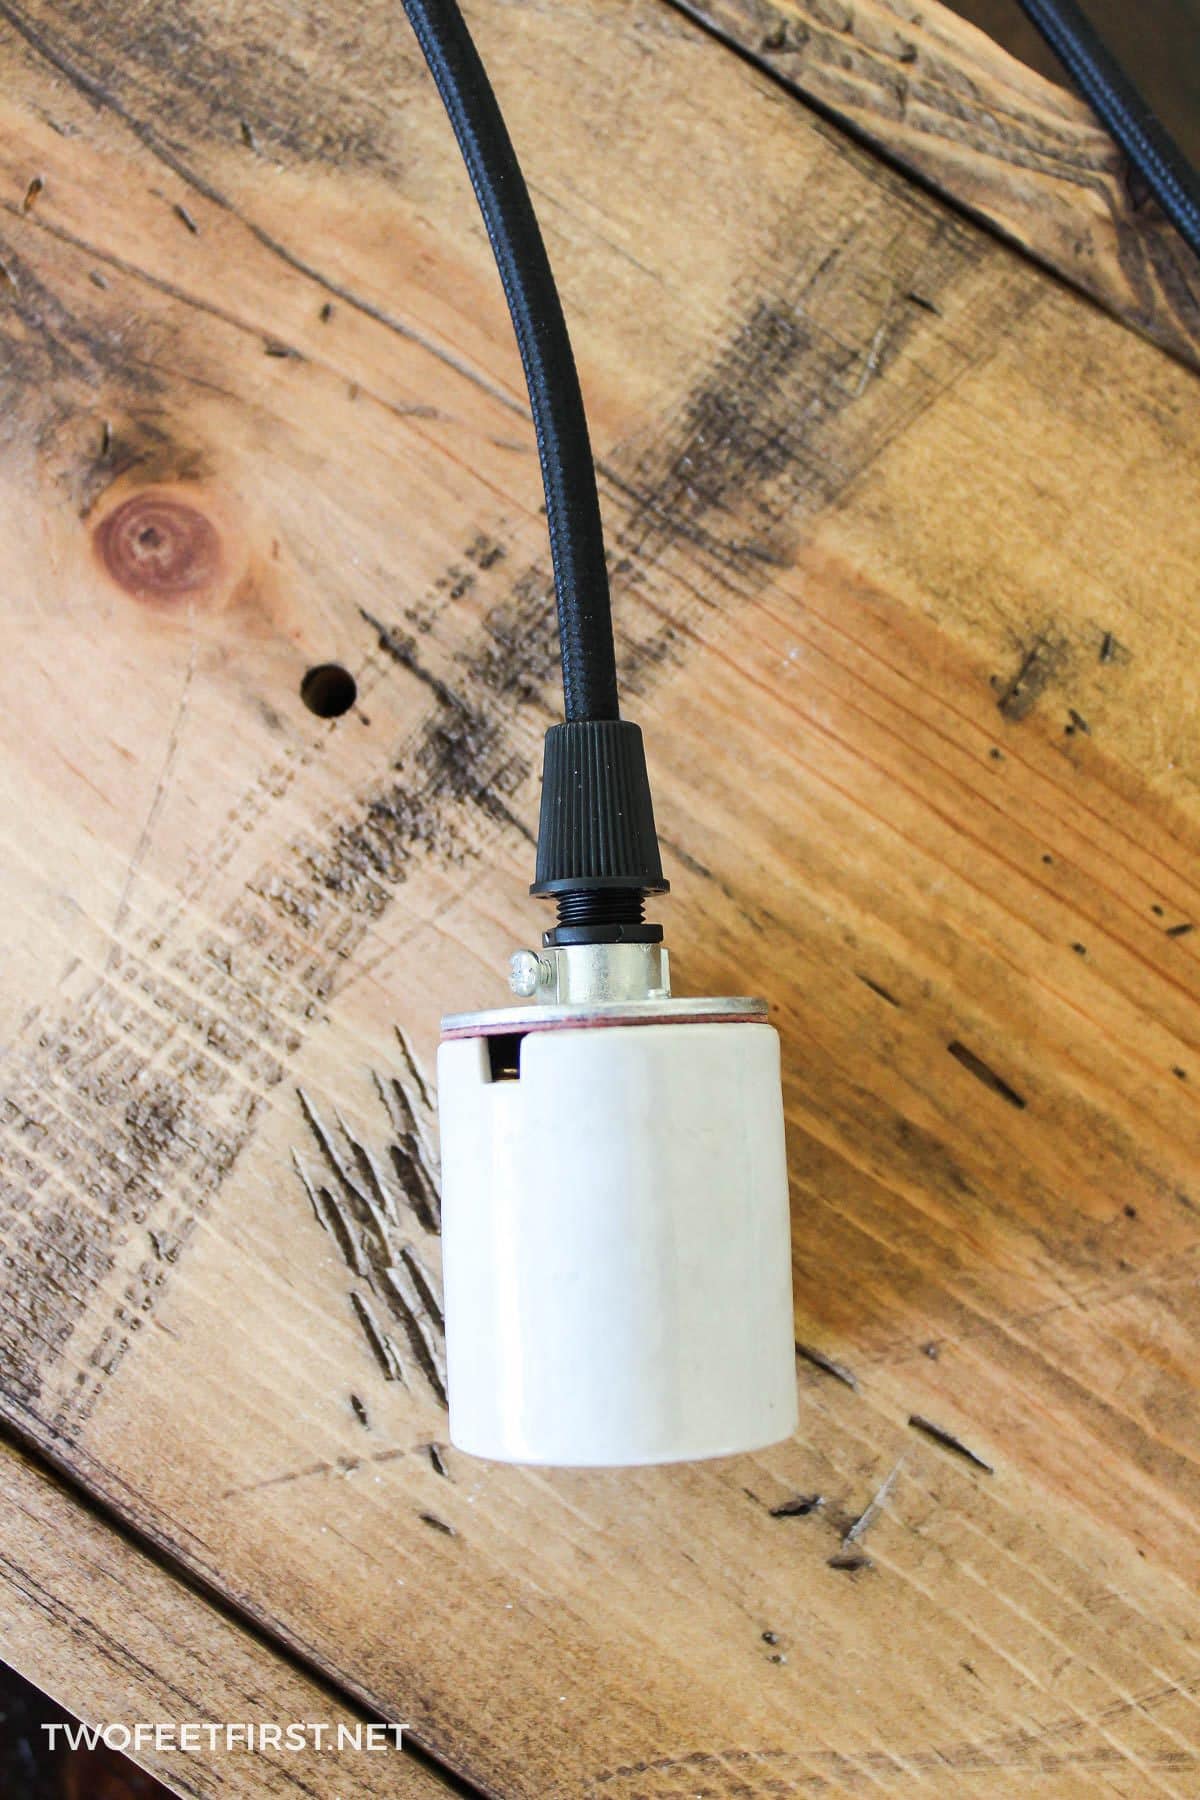
I took the porcelain light socket (linked to a different one than pictured because it’s cheaper and you do not need the extra parts) and unscrewed the top metal piece from the porcelain so I could attach the wires.

PREPPING THE CLOTH WIRE:
Next, I took about 1-1/2″ of black electrical tape and taped around the cloth wire about 2″ away from the end of the wire (this will help the cloth from fraying & moving).
Taking the razor blade, I carefully cut the cloth of the wire just below the electrical tape (making sure NOT to cut through the wire).
Then, I removed the cloth from the wire. I found that I did cut through the black cover over the actual wires just slightly and if I moved the wire end back and forth, the black cover would come right off.
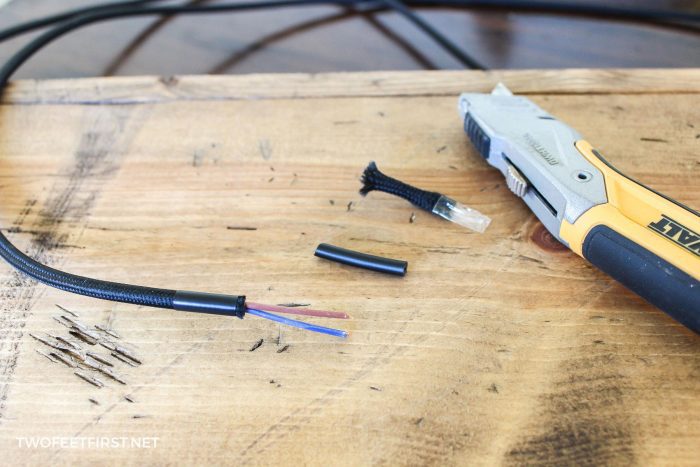
Then, taking our wire stripper tool (love this thing), I removed about 1″ of the wire cover to expose the actual wire.

ASSEMBLE THE LIGHT SOCKET:
Next, I took the wire cord grip (this helps the cloth wire stay in place and relieves strain on the wire), and placed it onto the wire, like pictured below.
Then, I took the metal top of the light socket and placed it onto the wire also (I attached the bottom of the wire grip to the metal piece first). I found it helped to twist the ends of the wire together and form a hook before attaching to the light socket.
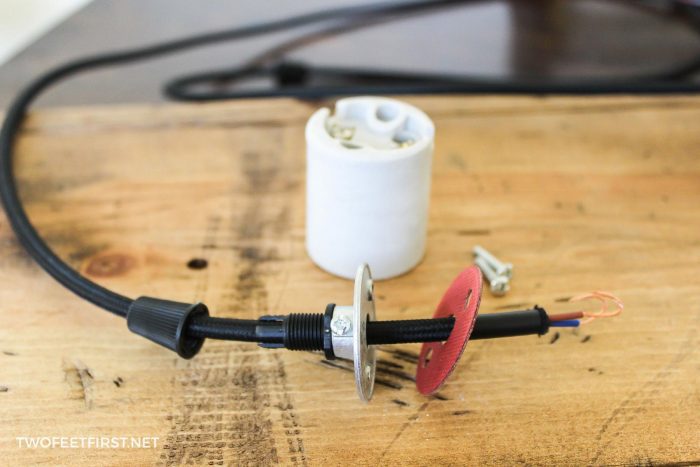
Now that I had our hot (black or brown) and neutral (white or blue) wires all ready to install.
TIP: When installing wires to the light socket, make sure that the loop in the wire is going the same direction as the way the screw tightens.
Then, I attached the hot wire (brown, in our case, but usually black) to the brass screw and the neutral wire (blue, in our case, but normally white) to the silver screw.

After attaching the wires, we reattached the light socket back together. Then, we screwed the wire cord grip into place.
TIP: DO NOT overtighten the grip because it can break. (Please don’t ask how I know that!)
I ended up with this.
DETERMINING THE LENGTH OF THE PENDANT LIGHTS:
At this point, I installed a cage to the light socket, threaded the wire through the wooden box and taped the wire in place to determine the length we wanted our lights to be.
This was done by one of us holding the box into place above the sink and adjusting until we were happy.
I then marked the wire with a white colored pencil right where it comes through the inside of the box.
Next, I took a piece of electrical tape and placed it about 8-10″ from this mark around the wire then I cut the tape in half right through the wire.
SIDE NOTE: You want to cut in the middle of the tape to keep the cloth around the wire from fraying.
Now, before I cut any more wire, I installed the other 2 light sockets to the ends of the wire the same way as the first light socket, the previous step.
After those two light sockets are assembled, I measured the distance from the first light socket to the marked line on the wire. With that measurement, I marked the other two light sockets to that same distance.
Then, again, I added electrical tape about 8-10″ from the mark and cut the tape in half right through the wire.
Now our light sockets were wired and ready to be installed on the wood box.
WIRE THE BOX OR PUT IT ALL TOGETHER:
To wire the box, I threaded all three light socket wires through the holes previously drilled. Starting with one wire, I moved the wire until the mark I placed was right where it comes through the inside of the box (same way as the light used to find the perfect length for the pendant light).
SECURING THE CLOTH WIRE TO THE LIGHTBOX:
Then, taking wire staples, I secured the wire to the board. I added a couple in a zig-zag pattern just to make sure the wire would not move (you will want to leave about 4 inches at the end of the wire). I did this for the other two lights also.

Once the wires were secured to the wood, I took some electrical tape and taped the wires about 3″ away from each end.
Taking the razor blade, I carefully cut the cloth of the wire just below the tape (just like before). And just like before, I removed the cloth plus the black plastic covering the actual wires.
I then took my wire strippers and stripped about a 1″ off each wire to expose the hot and neutral wires. I did this for each light socket wire.
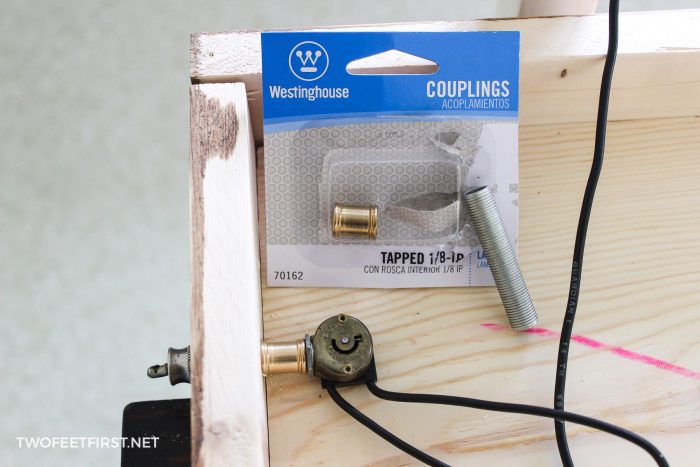
INSTALLING A PULL-CHAIN SWITCH (OPTIONAL):
Next, I installed the pull-chain switch to the box. Now, because the 3/4″ wood is thicker than most lights, I had to adjust the attachment for the switch.
To do that, I used a 1.5″ lamp nipple (pipe fitting with male ends) and placed it inside the hole I drilled on the side of the box.
Next, I took the tube coupling and attached the pull-chain switch to the lamp nipple on the inside of the box with it.
Then, I screwed the other side of the lamp nipple to the screw that holds the switch in place (sorry I have no idea what it’s called).
Later, I added the extra pull-chain to the end of the switch.
CUTTING ADDITIONAL WIRE TO WIRE THE LIGHTS:
Now that the pull-chain was installed, I wired everything together.
This is where the extra wire (cloth wire, 12-2 or 14-2) comes into play. I took the extra wire (mine was 14-2 that we used for installing a new breaker) and cut a piece the distance from the middle of the box to the pull chain switch plus at least 3 extra inches (believe me, you want to have extra wire to move around).
SIDE NOTE: The middle of the box is where the power will come into the box from the house.
Then, I cut another piece of wire from the pull chain to the next closest light socket wire plus at least 3″.
SIDE NOTE: If you are not adding a pull chain switch, cut the first wire from the middle to one of the light socket wires on the end plus 3″.
I did this two more times going from one light socket to the next plus adding at least 3″.
I now had all the wire I needed to wire my lights together.
WIRING THE LIGHTS TOGETHER:
Starting with the first extra wire I cut, I removed the hot and neutral wires from the yellow cover (I now had black and white wires). Then with my wire strippers, I stripped about 1″ off each end of the wire.
Because I have a pull-chain I will wire the pull-chain switch first but if you do not need the pull-chain, skip this next step.
I then took the black wire (hot wire) and wired it to one end of the pull-chain switch (a pull chain has two black wires).
To wire them together, I took the black wire from the switch and twisted it around the extra black wire, then added a wire cap to keep the wires together.
Next, taking the next extra wire (the one from the switch to the first light socket wire), I removed the yellow cover and only using the black wire, stripped the ends of the wire about 1″.
With that same black wire, I then wired it to the other black wire on the pull-chain switch. I twisted the pull-chain switch wire around the extra black wire, adding a wire cap to keep the wires together.

Now, I wired the lights to the switch.
First I removed all the hot and neutral wires from the extra wire cover (mine was yellow).
Then, I stripped about 1″ off each end of each of the wires. Starting with the light closest to the pull-chain switch, I took a piece of the electrical tape and taped the hot wires from the pull-chain (black), wire from the light socket (ours was brown), and the extra wire in-between the current light and middle one (black) together. I also did this for the neutral wire (white).
The picture below demonstrates connecting the last light that is why there are only 2 wires, not 3.
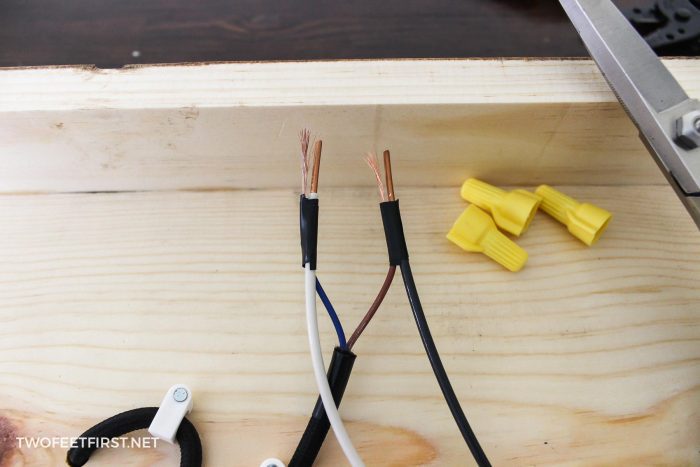
Next, I took another piece of electrical tape and taped the actual wires together. I found that the wire coming from the light socket would not stay connected unless I taped the wires together. Then I placed a cap on the wires, like the picture below.

The first light is now wired so I moved to the next light completing the same process.
And then to the last light – this time there will be 2 wires, not 3, like the pictures above. The back of the lightbox now looked like this and that is how I wired three lights together.

INSTALLING THE LIGHTBOX INTO PLACE:
Now it was time to add the light above the sink.
IMPORTANT: Turn OFF the power to the wire by switching the breaker to the OFF position.
To make sure the power was off, we used our voltage checker to test.
Next, we found the location we wanted the box and marked where the bolts would go to hold the box to the cabinet. I took my drill and drilled 1/4″ holes into the marked spots.
Then, my husband held the box while I wired the light, using the wire caps. I turned the power back on and tested the wires, making sure all the connections were working with the voltage checker (make sure the switch is on).
After checking the wires, we bolted the box to the cabinet. I added the light guards to the light sockets and installed the light bulbs.
And now, finally, we have our own DIY pendant light!

How about a cost breakdown to give you an idea of the cost, everything I mark as free we already had on hand.
MATERIALS:
- lamp bulb guard = $16.50 (for 3)
- keyless light socket = $13.90 (for 3)
- antique cloth wire = $7.60 (for 8 ft)
- wire cord grip = $4.50
- 14-2 or 12-2 wire (about 3 ft) = FREE (about $2, you can buy it by the foot)
- wire staples = $3.80
- electrical tape = FREE (about $2)
- wire caps = FREE (about $2.20)
- spray paint = FREE (about $5)
- light bulb = $7.50
- pull-chain switch = FREE (would cost about $4.30)
- lamp nipple = FREE (would cost about $3.30)
- tube coupling = $1.75
- extra chain = $3
- wood – 1″x8″x4ft & two:1″x3″x8ft boards = $10.75
- 1.25″ finishing nails = FREE (would cost about $4.75)
- 1/4″x3.5″-4″ bolt with nut = $1
Our TOTAL = $70.30
TOTAL FOR ALL MATERIALS = $93.85, without pull-chain $81.50
What do you think of our pendant cage light? Do you like the wood box to give it a little more texture? I would love to hear your thoughts or what I did wrong. But let’s leave with a before and after…
SIDE NOTE: Here is what my kitchen looks like after removing the decorative trim plus building a cabinet around the fridge.

DIY Pendant Light
Are you looking for a pendant light but are having a hard time finding it? Change out that old fluorescent light with a DIY pendant light fixture above the sink. Here is how to assemble the pendant light.
Materials
- lamp bulb guard
- keyless light socket
- antique cloth wire (we got 8ft but used about 5ft)
- wire cord grip
- 14-2 or 12-2 wire (about 3 ft)
- wire staples
- electrical tape
- wire caps
- spray paint
- light bulb (we used 40 watts LED light, here)
- pull-chain switch (optional if you do not have a light switch)
- lamp nipple (for pull-chain)
- tube coupling (for pull-chain)
- extra chain (for pull-chain)
- one: 1″x8″x4ft wood board
- two: 1″x3″x8ft wood boards
- 1.25″ finishing nails
- 1/4″x3.5″-4″ bolt with nut
Tools
- drill
- screwdriver
- wire stripper
- voltage tester
- hammer or air compressor w/nail gun
- razor blade
Instructions
- Paint the metal guards with spray paint.

- Create the wooden lightbox.
- Wire the light sockets.

- Determine the length of the pendant lights.
- Wire the box to the pendant lights.
- Install the lightbox into place. IMPORTANT: Turn off the power to the wire by switching off the breaker.


This is darling and SO much better than before! I’m literally trying to figure out where I could put this if I made my own! Thanks for sharing!
Thanks Kate! I hope you can find a place to put your own!
What a huge improvement! I love the rustic/industrial cage look. I haven’t been brave enough to attempt any electrical projects yet but this is definitely inspiration!
Thanks Jesica! I was a little worried about doing this electrical project but it was not bad at all! I hope you try it out sometime.
Great tutorial!
I really like it and the vision was great. Would you ever consider taking down the scroll in front to complete the look? We had the same piece over our sink and took it down. It really helped our space out.
Hi Ashley! I did consider taking down the scroll part but in the end decided to wait until phase 2 of the kitchen remodel, when we add more cabinets on the other side and have to cut out some of the current cabinets. But maybe I will change my mind before that happens because I have had lots of people ask and I would have to agree with you that it does help out the space. Thanks for stopping by!!!
Oh my word, I need this in my life!
Amazing job!
Thanks so very much for sharing at Something to Talk About! This will be a feature next Monday :)
Happy holidays!
Thanks Karen for stopping by! We are loving the pendant light. I look forward to the feature, thank you for the opportunity! Happy holidays to you!!
I love that you took matters into your hands and created such a beautiful fixture for your kitchen. Thank you so much for sharing with us at Create • Share • Inspire Link Party. We hope to see you back this week!
Thanks Alicia!!!
What a cool idea! Thanks so much for sharing–that is a great DIY :) You all are talented!
Thanks Amy!
your kitchen looks just like ours and i have wanted to do this now with your excellent tut i can thank you xx
Thanks Chris, hope your remodel goes well!!!
They look amazing in the kitchen!
I love what you did here.. Been planning on doing this for a while and i am picking up material to make the box tomorrow.
I do have 1 question.. I am not quite understanding how you attached the box tonthe ceiling.. And tips or can u explain in more detail how you did it.
I also agree with the taking down the peice in front to show off and open up the beautiful peice.
Hi, Cassie! We attached our box to a cabinet above the light with a bolt and nut. If you are attaching it to the ceiling where there is no wood to attach it to, I would suggest using toggle bolts. I demonstrate how to use toggle bolts in this post. Let me know if you have any other questions!
We are not handy. Wish I could find someone and just pay them to do this for me.
Hi, Lyndsey! Thanks for stopping by and commenting. When we first started DIYing we were not handy but we decided to give it a try with our window trim. Since then we have done things we never thought we could. I hope someday you find something that you feel like you could give it a try because you could be hooked! Wish you the best!!!
Great look with this DIY light project!
I’m guessing that when you said “Antique Cloth Wire”, you didn’t used old antique wire, you actually purchased new wire that has an antique cloth “look”. Am I right?
I can’t wait to try this project for myself!
Hi Judy! Yes, when I say “Antique cloth wire” it is NOT an old wire reused (that would be an electrical problem waiting to happen). This was what the new wire was called, thank you for clarifying! Be sure to send me photos after you complete your light!
Great work! Pendant lighting can add a great visual styles to a room. This pendent light is very easy to make by following your instructions. I am totally inspired with your work. Thanks for sharing.
Hello Amy!
What a great idea and it looks fantastic! I was wondering if you had any idea to wire this to recessed lightning box that is currently above our sink? Or if you could guide us in the right direction? Great job again!
-Al
Hi Al,
I am not sure exactly how to wire this to a current box above the sink. I wish I had some ideas for you but I would probably have to see the box to give you ideas, sorry!
Sorry Megan, I mispelled Megan and it auto correct to Amy.
Thanks,
Al