A step-by-step tutorial on how to install a DIY drip irrigation system, an automatic watering system for plants, perfect for flowers and gardens.
You don’t need to be an avid gardener to experience the agony of weeds constantly invading your flower bed.
Your plants want plenty of water and nutrients but if you’re not vigilant, the weeds will pop up quickly and share in this bounty too.
But who says the entire area has to be watered?
Make your life easier by installing a DIY drip irrigation system, a fantastic automatic watering system for plants.
This type of configuration dispenses a small amount of water to a plant right at the base, so you are not watering extra soil and that means less weeding.
I first discovered how amazing a drip irrigation system was when we first installed one for our flower bed. That arrangement used a hose faucet timer to work.
If you want a drip irrigation that simply connects to an outdoor hose faucet , be sure to check out this tutorial on creating a DIY hose drip irrigation system.
But, if you really want to automate the system so it’s connected directly to your sprinklers’ waterline, this is your tutorial.
SIDE NOTE: Eventually, we converted the other hose system to an automatic one.
How does a drip system work?
A drip irrigation system works by releasing water slowly at the roots of the plant, which allows the soil to fully absorb the water before the water can evaporate or runoff.
Another benefit to a drip system is that water is only applied where it is needed, not sprayed everywhere like a sprinkler.
A drip irrigation system is the most efficient way to water your landscaping, saving you water and money. And from the endless chore of weeding!
These systems are easy to install, easy to design, and can be inexpensive.
HOW MUCH DOES IT COST TO PUT IN A DRIP SYSTEM?
The cost will depend on how long the landscaping area is and how many plants you have.
To give you an estimate, let’s say you are installing a drip valve that will water a 40-foot flower bed with 14 plants. It will cost you a total of $110, about $2.75 per foot.
Now, let’s talk about installing your automatic watering system and the materials you will need.
Disclosure: This post contains some affiliate links or referral links for your convenience. It is a way for this site to earn advertising commissions by advertising or linking to specific products and/or services. Click here to read my full disclosure policy.
Automatic watering system for plants
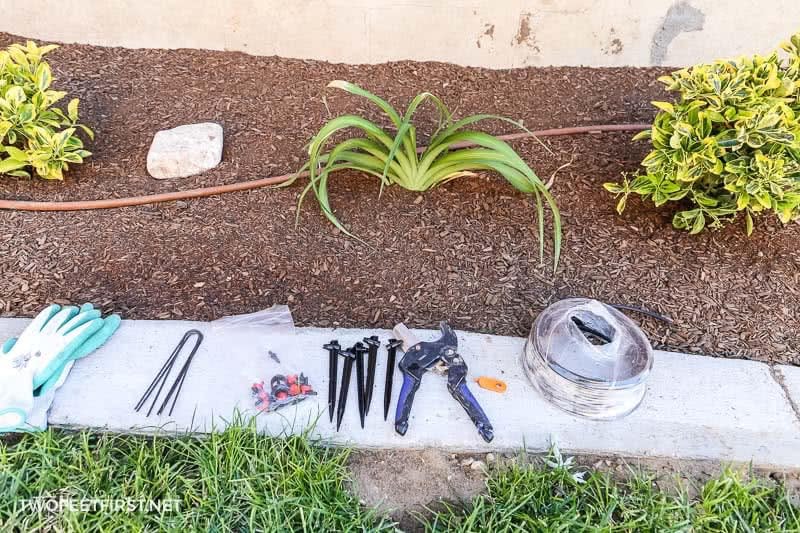
Materials
- drip irrigation valve (has a pressure regulator and filter)
- 1/2″ × size of the valve male threaded barb adapter (connects to the valve to tubing)
- 1/2″ blank tubing
- 1/4″ tubing
- extra fittings for 1/2″ tubing
- figure eight for ends
- barbed adapters (connects 1/2″ tubing to 1/4″ tubing)
- emitters (drippers)
- loop stakes
- tubing stakes

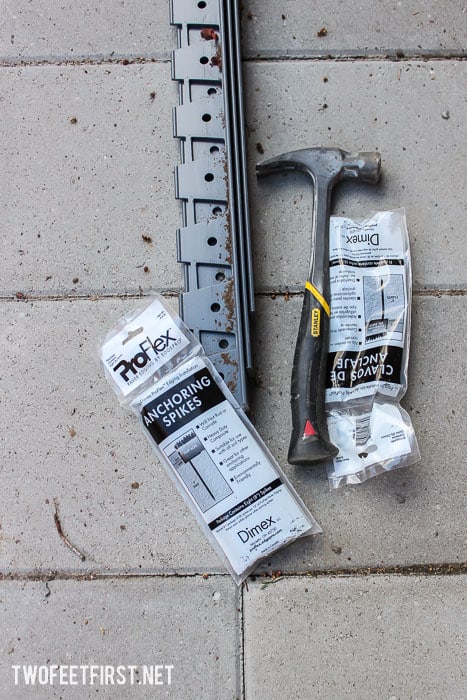
Tools
- pipe cutter
- hole punch
- tape measure
SIDE NOTE: If you need more information about purchasing materials (fittings and emitters), be sure to read our guide about drip irrigation materials.
STEP 1: DESIGN YOUR DRIP IRRIGATION SYSTEM
It’s always a good idea to have a plan before starting any project. You need to map out your landscaping where the system will be so you will know how many items to purchase.

Here is a guide for each of the critical pieces:
- ½” Tubing: Use a tape measure to measure the length of the landscaping area to determine the amount of 1/2″ tubing you need to buy. Add a little extra to allow the tubing to wave around the plants.
- TIP: I recommend adding at least 5 feet extra to the distance.
- ¼” Tubing: Plan on about one foot of 1/4″ tubing for each plant but again, add a little extra.
- Barbed Adapters: You will need adapters to transition to the 1/4″ tubing – this amount depends on the number of plants you have. Also, consider if you need a straight or tee adapter.
- Loop and Tube Stakes: Use the loop stakes, about every two to three feet of the 1/2″ tubing. Use one tubing stake for each emitter dripper.
- Emitters: Finally, decide the best type of emitter for each plant or area and note this on your design.
STEP 2: PLACE THE TUBING
Now you’re ready to lay your 1/2″ tubing according to your design.
TIP: Leave the tubing in the sun for about 30 minutes to make it more flexible and easier to work with.
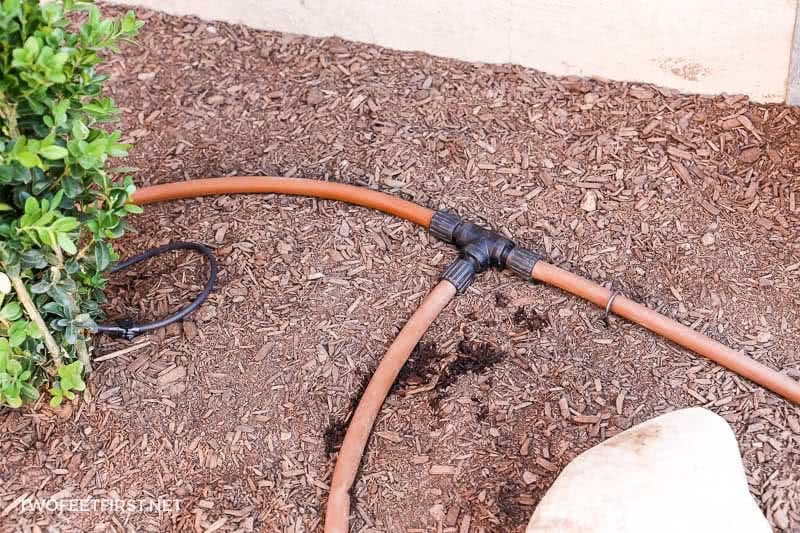
Because this is an automatic watering system that works with a sprinkler timer, you need to install a drip irrigation valve into your valve box.
SIDE NOTE: If you need more information about this, see my post about installing a sprinkler system (which includes the valves).
Next, attach the threaded barb adapter to the valve. I would recommend using a PVC union between the adapter and valve to make it easier to remove the valve if ever needed. You can also use Teflon tape to secure it into place and prevent leaks.
Now, push the 1/2″ tubing onto the fitting and start placing the tubing according to your design.

Place loop stakes to anchor the tubing to the soil, so it does not move around.

If you need to branch off the main tubing, cut the tubing with pipe cutters and attach the fitting.
SIDE NOTE: Later, you can cover your tubing with mulch to hide it.
Once all the tubing is aligned, flush the line to remove any debris that can clog the emitters. You can do this by turning on the water and letting it run for about a minute.
SIDE NOTE: While the water is running, you can check to make sure there are no leaks at any of the connections.
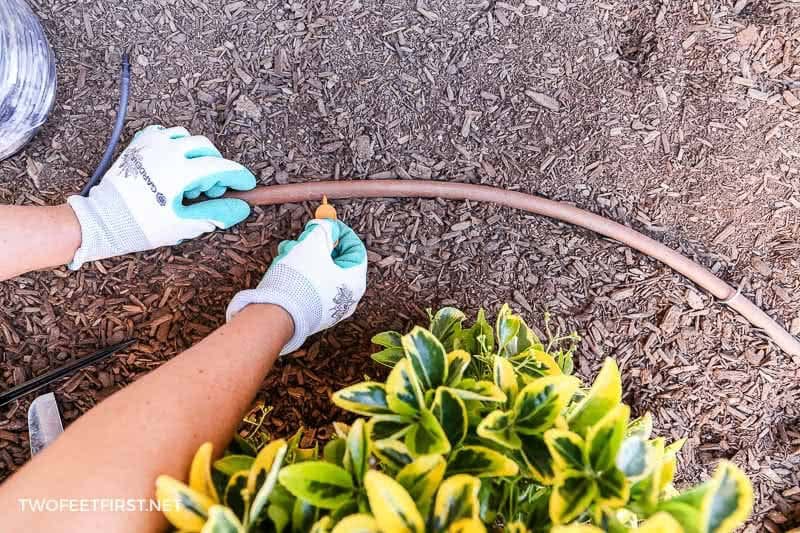
After the line is flushed, add a figure-eight fastener at the end of any 1/2″ tubing.

STEP 3: INSTALLING THE EMITTERS
To attach the emitters, you need to transition to the 1/4″ tubing.
Using your hole punching tool, punch a hole into the 1/2″ tubing wherever you need to add an adapter (where the emitters will be).
SIDE NOTE: If you make a mistake, you can use a goof plug to patch the hole.
Push a barbed adapter into the punched hole. Then, attach the 1/4″ tubing by pushing it onto the adapter.

TIP: Sometimes, there are two sides to the adapters – the thicker side goes into the 1/2″ tubing.
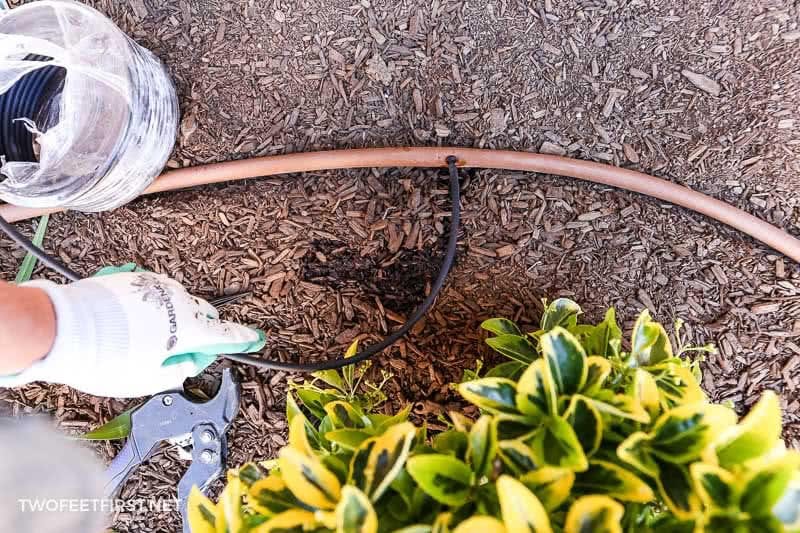
Take the 1/4″ tubing and lay it along the soil until it reaches the plant’s root base. Cut the tubing at this distance.

If you are using tubing stakes to keep the emitter out of the dirt, place the stake onto the tubing; then, place the emitter onto the tubing.

Push the stake into the soil so that the emitter is at the root of the plant.

Continue adding emitters to each plant the same way.
Finally, run the system to make sure each emitter is working properly and watering the plants base. Adjust any placement if it’s not dripping at the plant’s roots.
Now your drip irrigation system is ready to go! Set your timer on your sprinkler timer and let it do the watering.
STEP 4: MAINTAIN YOUR IRRIGATION SYSTEM
Of course, just because you don’t have to water the plants physically doesn’t mean you can completely forget about them.
There are two things you should do to keep your system running smoothly:
- Inspect the emitters occasionally to make sure they’re working.
- If you live in a cold climate, make sure you winterize the drip system, so it doesn’t freeze.
And that’s it! Simple, right?
You should now create your design and purchase your supplies so that you can have your own automatic watering system for plants. No more plants are drying because you forgot to water them!
And only the plants you want will be watered and the weeds will have to find some other homeowner to bother!
Interested in more landscaping projects? Here are some other posts you will enjoy:
- Install Underground Gutter Drainage
- DIY Concrete Landscape Edging
- Build a simple hose sprinkler
- Install a rain barrel

Automatic Drip Irrigation System
Make watering your landscaping easier by installing an automatic drip irrigation system, an easy DIY project!
Materials
- drip irrigation valve (has a pressure regulator and filter)
- 1/2" × size of the valve male threaded barb adapter (connects to the valve to tubing)
- 1/2" blank tubing
- 1/4" tubing
- extra fittings for 1/2" tubing
- figure eight for ends
- barbed adapters (connects 1/2" tubing to 1/4" tubing)
- emitters (drippers)
- loop stakes
- tubing stakes
Tools
- pipe cutter
- tubing hole punch
- tape measure
Instructions
- Create your design (map) of the landscaping.
- Determine your supplies and purchase them.
- Install the drip irrigation sprinkler valve.
- Connect the 1/2" tubing to the valve using a union and threaded barb adapter.
- Place the 1/2" tubing onto the soil according to your design. Plus add loop stakes to keep the tubing in place.
- Flush the line and check for any leaks then place the figure eights onto the tubing.
- Add each emitter to a plant by punching a hole in the 1/2" tubing, connecting the 1/4" tubing with a adapter, cuting the tubing to desired length, place the tubing stake and emitter on, then place at the plants base.
- Continue this process until all the plants are being watered.
- Test the system and enjoy!
Notes
Make sure you check the system regularly to make sure it is working properly and DON'T forget to winterize the system.