A tutorial on how to make a DIY merry Christmas wood sign for your holiday decor.
While shopping for Christmas decor, you keep picking up the Merry Christmas sign in the pretty font.
Did you ever notice how it’s the simple, elegant holiday decor that stands out the most?
It’s exactly what you’re looking for, an escape from all the busy patterns and loud colors of the season.
But that’s not even the best part – did you know that you can make this sign yourself?
Use this simple DIY merry Christmas wood sign tutorial to get you started.

Disclosure: This post contains some affiliate links or referral links for your convenience. It is a way for this site to earn advertising commissions by advertising or linking to specific products and/or services. Click here to read my full disclosure policy.
Now, let’s go back to the tutorial.
DIY Merry Christmas Wood Sign
MATERIALS:
- 1/4″ x 2′ x2′ MDF sheet
- #220 grit sandpaper
- paper
- white spray paint
- black acrylic paint
- paper
TOOLS:
- set of paintbrushes (I used a fine round brush and square brush)
- circular saw or table saw (or have the MDF cut at the hardware store)
- printer
- pencil
SIDE NOTE: This tutorial does not include the wood frame but I have a link below for one I made that allows you to change out the artwork.
Need a video? Here is a step-by-step tutorial on how to transfer a design to the wood.
STEP 1: CUT AND PAINT THE WOOD
Cut the 2-foot by 2-foot MDF sheet in half so that it’s 1′ x 2′.
SIDE NOTE: Save the other piece for another sign.
Then, sand the sheet with #220 grit sandpaper to give you a smooth finish. Wipe clean with a soft cloth.
Next, paint the sheet with the white spray paint. I would recommend at least two coats (with drying time in between) to give you an excellent finish.
TIP: Use a spray grip accessory to keep your fingers paint-free.
STEP 2: TRANSFER THE PRINTABLE TO THE WOOD
I always try to find affordable ways to make simple projects without having to buy expensive machines. So, don’t worry, you do not need a fancy machine, like a Cricut, to make this sign. You only need a printer.
But first, you will need the design template, so here’s the link to the “Merry Christmas” printable. It’s free but it is only for personal use, not for projects you want to sell.
Now, print your template, then tape the pieces of paper together.
After, place the printable onto the wood, center the paper, then tape the top of the printable to the wood.
Next, flip the printable up, so the print is not showing. Then, take the pencil and scribble along the edges of the letters.
TIP: Place a blank piece of paper under the printable so it does not transfer anything onto the board.
Once everything is covered with lead from the pencil, flip the paper back onto the wood.
Using a sharp pencil or pen, trace the outline of the printable. This will transfer the lead from the back of the paper onto the wood.

TIP: Check to make sure the transfer is working; if not, scribble more lead onto the back of the paper. Then, retrace from the front of the paper onto the board.
When the whole printable has been transferred to the wood, you can then remove the paper.
STEP 3: PAINT THE SIGN
Now that the printable is transferred on the wood, it is time to pull out the paint.
I tried using paint markers, pens, and permanent markers, but I did not like how they looked. I would recommend using a paintbrush with paint. And believe me, it’s not that difficult once you have the right tools.
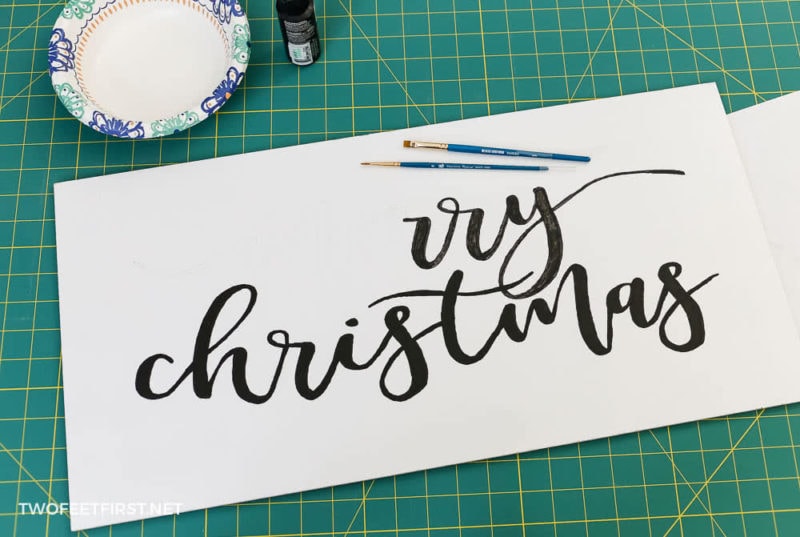
Start by using the small, round brush to paint the outlines of the transfer.
SIDE NOTE: Place a blank piece of paper under your hand, so you don’t smear the transfer.
Then, fill in the other areas with the square paintbrush.
TIP: It helps to work in small sections so you’re not smearing the paint.

Let each row dry before moving to the next row to prevent smearing.
After the first coat of paint has dried, paint a second coat to give you crisp words.
SIDE NOTE: The image above is an example of one coat of paint and two coats, can you see the difference? The top line only has one coat, where the bottom has two.
STEP 4: INSERT THE SIGN INTO A FRAME
Once the sign is completely dry, it’s ready to insert into a frame.
There are many ways to frame a wooden sign but with this sign, I wanted something that could be reversible. This way, I could have a sign for different seasons but still use the same frame.
To do this, I built an interchangeable wood frame. It was easy to make and you can do it too. See the step-by-step tutorial on how to make an easy change frame for wood signs.

Or you can use my tutorial on how to build a simple wood frame.
STEP 5: DISPLAY THE MERRY CHRISTMAS SIGN
Now that your sign is framed, it’s time to hang your beautiful artwork on the wall.
You can use the standard nail hanging technique, or you can use my personal favorite 3M command strips. They leave no nail holes on the wall, and they’re easy to install. See my tutorial on how to hang pictures without nails to see for yourself.
I hope this helps you decorate your home for the holiday season with this Merry Christmas sign.
So many things can be made right at home with gorgeous lettering that looks professional! If you’re ready for another project, try to make a Let it Snow throw pillow to coordinate with your new sign.


Merry Christmas Wood Sign
Decorate your home for the holiday season by creating this DIY Merry Christmas wood sign.
Materials
- 1/4″ x 2′ x2′ MDF sheet
- #220 grit sandpaper
- paper
- white spray paint
- black acrylic paint
- paper
Tools
- set of paintbrushes (I used a fine round brush and square brush)
- circular saw or table saw (or have the MDF cut at the hardware store)
- printer
- pencil
Instructions
- Cut the 2'x2' sheet in half (1'x2'), lightly sand, then spray paint the wood white.
- Transfer the printable onto the wood using a pencil.
- Paint the tracing with black paint using a round brush and square brush. Then let the paint dry, I would recommend two coats of paint.
- Insert the sign into a frame then place on the wall and enjoy!


Very pretty! What a great idea to have interchangeable frames.
Thank you, Jenny!
I love everything about your Christmas sign!! I want it to hang at my house!! Please! hehe
HaHa! Thanks, Christine!
I love this sign so much, so simple and so beautiful!!
Thanks, Katrin. I like it too!
Great tutorial! I love the way your sign turned out!
Thank you, Eileen!
What a fun way to decorate for Christmas or any time of year. I love the creative way you can change out the wording.
Thanks for sharing how to transfer, as well!
Thanks, Meegan!