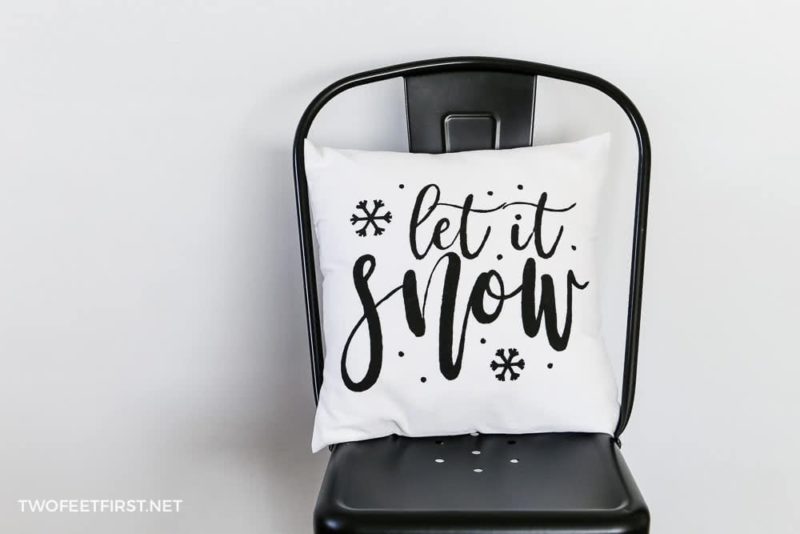
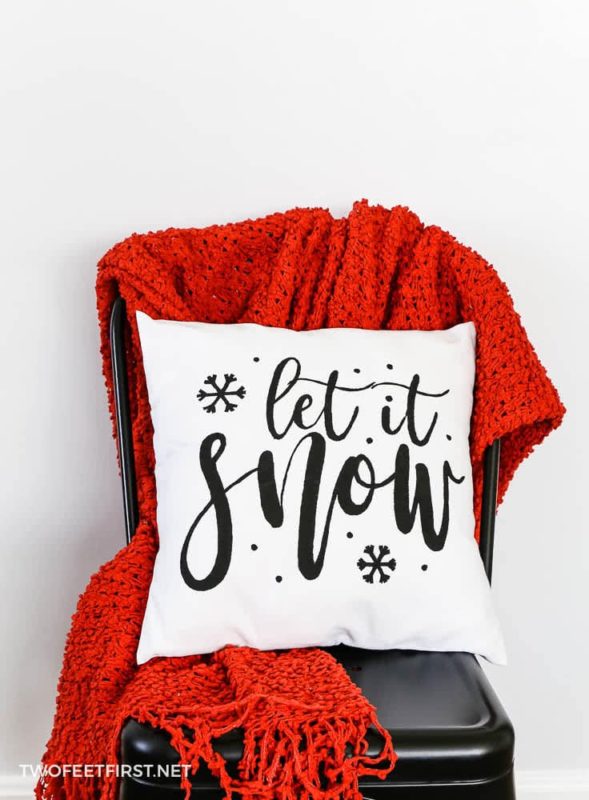
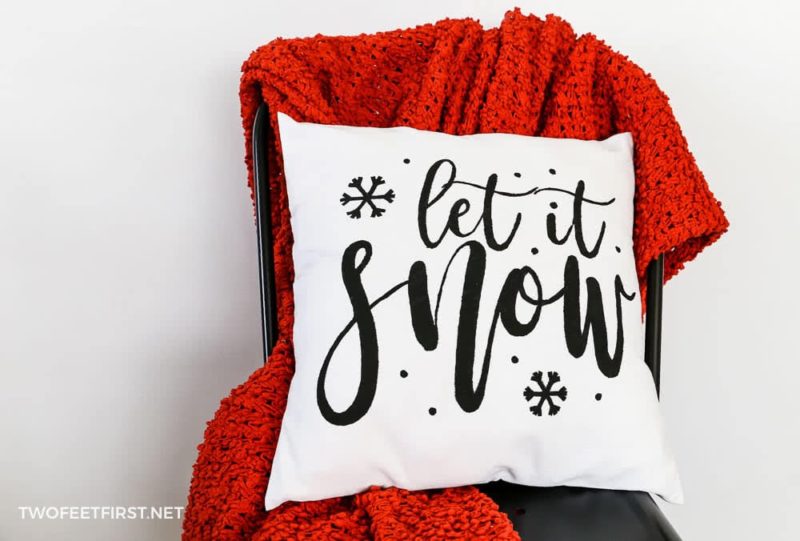
A step-by-step tutorial on how to make a “Let it snow” throw pillow cover, which is a perfect way to decorate your home this holiday season.
Do you want a simple way to decorate your home for the holidays? Plus something that will not cost a lot because the holidays are already expensive. Well, I have a simple and inexpensive way to decorate your home this holiday, and it a simple “let it snow” throw pillow cover tutorial.
As a side note, this tutorial is part of the Deck the Home challenge from At Home DIY. The Deck the Home challenge is a 5-week series with amazing holiday projects from 30+ DIY bloggers.
Each week there is a new theme, and this week’s theme is 2-hour holiday home decor. I will be sharing my project below, but after the tutorial, there is a link to all the other projects for the week, so be sure to check those out!
Disclosure: This post contains some affiliate links or referral links for your convenience. It is a way for this site to earn advertising commissions by advertising or linking to specific products and/or services. Click here to read my full disclosure policy.
The inspiration from this project is from The Cotton And Canvas Co. on Etsy. So if you don’t want to make the pillow, you now know where you can purchase one.
Now let’s go back to the tutorial.
How to make a “let it snow” pillow cover
MATERIALS:
- white 16″ pillow cover or 1/2 yard white fabric
- 16″ pillow insert
- black outdoor paint (waterproof)
- freezer paper
- foam paintbrush
TOOLS:
- sewing machine (if making pillow cover)
- printer
- x-acto knife
- scissors or rotary cutter
- ruler
STEP 1: The pillow cover
Because this is a tutorial in hopes of saving you some money, I would recommend you sew your pillow cover. And don’t worry, it’s effortless, only four straight stitches. But if you already have the cover, skip this step.
The easiest way to sew a cover is by sewing an envelope pillow cover, no zippers, and it’s only one piece of fabric.
In this tutorial, we are using a 16″ pillow. If you want to sew a smaller or larger pillow cover, or if you need a more detailed tutorial, visit my tutorial all about how to sew an envelope pillow cover. This project only shares the simplified instructions.
SIDE NOTE: If you are wondering, should I wash the fabric before? Yes, you should always prewash fabric before sewing if you ever plan on cleaning it in the future.
Cut your white fabric into a 17″ x 38″ piece.
After cutting the fabric, sew a basic double-fold hem on the smaller sides (17″).
This is done by folding the raw edge of your fabric 3/8″ up (wrong sides together), iron. Then fold again, 1/2″, and press with an iron.
SIDE NOTE: Using a seam gauge makes this easier.
Topstitch your double hem with a seam allowance of 3/8″ on the right side of the fabric.
With right sides of the fabric facing up, fold one hem 1/3 across the fabric. Then fold the other hem over the last hem until the fabric is 16″.
Pin the raw edges together and stitch together with a 1/2″ seam allowance. Trim the corner of the fabric then turn the fabric right side out.
STEP 2: Print the design on to stencil
Okay, again, I am trying to save money and allow anyone to make this pillow. So don’t worry, you do not need a fancy machine, like a Cricut. You only need a printer.
But first, you will need the design, so here’s the link to “Let it snow “printable. Don’t worry, it’s free, but it can only be used for personal use, not for projects you want to sell.
The way this is done is by using freezer paper. That’s right, the stuff in your kitchen or could be in your kitchen.
SIDE NOTE: I have a full detailed tutorial on how to make a freezer paper stencil if you need it. But here is the short instructions on how it’s done.
- Cut the freezer paper into four pieces of 8.5″ x 11″ (the size of standard paper) and another piece to fit inside the pillow cover, 15″ x 15″.
- Print the design onto the non-waxy side of the papers.
- Iron the papers together to give you the full stencil, waxy edges together.
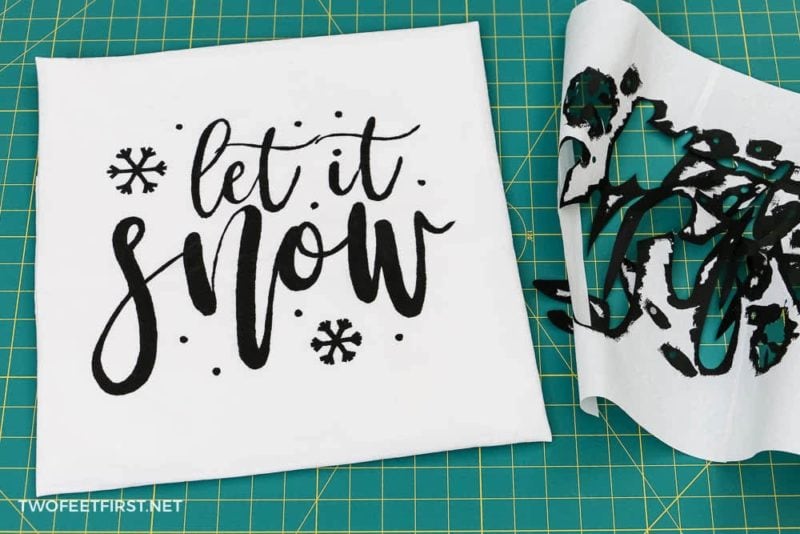
- Use an x-acto knife to cut out the stencil. Tip: Label inside pieces, so you know where to place them later. SIDE NOTE: I used a hole punch to add additional circles to the stencil.
- Place the 15″ x 15″ piece of paper inside the pillow cover. Have the waxy side facing the back. This is to prevent the paint from seeping to the back of the cover.
- Iron the stencil onto the front of the pillow cover, the waxy side will be down.

TIP: It does not take a lot to iron the freezer paper onto the fabric, but make sure all the edges are completely ironed in place.
And now you’re ready for paint.
STEP 3: Paint the stencil
Once the stencil is completely ironed onto the fabric, it’s time to paint.
Using waterproof paint, dab the paint onto the fabric with a foam paintbrush.
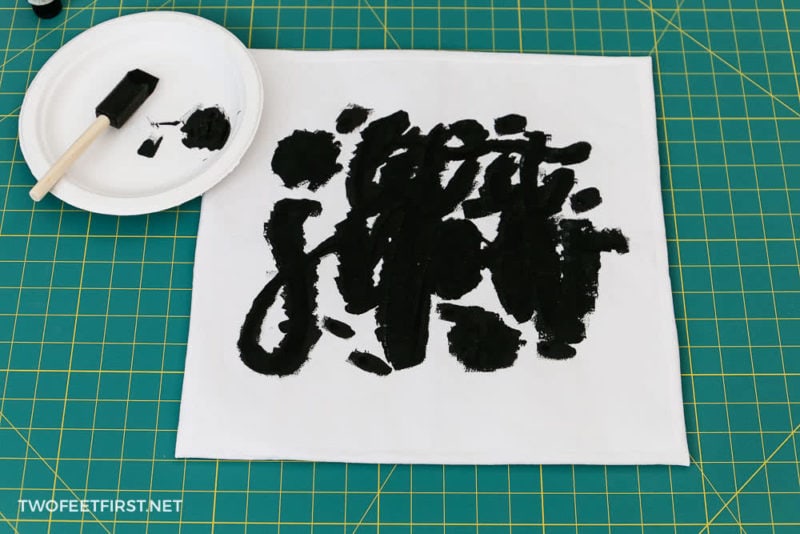
When the whole stencil is painted, let the paint dry completely.
After the paint has dried, see if you need a second coat of paint to get the coverage you want. If you do, repaint the stencil and let the paint dry.
SIDE NOTE: I only used one coat of paint.
Then remove the stencil (freezer paper) from the fabric and the insert inside the cover (to stop the paint from bleeding through).
STEP 4: Insert the pillow into the pillow cover
Now you’re ready to insert the pillow into the cover, which is easy to do because its an envelope pillow cover.

Place your pillow on your sofa, chair, or bed, and enjoy your simple holiday decoration.
Be sure to take a peek at the other DIY blogger’s 2-hour holiday projects.


Interested in more holiday pillows? Here are some other posts you might enjoy: DIY grinch pillow cover by Woodshop Diaries | DIY drop cloth pillows by Place of My Taste
Just in case you missed one of my other Deck the Home projects:
- DIY lighted outdoor Christmas tree
- DIY Happy Holidays Wood Sign with lights
- Simple Christmas Hoop Wreath
- DIY Winter Wreath with magnolia leaves
And don’t forget you can see before and afters in our full house tour by clicking HERE.


DIY Let It Snow Pillow Cover
Decorate your home this holiday season with a simple DIY Let It Snow pillow cover.
Materials
- white 16″ pillow cover or 1/2 yard white fabric
- 16″ pillow insert
- black outdoor paint (waterproof)
- freezer paper
- foam paintbrush
Tools
- sewing machine (if making pillow cover)
- printer
- scissors or rotary cutter
- ruler
Instructions
- Create an envelope pillow cover or purchase one.
- Print printable onto the freezer paper sheets.
- Iron sheet together and cut out the stencil with x-acto knife.
- Insert paper inside pillow cover to prevent paint from seeping onto the back of the fabric.
- Iron stencil onto the pillow cover.
- Dab the paint onto the stencil and let it dry.
- Remove stencil and insert pillow, enjoy!


Love this! I am a huge fan of changing pillow covers for the seasons…especially around the Christmas holidays!
Thank you, April.
I love this pillow. Making pillow covers is one of my favorite things to make for the seasons and holidays. Your pillow looks so pretty!
Thanks, Jenny!
This is so cute! I tried to print on wax paper in my printer but it made a huge mess. I’ll have to give it a go again because sometimes I want a stencil but don’t want to buy one.
Thanks, Toni! And yes wax paper would make a mess.
This is gorgeous! And would cost a fortune at the store!
Thanks, Eileen!
I LOVE the pillow!!! Thanks for the extra tutorial on how to sew a pillow cover, I want to try and make one!!
Thanks, Christine and the pillow cover is so easy to make!
Such a lovely pillow cover for the holiday and after too!! Love the black & white!
Thanks, Katrin. I love the black and white too!