A step-by-step tutorial on how to build a picture shelf.
Are you looking for a creative way to display your photos and create a focal point in the room?
Nothing grabs your attention like a mixed collection of frames casually resting on a rustic picture shelf and a couple of adorable accessories in between.
After completing my gallery wall in our living room, I wanted to change our other picture wall. I love the idea of a shelf that holds pictures and decided that was what this wall needed.
Also, I had one more old wooden window which I turned into a photo frame – what a perfect way to display it!
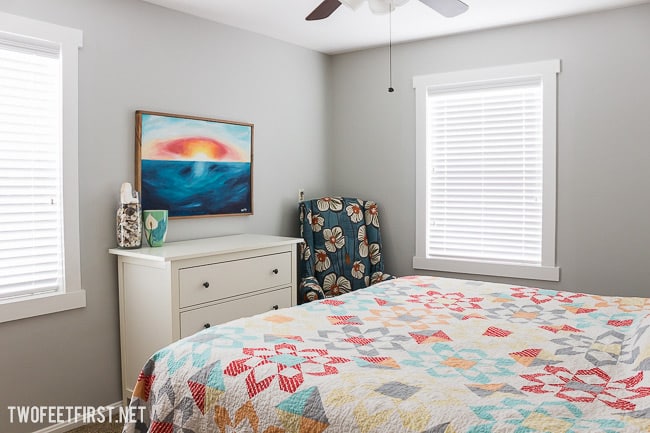
Here is our wall today:

What do you think? A picture shelf is very versatile – you can easily rearrange your frames, have a specific theme and add a few decor items.
This build was quick and easy and did not cost a lot. Here are the supplies I used (this could give you multiple shelves).
Disclosure: This post contains some affiliate links or referral links for your convenience. It is a way for this site to earn advertising commissions by advertising or linking to specific products and/or services. Click here to read my full disclosure policy.
BUILD A PICTURE SHELF
MATERIALS:
- 2 – 1″x4″x8ft board
- 1 – 1″x2″x8ft board
- 1.25-inch wood screws
- 2″ screws (to hang on the wall)
- #220 grit sandpaper
- stain
- mineral oil
TOOLS:
- drill
- Kreg Jig
- level (for hanging)
- orbital sander
- miter saw
- wood clamps
- stud finder
- safety glasses
- face mask (for dust)
- ear protection
CUTTING AND PREP:
First, I measured the wall and figured out how long the shelf would be. I decided on 6 feet for the bottom one and the extra 2 feet for the top shelf.
I then cut all three boards to 6 feet and made sure the extra was all the same size (about 2 feet).

After, I took one of the 4-inch boards and placed Kreg Jig pockets about 12-16 inches apart, starting at the edges (I placed 4 on the smaller shelf).
Next, I used my orbital sander and sanded all the wood with #220 grit sandpaper. Then, I wiped them clean to remove any dust.
ASSEMBLE THE SHELVES:
Now, it’s time to assemble the shelves.
Taking the one 4 inch board that had the pockets, I placed that on a flat surface (pockets facing up). Then, I placed the 2-inch board alongside the 4-inch board, with the longer side facing up. I adjusted the ends so they were level (if one side happens to be longer, you can cut it to match).
Once the ends were level, I used the clamps to secure the two boards together.
Then, using the 1.25-inch screws, I screwed the boards together through the pockets.

Next, I added the other 4-inch board. I placed this board on the other side of the 4-inch board, the same way as the 2 inches (long side up, horizontal).
Once the ends were level, I clamped the boards together.
To attach them, I drilled screws straight into the boards (it’s easier to turn the shelf so the 2-inch side is flat on the surface). First, I pre-drilled a 1/8 inch hole from the bottom of the horizontal board into the vertical 4-inch board.
Then, I used the 1.25″ wood screws and attached the boards together ( the spacing was about 12-16 inches).


At this point, I adjusted any ends of the shelf that needed to be level by using the miter saw, followed by sanding.
Then, I applied a mix of special walnut and provincial stain to the shelf (I put one layer, let it dry and then applied the other stain).
After the second layer of stain dried, I wiped the shelf with mineral oil to bring out the color even more.
INSTALLING THE SHELF:
To install the shelf, it will be helpful to have a second person (my daughter, who was 6, helped me). I chose where I wanted the shelf to rest on the wall, height and width, marking each with a pencil (DON’T use a pen).
Then, I took my stud finder and found the studs, marking again with a pencil.
I found two studs close to where the ends of the shelf will be. Then, with the help of my daughter, we held the shelf into place.
I pre-drilled a 1/8 inch hole through the shelf to the stud in the wall (only doing one side). Then, I partially drilled the 2-inch screw into the hole but NOT making it completely flush yet.
I then placed the level onto the middle of the shelf and moved it until it was straight. Then, I pre-drilled another hole on the other side of the shelf, making sure it was on a stud.
Again, I used a 2-inch screw to attach it to the wall.
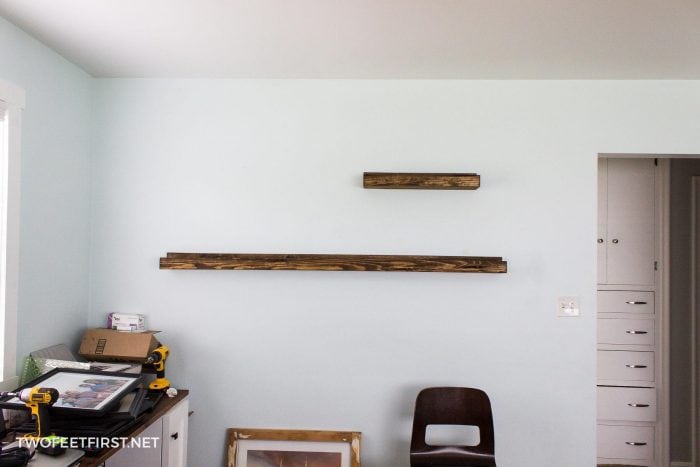
Finally, I tightened both screws to make them flush to the wall.
And now, our shelf was ready to place pictures.
SIDE NOTE: A great way to update picture frames is to spray paint them!
As you can see, these were very easy to build and you can do several in one afternoon. You can even paint them for a different look.