How to sew a Christmas stocking from a classic pattern that’s charming on its own and easy to make.
Christmas stockings come in all varieties – chunky knit, needlepoint, embroidered, velvet…even one with a mermaid tail (still scratching my head on that one).
But the holidays were a few weeks away and yet, I had no Christmas stockings.
My husband wanted the classic stocking with red velvet and fluffy white cuff. After searching online, I came across this tutorial on adding a cuff to a stocking by Cluck Cluck Sew.
It took me longer to find a pattern for the stocking since most tutorials used a stocking to make the stocking pattern. What if you do not have a stocking in the first place? And most patterns were not big enough for what I wanted.
Long story short, I created my own stocking pattern and can’t wait to share it with you!

Disclosure: This post contains some affiliate links or referral links for your convenience. It is a way for this site to earn advertising commissions by advertising or linking to specific products and/or services. Click here to read my full disclosure policy.
Christmas Stocking Tutorial
MATERIALS:
Approximate Size of Stocking: 8″ x 18″ (makes 4 stockings, yardages based on 44″ fabric )
- 1 yard Main Fabric (I used red velvet)
- 1 yard Lining Fabric (I used white cotton fabric)
- 1/2 yard Cuff Fabric (I used a soft and fluffy fabric)
- 1 yard Batting
TOOLS:
- sewing machine
- sewing scissors (I used pinking scissors)
- pins
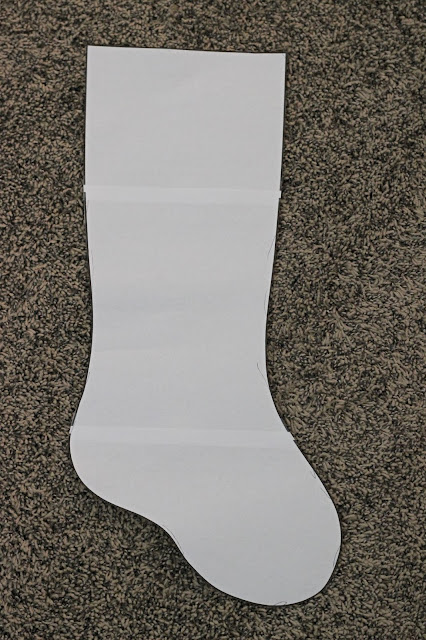
PREPARE THE PATTERN
Here is the Stocking Pattern – print, cut and tape together.
I traced onto cardboard and used that to trace onto the fabric.
CUT OUT THE STOCKING:
(for 1 stocking)
- Cut 2 of the stocking pattern for Main Fabric, Lining, & Batting
- 9″ x 13.5″ Cuff
- 2″ x 6″ Hanging Tab (I used the main fabric)
After cutting all the stockings out, take the main fabric and place right sides together.

Sew 1/4″ seam allowance around sides, leaving the top open.

Then, turn the fabric right side out.

PREPARE THE LINING:
With lining fabric, place right sides together and put batting on both sides of fabric (making a sandwich).

Sew 1/4″ seam allowance around sides, leaving a 3″ hole in the side for turning. Leave the right side in.
SEW THE CUFF:
Take your cuff fabric, place 9″ ends together (right sides), and sew 1/4″ seam allowance.

Turn the cuff right side out, so it’s folded at the bottom and raw edges on the top.
MAKE THE STOCKING LOOPS:
For the fabric stocking hanger, sew together 6″ ends of the tab (with right sides together), using a 1/4″ seam allowance. Turn the fabric right side out, so it’s folded at bottom and raw edges on top.
(With my fabric, I sewed 1/4″ seam on raw edges to hold fabric together)

COMBINE ALL THE PIECES:
This is what you should have so far.

Stick the cuff on and around the top of the main stocking fabric, matching the raw edges, and pin. (I then sewed a 1/4″ seam allowance around the raw edges to keep the fabric from moving around)
You can now pin your hanging tab to the cuff/main fabric.

Insert the whole stocking into the lining fabric. The main fabric and lining should be right sides together.
Pin all raw edges together at the top, making sure the seams are lined up on lining and main fabric.
TIP: Make sure your main stocking fabric is inside the lining fabric.

Sew all the way around the stocking using 3/8″ to 1/2″ seam allowance. Make sure all layers are sewn together.

Turn the whole stocking right side out, using the hole left in the lining fabric.

Once you have finished turning it over, sew up the hole left in the lining fabric. You do not need to turn all of the lining fabric, just enough that you can sew the hole.

To finish, stuff the lining inside the stocking and fold the cuff down. Press the edges as needed.


When you are done, you will have a thick, beautiful, stocking and you’ll be all ready for Christmas!


Aren’t they adorable?! Now I just need a place to hang them…


Thanks for the great tutorial! With your advice, I made an awesome Christmas stocking today!
Hi Shari, I am really glad you had a wonderful stocking just in time for Christmas!