Our mailbox redo has been on our list of things to do since moving into our home. First, our mailbox was taped together on the inside and the post was NO better. After we removed the light pole in the front at the first of the year, we discovered how open our yard looked. And mowing the lawn was a lot easier, minus the mailbox… Then we got this brilliant idea to move the mailbox to the other side of the sidewalk, under our pine tree because nothing but weeds can grow there. Here is our old mailbox post after redoing our water lines.

Because the old post for the mailbox was very wobbly we decided to build a mailbox post ourselves. And this is what our mailbox post (with a new mailbox) looks like today.

What do you think? I think it looks so much better! I am going to put this DIY into the EASY list because it took me less than an hour to build and stain. Here is how we did it.
BUILD A MAILBOX POST
Disclosure: This post contains some affiliate links for your convenience, click here to read my full disclosure policy.
SUPPLIES:
- 4″x4x8ft cedar post
- 21″ of 2″x4″ cedar
- 3.5″ wood screws
- cedar pocket plugs
- stain/waterproofer
- exterior wood glue
- gravel & concrete
- scrap boards
TOOLS:
- Kreg Jig
- drill
- miter saw
- tape measure w/pencil
- clamp
- paint brush (to apply stain)
- shovel
- sander
- level
Find the list of tools we use.
ADDITIONAL ITEMS:
- mailbox (we purchased this one)
- scrap board (to fit under mailbox)
- screws or bolts
CUTTING THE WOOD:
First is cutting the wood with the miter saw. Here are the cutting measurements:
1 – 4″x4″x72″ (post)
1 – 4″x4″x21″ (side/rail)
1 – 2″x4″x21″ (support – angle)

For the angle – your blade does need to be turned to 45 degrees. And the measurement is the longer side of the board.
CREATE POCKETS:
After cutting the wood, I did sand the edges to give it a clean edge. Then I took the Kreg Jig and placed 2 pockets on one end of the 21″ board (rail) but did this for all 4 sides (8 pockets all together).

Then I added a pocket on each end (both sides) of the 2×4 board. Think about the angle on this board and do not create the pocket to close to the point because this could make it break off.
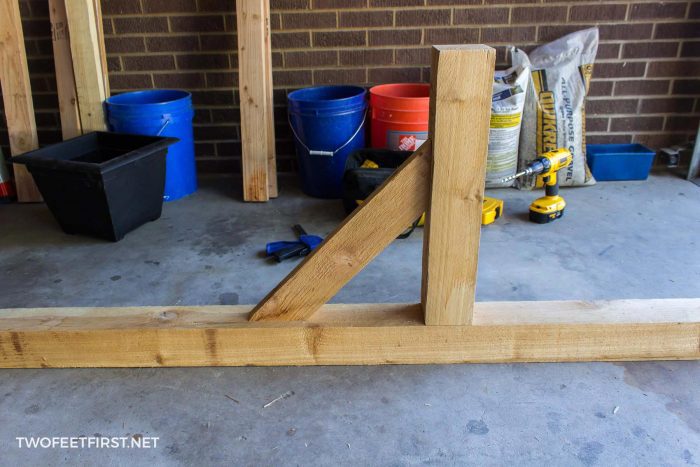
ASSEMBLE:
We decided to have 18″ of our post to be underground. So with the post flat on the ground, I measured from the bottom of the post and marked 18″ but also 48″. This last mark (48″) is where the bottom of the rail will sit on the post.

Then take the 21″ rail, I placed the side with the pockets against the post. Making sure the bottom was level with the mark but the sides were also flush. Then I attached the rail to the post using 3.5-inch screws. TIP: Give the rail some presser to attach it and work your way around the board to attach the screws.
In the next couple of pictures, you will notice NO pocket hole on the side of the rail. I decided to add these after installing the post to make it more stable. Don’t worry after adding the pockets you will not notice them!

Next was attaching the support board. Side Note: You will need a compact drill to fit inside the space. Take the support board and place it against the post and rail. Make sure the board is centered and there is no gap at the angle cuts. Once everything looks good, attach the board with the 3.5-inch screws.
STAIN/WATERPROOF:
Now we stain/waterproofed the mailbox post, we used Ready Seal in Natural Cedar (same as our fence). We also stained 12 pocket plugs at this time. I have found it works better to stain the wood first then install the plugs.
Once the stain had sat overnight, I added the pocket plugs into the pockets using the exterior wood glue.
INSTALL THE POST:
To install the post, Eric dug a hole 22″ deep by about 8″ round. Then we put 3-4 inches of gravel, placed the post on top and leveled it. We did this by using the scrap board to brace the post in place. See how to install a post in this post because we used the same method.
After we mixed some concrete (about 3/4 of a bag) and placed it inside the hole. We let this dry for 24 hours before moving on. Once the concrete dried we filled in the rest of the hole with dirt.

INSTALLING A MAILBOX:
We decided to purchase a new mailbox that could lock, we purchased the Oasis Locking Mailbox. To install the mailbox, first we cut a 3/4″ (normal 1″) board to fit the bottom of the mailbox. Mailboxes have a 3/4 inch gap from the bottom to the bottom edge. This is to install a mailbox.
After cutting the wood, we stained/waterproofed it also. Then we placed the board on the post, centered, and aligned it where we wanted it. Then using the 3.5-inch screws, we attached it to the post.

Next, we secured the mailbox to the board. With our mailbox, we had to use bolts w/nuts because the holes on the inside were wider than the post.
And that’s how we installed our new mailbox and post.
COST:
Because I love a cost breakdown:
4×4 = $15
2×4 = $FREE had on hand ($8 for a board)
pocket plugs = FREE (cost $5 for 50)
gravel/cement = $5
mailbox = $90
bolts = $1.50
screws = $FREE (cost $9.50 for about 55)
Our COST = $111.50 or the TOTAL COST = $134.00 or WITHOUT THE MAILBOX = $44
SO for less than $50 you could have a new mailbox post or spend $90 more (or less) and get a whole new mailbox!
What do you think? Anyone else need to update or replace their mailbox post?