Are you tired of tripping over your kids’ scooters? Here’s a tutorial on how to build a DIY scooter stand – it’s easy to use and you can put it together in a couple of hours.
How many times did you stub your toe on your child’s scooter before you finally looked for a DIY solution?
You remind your child a dozen times to put it away but if you don’t have a designated spot for it, it’s going to pop up where you least expect it.
I’ve got the perfect little garage storage idea for this painful dilemma and you’re going to love how simple and compact it is.
Let’s get started on this handy project that will save your sanity!

Disclosure: This post contains some affiliate links or referral links for your convenience. It is a way for this site to earn advertising commissions by advertising or linking to specific products and/or services. Click here to read my full disclosure policy.
DIY scooter stand
MATERIALS:
TOOLS:
- miter saw
- jigsaw
- Kreg jig (pocket holes system)
- safety glasses
- face mask (for dust)
- ear protection
To help you build your scooter stand, I created a free printable with all the measurements I used for mine. You can subscribe to my newsletter to receive the FREE PDF – click the button below if you’re interested. And, if you have questions, please visit the Q&A page on free printables/plans.
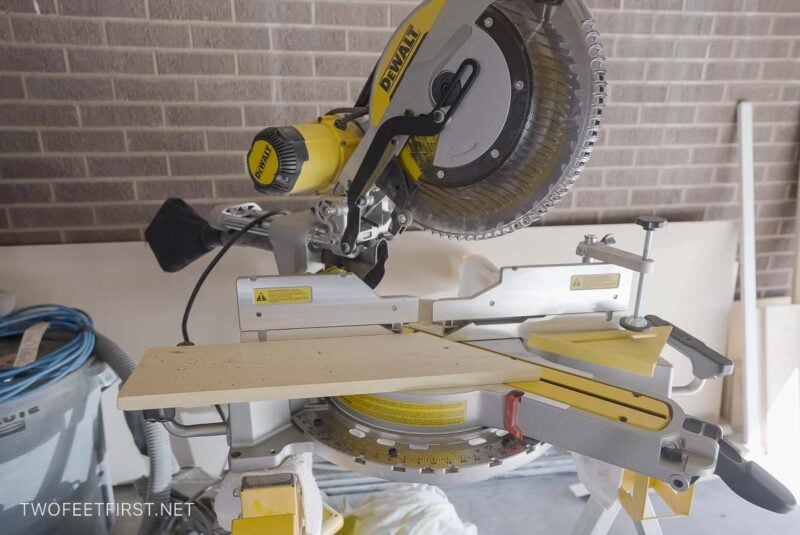
Cut the board
First, cut the 1”x6” board to length.
Use the free printable to determine the measurements you need.

Also, cut (6) 3” pieces from the board.
SIDE NOTE: You can cut one end of the 3” pieces at a 30-degree angle, see the image below, but it is optional.
Then, cut two triangles for the board at a 55-degree angle. And believe me, it needs to be at 55 degrees.
These triangles are the legs of the stand.
Add the pocket holes
After all the pieces are cut out, you will put pocket holes in the triangle pieces and all six of the 3” pieces.
Place two pocket holes on the 6” side of each triangle and the 3” pieces.
Add the notches
Next, you will cut out the notches for where the scooters will rest.
I recommend using a jigsaw for this but start by using a miter saw to give you the straight edge to the rectangle. After this, you can switch over to the jigsaw.
Each rectangle is 2-1/2″wide by 2” deep with a 5” gap between them.
SIDE NOTE: It’s a great idea to clamp the board down so it doesn’t move around while you’re working.
Use the jigsaw to cut the remaining rectangles out of the board.
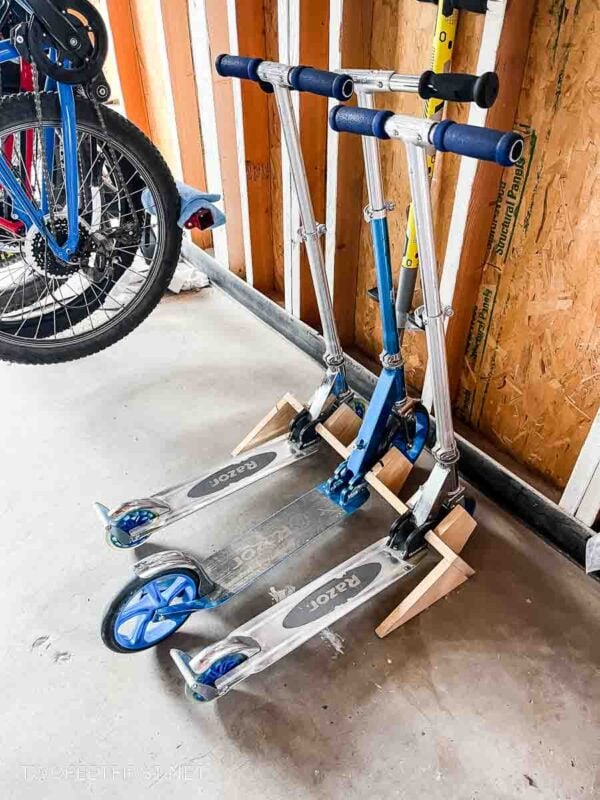
Assemble the scooter stand
Now, you are ready to assemble the stand.
Start by placing the notched board flat on the ground.
Then, attach a leg (triangle piece) to each end of the board using 1-1/4″ outdoor screws through the pocket holes.
SIDE NOTE: You can also use wood glue to hold the boards together.

Flip the board so that is resting on the legs, and attach the 3” pieces to the board. You will place two along each of the notched rectangles using the pocket holes and 1-1/4″ screws.
Once all the pieces are attached to the board, you can say bye bye to tripping over scooters!
FULL PROJECT VIDEO:
Are you someone that does better with visuals? Check out the full DIY Scooter Stand project video below, and don’t forget to subscribe on YouTube so you don’t miss out on future projects!