Organizing a small mudroom is easy with these DIY mudroom storage shelves, the perfect alternative to a cubby.
Something I have dreamed about is having a mudroom, especially with a backpack cubby. But my house is small, and I did not have the space to give myself this dream. It’s ok because what I came up with is going to work fantastically for my family. I decided to DIY a small mudroom storage shelves plus a floating bench and table.

The space we created for our mudroom, was created for our kids, and I hate unused space in my house so we created a plan that would fit our family needs. We decided to build a floating bench instead of building a whole cubby organizer. Check out the full tutorial on building a floating bench, here.
We loved this bench so much, we decided to build a floating desk in the same space so the kids could have a work station.
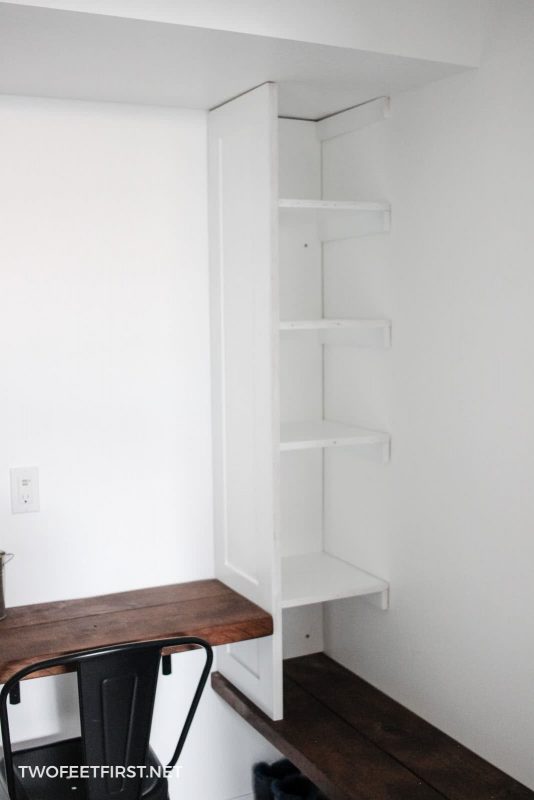
But because I wanted a location for storing gloves, hats, coloring supplies, and so much more. I created a small storage organizer in the corner to store all the extra things.
This was a simple build and I wanted to share just how I created this small mudroom organizer.
Disclosure: This post contains some affiliate links for your convenience, click here to read my full disclosure policy.
DIY SMALL MUDROOM STORAGE SHELVES
SUPPLIES:
- 3/4″ plywood
- 1″ screws
- 1/4″ x 3″ MDF strips (cut from a small 2’x4′ sheet)
- 1″x2″ primed boards
- 1-1/4″ finishing nails
- white sealant (caulk)
- 2-1/2″ screws to secure to the wall
- paint and primer
- #220 grit sandpaper
TOOLS:
- table saw or circular saw with rip-cut
- miter saw
- air compressor with nail gun
- Critter spray painter (optional)
- drill
- Kreg Jig K5
- square
- level
- caulk gun
- orbital sander
Find the list of tools we use.
STEP 1: CREATE THE DESIGN AND PLAN
Before starting any project you need a plan. This includes measuring the space and drawing a sketch. Here is my sketch of my mudroom organizer.

SIDE NOTE: If you want more help on starting a DIY project and creating that sketch plus so much more. Be sure to check out my workbook called “Start A DIY Project Workbook.”
The size of my organizer is 59.25″ tall, 13″ wide, and 13.75″ deep. I designed it so that a magazine basket could be placed on one shelf, a place to store paper, plus wicket baskets could be used!
I created this very similar to my daughters closet organizer but let’s get back to these storage shelves.
STEP 2: CUTTING, KREG JIGING, AND SANDING THE WOOD
After creating a sketch, it’s a great idea to create a cutting diagram. This cutting diagram helps you know the exact amount of wood you need to purchase and how to cut each piece.
SIDE NOTE: Again this is part of my workbook and I explain how to create your own.
Once you have your cutting diagram begin cutting the wood. Because I do not have a table saw, I used a circular saw with a Rip-cut to cut my plywood into pieces, I explain more about using a rip-cut in this post.

SIDE NOTE: I like to wait on cutting the 1″x2″ trim pieces until the organizer is in place, this is so I can get correct measurements.
When the plywood is all cut, its time to create the Kreg Jig pockets to hold the pieces together. One side of the back plywood piece and one side of 2″ x13-3/16″ braces received pockets. Plus each shelf will have pockets for attaching to the back piece and side piece.

TIP: Watch the video below to see pocket placement.
After its time to sand the plywood pieces and MDF strips with #220 grit sandpaper, an orbital sander is amazing for this.
Once the sanding is complete, wipe the boards with a dry cloth.
STEP 3: ASSEMBLE THE STORAGE ORGANIZER
To save time on painting, I decided to assemble the storage organizer first but it can be painted then assembled.
I also created a how-to video to help demonstrate the process of building this small mudroom storage shelves, plus the video shares the install process.
The first pieces that need to be assembled are the side and back pieces. The back piece will attach to the side.

After is securing the shelves and the bracing need for each shelf. Each shelf will be secured to the back and side plywood pieces. Bracing is secure to back plywood piece and shelf.

TIP: Make sure to create the Kreg Jig pockets on the correct sides, you will notice that I had to fill in pockets and create new because the first pockets
Once all the shelves and braces are attached to the storage organizer, the decorative trim can be added.

This is where the 1/4″ MDF strips are cut to frame out the side of the organizer. I have a detailed tutorial of this process from when I updated my cabinets doors for cheap, visit that page for those instructions.

SIDE NOTE: I did add
STEP 4: PAINTING
Before pulling out a
STEP 5: INSTALLING THE STORAGE SHELF
Once the paint has dried the organizer is ready to
To secure the organizer into place, I located a stud on the wall where the back plywood piece will be placed. Then I pre-drilled into the organizer in that location with a 1/8″ drill bit. After I took a 2-1/2″ screw and secured the organizer to the wall.
After the storage organizer is attached to the wall, its time to add the 1″x2″ trim to the front. Measure one side from top to bottom then cut a 1″x2″ trim to the measurement. Do this for both sides.
TIP: Its always better to cut bigger then trim down if needed.
Attach these trim pieces in place with 1-1/4″ finishing nails. Next measure for the trim pieces for each shelf.
TIP: Measure each shelf and write down each measurement, they can be different.
Attach the shelf trim pieces the same way with a 1-1/4″ finishing nail.

Once all the trim is installed, fill in the nail holes with spackling paste and caulk all the seams. After these have dried and spackling paste smoothed (with sandpaper), touch up the areas with paint.

When the paint has dried, you are ready to use the DIY small mudroom storage shelves to organize your stuff. In my case, I purchased small storage baskets.
I hope this tutorial will help you create a small mudroom organizer or at least give you some ideas.