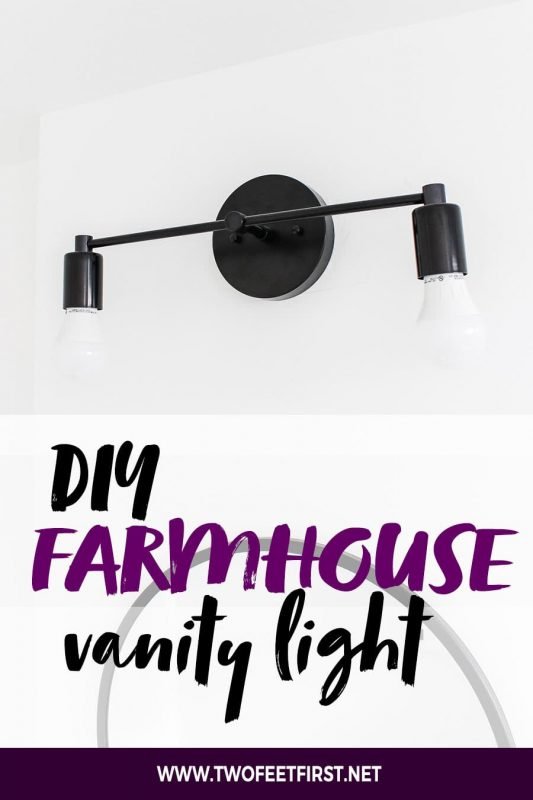
Learn how to build a DIY Farmhouse vanity light fixture to give your bathroom the makeover it needs.
Do you want to upgrade the light fixture over your bathroom mirror? And you don’t want to spend a lot of money to update a light? I have the perfect solution! Learn how you can build your own DIY farmhouse vanity light fixture for your bathroom with this tutorial.

This light fixture is very simple to make and will cost you less than $50 (mine cost $44 to be exact). Here’s what you need to create your own DIY light.
DIY FARMHOUSE VANITY LIGHT FIXTURE
Disclosure: This post contains some affiliate links for your convenience, click here to read my full disclosure policy.
DON’T WANT TO MAKE ONE? Here’s is where you can buy a similar light.
SUPPLIES:
- two – porcelain socket with 1/8″ips cap and wires
- two – black finish Edison socket cup
- two – 1/2″ x 1/8″ips threaded hollow nipple
- two – 1/8″ips x 1/8″ips 90-degree straight armback
- two – 7″ x 1/8″ips black male threaded pipe
- one – 1/8″ips x 1/8″ips “T” armback
- one – 2″ x 1/8″ips black male threaded pipe
- one – 5/8″ 1/8″ips x 1/8″ips straight coupling
- one – 1″ x 1/8″ips threaded hollow nipple
- one – 5″ black canopy
- one – 8/32 black acorn cap
- one – 1/8″ips hex head nut
- one – 1/8″ips star lock washer
- one – 1″ washer with 1/8″ips slip through hole
- two – 1-1/2″ x 8/32″ threaded stud
- one – 2-3/4″ swivel crossbar
TOOLS:
- screwdriver
- wire strippers
- wrench
Find the list of tools we use.
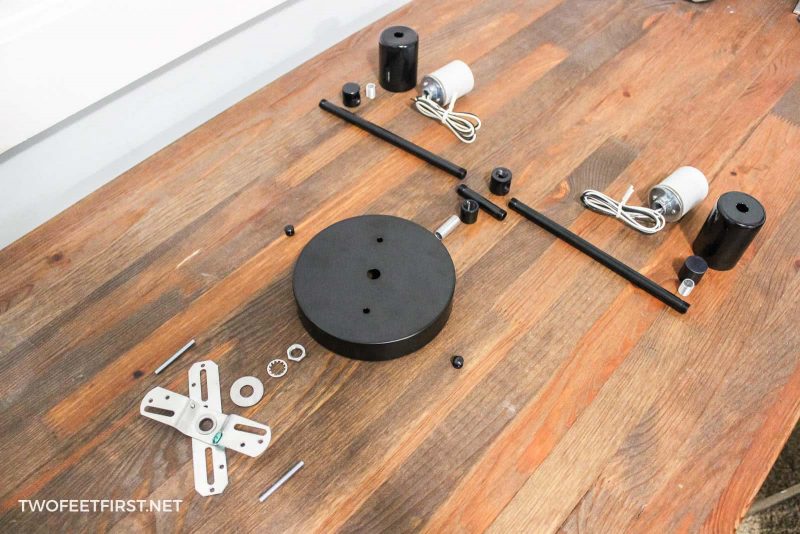
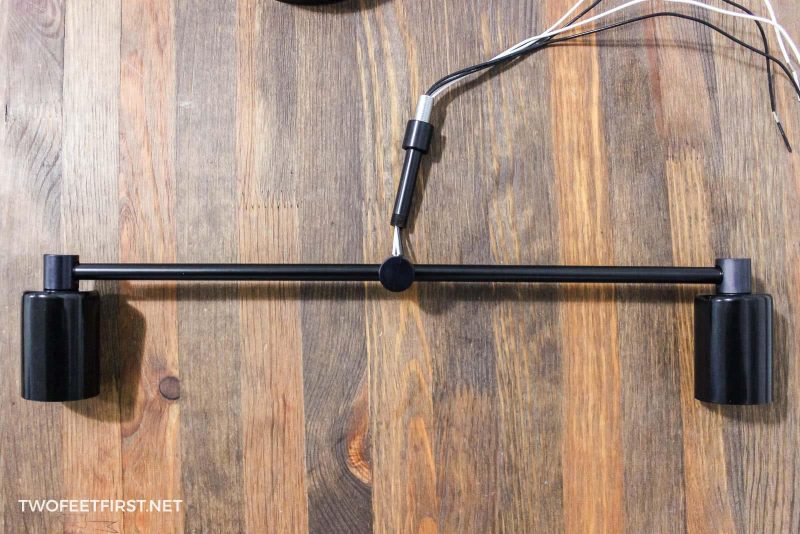
Here is an image to make locating where each part is in the assembly of the light fixture. Plus I have labeled each component with a letter and provided a part number that can be used at Grand Brass Lamp Parts store.

- A – Porcelain socket (SO10085TF24)
- B – Edison socket cup (CU578BL)
- C – 1/2″ threaded hollow nipple (NI0-1/2X1/8)
- D – 90-degree straight armback (AB472BL)
- E – 7″ black threaded pipe (PIBL07)
- F – “T” armback (AB477BL)
- G – 2″ black threaded pipe (PIBL02)
- H – Straight coupling (NE438BL)
- I – 1″ threaded hollow nipple (NI1-0X1/8)
- J – Canopy (CAS05BL)
- K – Acorn cap (FI855-8/32BL)
- L – Hex nut (NU233WZ)
- M – Star lock washer (WASTAR1/8NP)
- N – 1″ Washer (WA1-0X8)
- O – 1-1/2″ Stud (SCS600)
- P – 2-3/4″ swivel crossbar (CBSV2-3/4)

* PLEASE NOTE that I am not an electrician and you should be aware that there are dangers in doing this project yourself, please be careful!
STEP 1: ASSEMBLE THE LIGHT FIXTURE
To start wiring and assembling the vanity light fixture you will start with the pre-wired porcelain socket.
Thread the wire from the wired porcelain socket through the 1/2″ threaded hollow nipple, Edison socket cup, and 90-degree straight armback. Tighten the 1/2″ hollow nipple to the socket, thread the socket cup through the nipple, then tighten the armback to the nipple.
Complete this step for both wired sockets.

Next, thread the wire from one light socket through a 7″ black threaded pipe and “T” armback. Then thread the wire from the other light socket through a 7″ black threaded pipe and the same “T” armback (see image below for example).
After, attach the pieces together.
Now take the 2″ black threaded pipe, straight coupling, and 1″ threaded hollow nipple. Tighten those pieces together.
Once the pieces are assembled, thread the wires (from both sockets) through the 2″ threaded pipe and tighten the pipe to the “T” armback.
Now thread the wires through the canopy, large washer, the star lock washer, and then the hex nut. Tighten the hex nut into place with a wrench.

STEP 2: ATTACH THE LIGHT TO THE WALL
*MAKE SURE YOU TURN OFF THE BREAKER POWERING THE LOCATION OF THE LIGHT. Also, remove the old light fixture.
Mount the flat part of the crossbar onto the lightbox, then thread the two 1-1/2″ studs into the crossbar.
Next wire the wires to the wires inside the lightbox.
SIDE NOTE: You can wire the wires before mounting the crossbar.
Place the canopy over the two studs and secure in place with the acorn cap.
Then screw in your lightbulbs and turn the power back on to the breaker. And you now have a DIY farmhouse vanity light fixture in your bathroom!
We have been loving this handmade bathroom light fixture plus our bathroom makeover! If you happened to miss any of it, see our basement bathroom tour to see the before and afters plus a list of all our projects for the room.

Also if you want this light fixture but don’t want to DIY it, purchase one similar at Etsy.