If you remember from a couple of weeks ago, I talked about our big plumbing issue. Today I wanted to give you more details about the issue.
But first I need to give a little back story. Our house was built in 1953 and all the plumbing is original to the home, meaning the pipes are 60+ years old. Since we moved into the home over 2 years ago, we have found that our drains do not like to drain. For example, we have a sink (lets call it the utility sink) that is next to our washing machine which is connected to the same pipe as the kitchen & washing machine. Whenever we use the kitchen sink, dishwasher, or washing machine the utility sink would fill up with water. Last year the floor drain in our laundry room started to back up. So my dad came and snaked the drain solving the problem. But a couple of weeks ago the drain started backing up again & the utility sink was filling up even more than before. We decided to have our main line snaked/flushed and camera-ed to check things out.
We were hoping and praying it would be nothing to serious. But at the same time we knew our pipes were old and we were prepared for the worst.
The plumber came and snaked/camera-ed the main line on a Monday for $225. But we found what we where afraid of… Our main sewer line was eroding away and was separating at the joint were it connects to the city sewer.
At this point we had 3 options:
- Leave the pipe: This option just sounded silly to us because it would only be a matter of time until we would have a sewer backup and NO one wants that to happen….
- Re-line our pipe: With this option they would insert a new pipe inside the old pipe. This would solve all of our problems.
- Re-place the line: This would be removing all the old pipe and replacing it with new.
We decided to think about it, really just call around to see the prices of option 2 & 3. Our line is 81 linear feet, we found the cost of option 2 was about $6,000 and option 3 was $10,000+. What option would you pick? We decided on option 2, plus option 2 was a lot less messy because they would not be digging up our yard.
So we scheduled the plumber to come out the next day to start demoing a little hole in our basement floor. After that they would re-line our pipe.
At this point we were afraid that all our other lines underground were going to be bad and would need to be replaced. Like the ones going to the kitchen sink & bathrooms. So we again prepared for the worst.
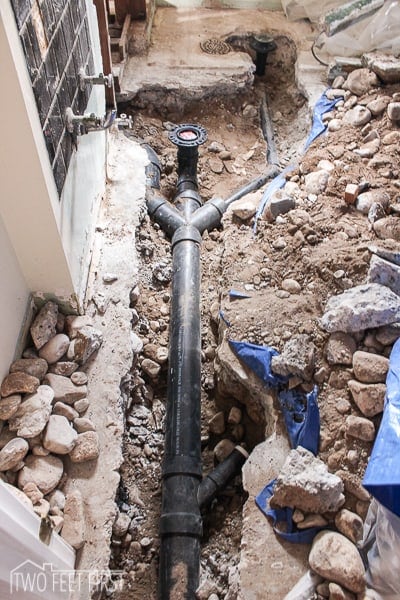
Tuesday morning came and they started demoing about a 2ftx3ft space of cement. They were opening the section where the kitchen sink connects with the main line, this is the last connection in the house until it reaches the sewer. After they opened the hole and exposed the pipe, we found what we were afraid of… The pipe connecting to the main line from the kitchen sink had a hole in it. Meaning we would have to replace all our underground pipes to reconnect the kitchen sink. Here is what the pipes looked like that they opened up.

Or how about the picture below, do you see the broken pipe? That is our kitchen sink pipe, it just broke into pieces when they tried to cut it…

They gave us some more options at this point, which really was them replacing all our underground pipes for another $4,800…. This price was them doing everything all the demo, installing the new pipe, and refilling the holes. To us that was a lot of money, so we asked how much it would cost to just do the plumbing/new pipes. They gave us a quote of $1,800+ depending on how much work they would have to do if we did not demo everything the way they needed. That was a $3,000 dollar difference. It would take us about 2 months to make that from Eric’s job and if we did the work it would take us a couple of days… We decided to demo the cement ourselves, plus we decided to get more plumbing bids because we thought that price was still a little high. Another plumbing gave us a bid of $1,100 to do the same work, we are going with this guy.
Sorry to give you the cost of everything but when we were trying to find out how much it cost to reline the sewer, we had a hard time finding a cost and that is why we are sharing.
But back to relining our main sewer line. This process was pretty cool! Now I am not exactly sure how it all works but I will share what I noticed. Here is what the pipe looks like after it has been cured:

First thing they did was clean the old main line really well. Then they went outside and unrolled some plastic on the sidewalk to the length of our main line. They were out there for a long time adding stuff to the plastic, making it a tube. (Think of it as like a firefighters hose when there is no water in the hose) After that they rolled the plastic up and took it downstairs. They used a machine to push the plastic into the old pipe. They told me the plastic was turning inside out, like a sock. The machine used air to push it through the pipe. after the plastic was in place, they cured the plastic using heat, this is where it becomes a pipe. After a long wait because it had to reach a temperature, they let the pipe cool. Then they attached the rest of the line using clamps and a section of new pipe, until we finished the rest of the pipes. We could not reattach the kitchen sink because it was so damaged, meaning we could not use the kitchen sink or washing machine until we fixed it.

Some cool things about relining the pipe is that it will last for 50 yrs (it could last a lot longer if you do not put chemicals down your drains: like Draino) and the new pipe is a pipe itself. So the new pipe does not need the old pipe to work, it only needed the old pipe to form.

And that’s how we spent a very pretty penny to fix our main sewer line. Anyone else need to fix their main line? Or have you? Did you reline your old pipe or replace it completely?
See the other steps of this adventure here:


Guys, I feel for you. That’s a lot of money. :/
About adding the costs, imho you do a service to whoever finds themselves in the same situation. I for one, search for cost info always and I added that in my last post (our kitchen reno).
Tons of information in your post, thanks!
Thanks, it was a lot of money… But the piece of mind is always wonderful! I can not wait to see your finished kitchen, there is a lot of potential there. I really like it when people give the cost of things, it gives you a better idea of things. Thanks for checking out the blog!