This is one of those projects we were working on for a Christmas present and because Christmas is over I get to share it with you, YAY!!! Many years ago we made a bunch of kid growth chart rulers and we have loved ours so much that we decided to make one for my little sister because she is going to pop out a baby sometime this month. Our growth chart ruler is in our living room and I get questions about it all the time so how about I just show you how we made ours (aka. my sisters).

DIY GROWTH RULER
Disclosure: This post contains some affiliate links for your convenience, click here to read my full disclosure policy.
SUPPLIES:
- 1″x8″x78″ board – this can really be any size you want!!
- sharpie marker or paint pen – we used black but you can use any color
- 3 sheets of paper (or number stencils)
- ruler or tape measure
- fine point sharpie or pencil
- ballpoint pen
- stain (optional)
- polycrylic with a paintbrush – you can use the spray kind!
- painters tape
TOOLS:
- orbital sander with #120 or #220 sandpaper
- scissors
Find the list of tools we use.
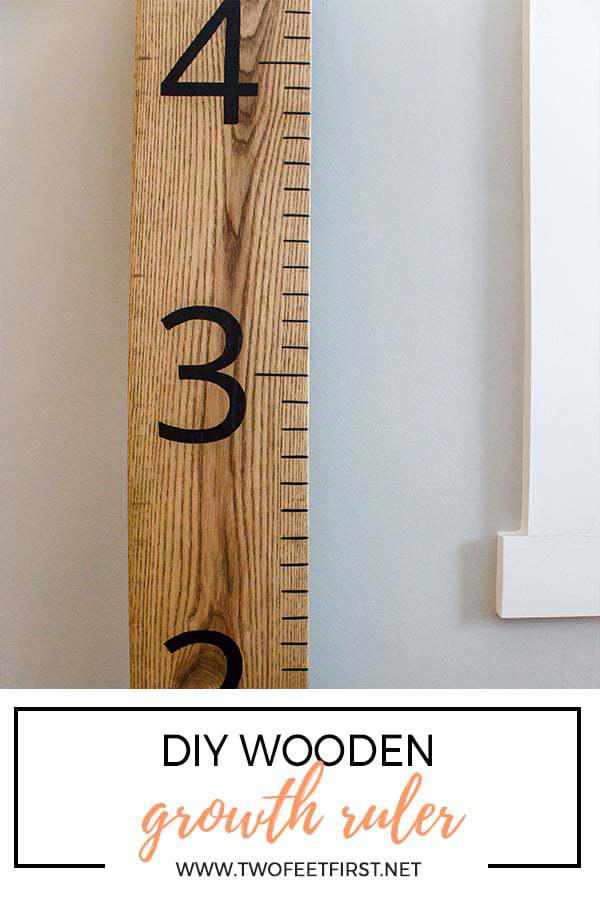
First thing first, cut the board to the size you want. We have ours flat on the ground and do not plan on our kids being taller than 6ft 6 inches. So if you know you will need a taller board please cut yours longer and if you plan on hanging it on the wall you may want to start the board around the 6″ mark that way it does not hit a baseboard. But the choice is up to you!!!
After cutting the board, we took an orbital sander and sanded the board until it was smooth.
Next, you can decide if you would like the board stained or not. The ruler that we have is not stained but the one that we are using for the tutorial is stained in special walnut.

Once the stain is dry, I took a ruler and marked 1-inch marks along the entire length of the board. In order to mimic the lines on a ruler, I made the 1″-11″ lines 1 inch long and the 12″ (every foot) lines 2 inches long. Make sense? I drew all the lines with a fine point sharpie first, then went back over them with my regular sharpie later but you can use a paint pen.

Now I transferred the numbers onto the wood (if you have a stencil you can skip this step). First, you need to create your numbers, so find a font that you like (sorry can not remember the one I used) and make the numbers measure anywhere between 4 – 5 inches after printing. The ruler in the tutorial has 5″ numbers and our ruler has 4″ numbers. I did put two numbers on one sheet of paper.
After printing, I placed the numbers where I wanted them (I did cut the paper down) using painters tape to hold in place.

I then traced the numbers with my ballpoint pen.

This left a slight indention onto the wood, can you see it?

I then simply filled that outline in with my sharpie marker but again you can use a paint pen. It requires a little bit of a steady hand, but you’ll get the hang of it! I also went over all the lines and outline twice before going to the next step, it made it slightly darker.

After I had everything marked the way I wanted, I took a paintbrush and apply a coat of polycrylic over the board. This will protect the wood/numbers and you can still mark and write on the board after!
Once that dried the wooden growth chart ruler was complete!!! SIDE NOTE: For our board, I do use a sharpie paint pen to mark my kid’s growth but I believe a sharpie marker would work also!

What do you think?


