Do you remember when this happened to one of our basement windows?

Let me give you a little refresher, we were working on cutting into our cement and things where getting very very dusty. So we forced the bathroom window open, really it took sometime to open that window. After we finished the project and the dust died down, we needed to shut the window. But we were in a hurry and someone pushed on the glass instead of the frame to make it shut. One hand through the glass later (don’t worry that someone just happened to be wearing gloves), we had a new project of fixing the broken window. We were not very happy about it but not very upset because we needed to replace this window anyways, now it was just going to happen sooner than planned.
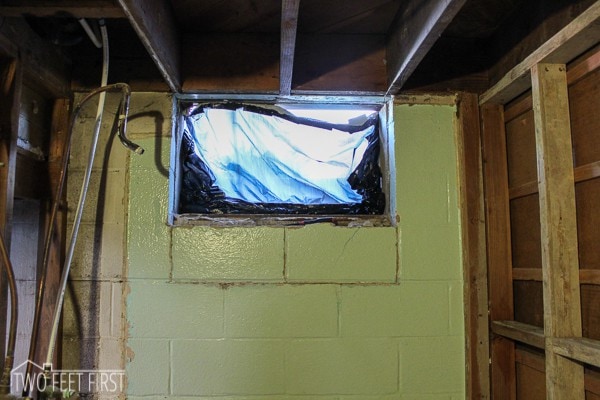
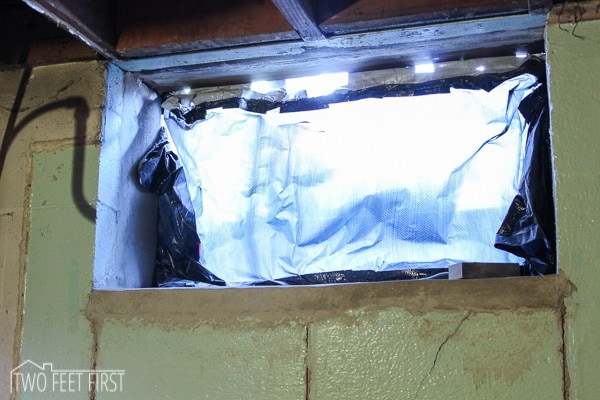
After a couple of months of our window looking like the picture above, we finally decided it was time to replace the window. Because I was worried about the window being a different size then what it measured, we decided to remove the old window first before ordering a new one.
Something our house never lets us down with is that things are done to LAST (this applies to the original owners), not a bad thing all the time but when you are trying to replace/update something it is. Our suppose to be easy to remove the old window, planning on no more than an hour, ended up taking about 3 hours because the old window was cemented into the foundation. So we had to chip away some concrete to remove the old window. After getting the window out we covered the hole with a thin sheet of plywood and plastic. As a side note, the old window was about an 1.5″ smaller then the opening, glad we removed the old window first…
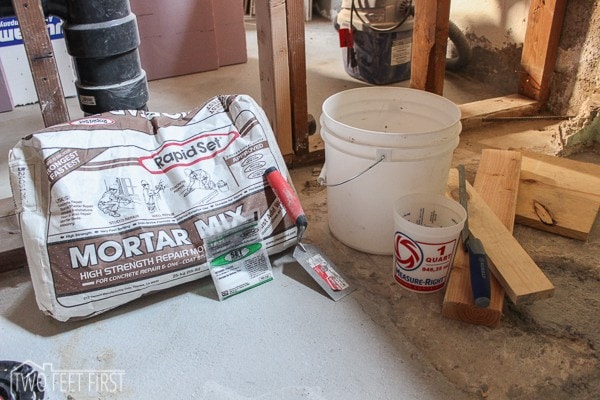
Now we had a new problem, from chipping away the concrete, we needed to re-cement around the window. After some research I picked my supplies to re-cement around the window.
Supplies:
– Rapid Set Mortar Mix
– Set Control Packet
– Trowel
– Water
– Bucket
– Water Bottle
First I cleaned the area by removing all the old flaking concrete and paint. Next I lightly sprayed the area with water, only want it to be damp. After I mixed the concrete (really called mortar) to the bag instructions, making sure to add the Set Control packet to the water before hand (this will help slow the drying process).
Now I added the mortar to the window opening, I made sure I built up the area before worrying about the look. I did find it a little difficult to build up the area, I used a big scrap of wood to help but I am thinking I had my mixture a little to watery. After I got the mortar added to the area, I then worried about the look and made sure everything was level (I made mine have a slight slant toward the shower that way water will not sit on the window sill). Once everything looked good, I started the drying process, making sure to dampen the area with water for at least an hour (this will help the area from cracking).
After letting the cement dry/sit for a couple of days, I could add the new window. I did have a little drama with the window being ordered wrong (the glass type was wrong) but after getting it fixed we were ready to go.
I talked with my dad before installing the window to make sure I was going to install the window correctly. I asked if I needed to screw the window to the foundation, he told me that with most basement windows they are just caulked to the foundation but if I wanted I could add a screw. I also found out that my parent’s basement windows have steel around all sides of the window, so their windows only have caulk around them and the house is 28 years old. Plus they did have a baby calf try to go through one window and the window did not move.
Anyways back to installing the basement window, or the way we did it because there are always other ways , make sure you pick the best option for you.
Here are the supplies did to install a basement window:
– Window
– Shims
– Spray foam
– Caulk
– Cleaning supplies
– Razor blade
– Level
– Caulk gun
We decided to purchase a Milgard window this time in vinyl with a block frame and of-course privacy glass because it is above a shower. The way I measured for my window was by measuring the opening height and width both inside and out, plus at the top, middle, and bottom. I then wrote down the smallest measurement for both height and width. At this point I took my measurements to the window store and ordered my window 1/4″ less than my measurement (if you are worried about doing this yourself most window stores will come measure for you!). It took about 4 weeks for our custom window to come in.
First thing I did after getting the new window was make sure it fit into the opening, which it did BIG RELIEF!!! Next I cleaned the opening and window to give the caulk a clean surface to stick to. Then I placed the window into the opening again, making sure the window was not upside down or inside out. I measured the bottom of the window to put it the distance inside the opening that I wanted. Taking a level and window shims, I then made the window level and added the shims to hold the window into place.

Next I took my razor blade and cut off the extra shim amount (if you score the shim it will break if pulled toward the window).
I cleaned the area again because now I was going to caulk around the outside of the window. I like to use DAP Dynaflex 230 caulk for outside work. After letting the caulk dry, I filled the gaps around the window in with spray foam, this will help insulate the window. TIP: Be careful with this stuff it expands like crazy and will stain stuff yellow.
After the spray foam dried, I took my razor blade and cut off the excess foam. Then I added caulk around the inside of the window (picture before was taken before doing these last two steps). Later when we redo the bathroom there will be tile against the window. Plus I still need to feel in a couple of cracks along the block with hydraulic cement.

** Side note: Every window is different this tutorial gives you an idea on how to install a basement window. Hope it helps!!**
This project only took us 14 weeks from the time the window was broken to the install of a new one, we were putting this one-off for a while. But the process was pretty easy, hardest part for us was removing the old cemented in window. What do you think? Anyone else need to replace their basement windows?