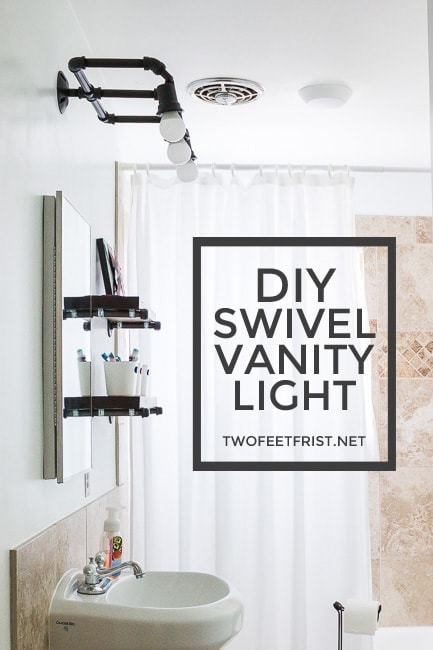
Once the school year started, I started to discover how many more pictures and projects where coming home with two kids. And because I do not like paper sitting all over the house, I started throwing away some of the papers. Then one day my son asked me (with a sad face), “Why do you not keep my papers?”. I explained my reasoning to him but then I started thinking that was not the best reasoning… So I thought of a way to display the kids artwork. And this is what I came up with, what do you think? Please look past the light, we are in the process of moving that one… and the messing living room…

This is a very simple way to display almost anything plus its CHEAP!! Let me show you how I did it in 6 easy steps.
SIMPLE ARTWORK DISPLAY
Disclosure: This post contains some affiliate links for your convenience, click here to read my full disclosure policy.
SUPPLIES:
- 1″x4″x8′ board (I used a furring strip)
- picture hanging set (looks like this)
- stain (optional)
- small binder clips
- sawtooth hanger or screws (used to attach the wood to the wall)
- nails
TOOLS:
- hammer
Find the list of tools we use.
STEP 1:
First thing I did was cut my board to the length I wanted which was 4 ft long but you can decide for yourself. TIP: You could have the wood cut at the hardware store.
STEP 2:
Because the artwork display will be in our kitchen I wanted the wood to match our pendant light above the sink. So I used this method to make the wood look older than stained the board in Provincial Stain by Minwax.
STEP 3:
After the stain dried, I added the screw eyes from the picture hanging set, I made sure to center it and placed it about 1.5″ away from the edge.

STEP 4:
Next I took the wire from the same packet and added it to the board, using the screw eye. Will look something like this.

STEP 5:
I then add 2 sawtooth hangers to the back of the wood to hang it onto the wall. But you can decide how you would like to hang the wood because you could use screws and attach it directly to the wall with them.

Then hang the wood up on the wall, make sure its level.

STEP 6:
Add the binder clips and clip the artwork up!!!

What do you think? This project cost me right around $10 and it was really easy. Hope you enjoyed our simple kids artwork display.
SaveSave


kids are so proud of their art work and this is a genius idea to display them xx
Thanks Chris! We have been loving it!!