A step-by-step tutorial on how to build a DIY planter box that can be reversed to reveal two different designs, so you can change up the look of your yard whenever you want.
Want to create a stunning focal point in your yard with a DIY planter box?
This planter box project is not only fun to work on – it’s also a versatile piece of art. It features two sleek designs, one on each side, when you want to change it up.
Why buy a planter box when you can build your own planter box that will add a unique touch to your outdoor space?

As part of a collaboration with other DIY enthusiasts, we have compiled a list of projects focused on creating your planter boxes. See below for the projects they have shared.

Disclosure: This post contains some affiliate links or referral links for your convenience. It is a way for this site to earn advertising commissions by advertising or linking to specific products and/or services. Click here to read my full disclosure policy.
Reversible DIY Planter Box
MATERIALS:
- 3/4″ plywood
- 2”x4” cedar (for legs)
- 2” or 1-3/4″ exterior wood screws
- nails
- black spray paint
- 24″ plastic planter
TOOLS:
- miter saw
- table saw
- cordless nail gun
- tape measure
- pencil
- safety glasses
- face mask (for dust)
- ear protection
I am using scraps of wood from my garage to build the planter box, but the planter box is approximately 25-1/2” wide x 10” deep x 26” tall.
Step 1: Cut the wood
The frame of the boxes, trim, and legs need to be cut to size.
The frame and trim will be cut from the plywood. For one planter box, you will need the following:
- (2) 24” x 24” – front and back
- (2) 9-1/2″ x 24” – sides
- (1) 9” x 23-1/2″ – inside
- (approximately 5) 3/4″ strips – for trim
- (1) 1-1/2″ strip – additional trim
- (1) 1-3/4″ strip – for the top of the planter box
You will also need to cut the legs from the 2×4 cedar. I cut these into two, making them 1-1/2″x1-1/2″. Then cut (4) legs at 19“ and (2) braces at 19“.
Step 2: Assemble the box
You must attach the legs to the front and back pieces to assemble the planter box.
Place one of the front pieces on a flat surface. Measure and mark 6-1/2″ from the top of the piece at the ends and middle of the piece. These markings will indicate where to install the legs and the bracing.
Attach the legs and bracing to the piece below these markings with wood glue and the screws.

Continue this process for the other piece.
Then, attach the side pieces to the leg pieces using wood glue and nails.

After, place the last plywood piece into the 6-1/2″ opening to give the plastic planter something to sit on.

Now, you are ready to add the design.

Step 3: Add the design
You will create the grid system on the wood to make it easier to install the decorative trim.
Start by placing the 3/4″ strip at the end on the front and marking along one side with a pencil.
Place another 3/4″ strip next to this strip and mark along its edge.
Keep moving and marking these strips until you have finished the entire side length. Then, mark the top to bottom of this side the same way.
You will be left with something like this:
Mark one side of the planter box the same way.
SIDE NOTE: If you are creating two planter boxes, ensure that you are marking the opposite side so the planter boxes can be next to each other and have a continuous design.
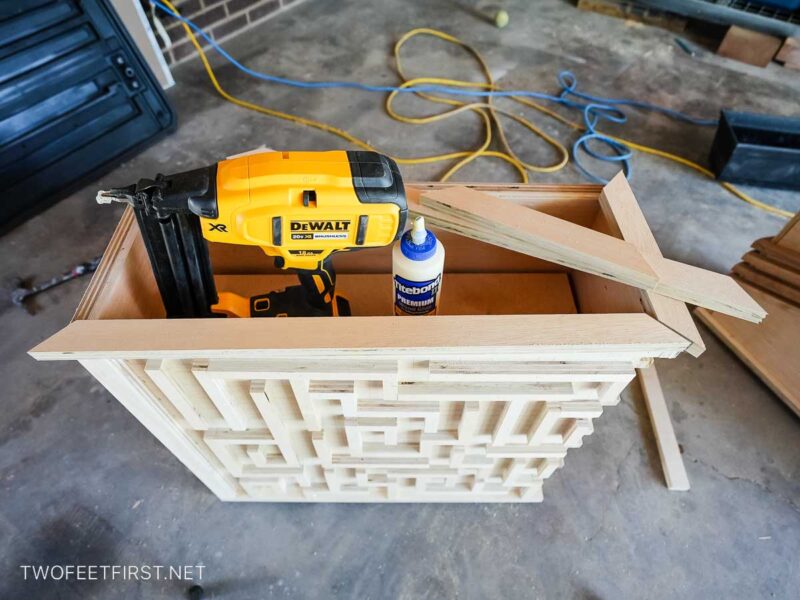
After you have a grid system on the front and one side of the planter box, mark the areas where you want to add the trim to create a maze.

SIDE NOTE: You will want a 1-1/2″ space between the trim pieces, and I recommend you watch my YouTube video to see exactly how to do this.
Once you have your design, cut the 3/4″ strips to fit these designs.

Now, here’s the fun part! Carefully install them into place by using wood glue and nails.
After, add additional trim pieces around the box with the 1-1/2″ strip to give you a finished look.

And here’s a beautiful way to complete the look. Simply cut the 1-3/4″ strip to frame out the top of the box using 45-degree angles.
TIP: Watch the video linked below to see how to complete these steps.
Step 4: Paint the box
After your design is complete, you can spray paint the boxes.
I used black spray paint to give me a bold yet elegant look. Feel free to use a different color. You will probably need to paint two coats, as I did.
SIDE NOTE: I used a total of 5 spray paint cans.
Step 5: Add the second design
Once the spray paint is dry, you can add the second design to the box by cutting 3/4″ strips at a 20-degree angle and attaching them (unpainted and unstained) to the box.
Your design should look similar to this:

Once you’ve built this gorgeous, sturdy DIY planter box, you’ll be eager to try other designs as well. The materials are easy to find and it will add major curb appeal to your home.
FULL PROJECT VIDEO:
Are you someone that does better with visuals? Check out the full project DIY planter box video below and don’t forget to subscribe on YouTube so you don’t miss out on future projects!


Love this creative design Megan! It looks like it would cost hundred! Thanks for the inspo.
Thanks, Michelle!