Installing a subway tile backsplash in the kitchen is a great way to give an instant update and add style, character, and value to your home. While it may seem intimidating, this tutorial shares how to install a subway tile backsplash yourself because it’s easier than you think.
In 1904, when New York City opened its first subway station, thousands of enthusiasts rushed in to get a glimpse of the new underground train tunnels.
Besides the excitement of the first subway ride, visitors also noticed the intricate wall art.
A huge part of the design was the 3” by 6” white tiles, chosen by the designers for three reasons:
- Inexpensive
- Easy to clean
- Reflected light
Homeowners admired them for the same reasons above but also realized these tiles were incredibly versatile.
Soon enough, those unique tiles found their way into bathrooms and kitchens of households everywhere.
They could be arranged in different patterns, you can vary the grout color for contrast, and the modern subway tiles now come in a variety of colors.
Over 100 years later, they’re still a classic and affordable choice for any kitchen, with a timeless, clean, and uplifting look.
You can give an instant update and add style, character, and value to your home by installing a subway tile backsplash.
Imagine how much better your kitchen will look with a beautiful new subway tile backsplash. And if you want to know, take a look at mine!
I wanted to transform my kitchen, and after updating the cabinet doors by adding trim, building a refrigerator surround, plus some more cabinets. I was left with this:
The space was still missing something, a backsplash.
I put off the project for three years because I was intimidated by the idea of tiling and I thought it would be expensive.
After I finally completed the project, I realized I was wrong.
This is an excellent beginner tiling project, and it’s inexpensive (depending on your tiles).
I wish I would have completed this project three years ago because installing a subway tile backsplash is easy, especially with this tutorial.
Disclosure: This post contains some affiliate links or referral links for your convenience. It is a way for this site to earn advertising commissions by advertising or linking to specific products and/or services. Click here to read my full disclosure policy.

How to install a subway tile backsplash
MATERIALS:
- thinset
- water
- buckets (I like to use a 2 gallon)
- 1/16” spacer
- marker
TOOLS:
- tile saw or tile cutter
- drill
- mixing paddle attachment
- scale
- 1/4” x 1/4” square notched trowel
- thinset removal tool
- grout scrapper/saw
- tape measure
- laser level
- safety glasses
- face mask (for dust)
- ear protection
To start this project, you need subway tiles.
The ones I used have a groove on them that allowed for a 1/16” gap so I didn’t need spacers between each tile.
You should also consider how you will trim the tile. In this case, I’m using a rounded (bullnose) edge tile.
Step 1: Mix the thinset
After all the supplies are gathered, the first thing you will do is mix the thinset.
Following the exact instructions on the package, I used a scale to weigh the water and the mix.

This was to ensure I got the correct consistency, and using a scale made that easy and precise.
I found it helpful to quarter a 50-pound bag every time I mixed a new batch. There are two reasons for this:
1) It was a good amount to work with at a time (didn’t set up before I would use it all), and 2) if you mixed the full 50-pound bag all at once, you would need a bigger drill, or you would risk overheating your drill.
To begin, put the water in the bucket and then pour in the mix.
Next, use the drill paddle attachment to mix the thinset (mortar).
Make sure you follow the instructions on the bag. The package will tell you the amount of time that you need to mix. Normally, there’s a mixing phase, a rest, and then another mixing session.
The product I used required a mix for 5 minutes, rest for 10 minutes, then mix for another 3 minutes before it was ready.

STEP 2: Install the subway tile backsplash on the wall
Once your thinset is mixed, you are ready to apply it.
Choose the right trowel
Because we are installing subway tile, use a 1/4” x 1/4” square notched trowel.
SIDE NOTE: The type of trowel you use will depend on the size of the tiles you buy and the kind of tiling project you’re doing (e.g. flooring or shower wall), here’s a reference on what size trowel to use.
Apply the thinset to the wall
Scrape the thinset onto the wall using the square notched side. You want to apply enough so that you have a consistent square notch on the wall.

For edge pieces (bullnose), apply the thinset directly to the tile. This will reduce the mess and help with the cleanup after installing it on the wall.
If you do get thinset (mortar) on the wall, you can wipe it up easily with a wet towel.
How to arrange the tiles
You want to start tiling on one side (wall) at a time. And it’s a great idea to use a laser level to ensure that you have a straight line.
IMPORTANT: Turn off the power to any outlets or light switches in the area before you start, you don’t want to change getting electrocuted or cause a fire.
To start the first row, I recommend using half of a regular subway tile, so 3”x3”.
TIP: Have a bunch of these 3”x3” tile pieces cut before you start. I cut mine during the thinset mixing.
After the half, 3” tile, you will place a full tile and continue putting a full tile on the row until you need to make a cut around something or come to end of the wall.

You want to ensure that you have a gap between the tile to countertop and tile-to-tile. This is where you will use the 1/16” spacers.
SIDE NOTE: Remember, the tiles I used already allowed for the 1/16” space so I will not be placing spacers between each tile. If your tiles do not have this, you will need to put a spacer between each tile.

Place spacers at the bottom of the tile to give you a space between the countertop and the tile.
TIP: I highly recommend using the thinset removal tool to clean up the spacers if any thinset seeps between the gap. It helps after your tiles have dried because you cannot leave thinset in the space – you have to scrape it out before you install the grout. But by using this tool, you will have a lot less scraping and cleaning before grouting. I didn’t use this when I was tiling our shower and I spent hours and hours cleaning out the space between the tiles.

ANOTHER TIP: Only apply enough thinset on the wall that you can put a tile on within 20 minutes. And if you’re not sure how much that would be, work in a 2’ x 1’ section at a time. Thinset on the wall will dry quicker than in the bucket.
STEP 3 – Cutting tiles
Let’s talk about the areas where you have to cut the tile.
Because subway tile is glossy, a pencil will not work to mark the tiles. Instead, use a permanent marker. Don’t worry if you make a mistake – it easily wipes off.
When you mark the tile, you’re determining where to cut. You can use a tape measure or hold the tile up in place and mark it (watch the video below to see it demonstrated).

I like to place an X in the area that needs to be cut out. This avoids any confusion when I get to the saw.

When you are operating the tile saw, make sure you are wearing safety glasses and keep your fingers away from the blade at all time.
TIP: If you are making multiple cuts at the same size, I recommend clamping a board piece to the saw table to give you a consistent cut each time.

The tile saw that I used has a laser on it, making it easy to see where you’re making each cut based on your line. If you do not have a laser, make sure you look at the saw blade and align the blade to your mark.
When cutting to a point on the tile (not all the way through), the blade will not cut all the way through where you want.
In this case, cut the tile on the front side to the marked location, then flip over the tile (backside) and cut past the previously cut cutline to the thickness of the tile (approximately 3/16” to 1/4”, maybe more).
This will cut the tile straight through at the desired location.

After the tile is cut, wipe off the tile with a dry cloth and install it on the wall.

SIDE NOTE: I like to test the fit first.
Continue this process until your whole backsplash is installed.

Let the tiles sit, untouched, for 24 hours to dry completely.
After, you will clean the grout lines and tiles to prep for installing grout. If you are interested, you can learn how to grout the backsplash tile in another tutorial soon. Plus, you can see how to install the floating shelves over the tile.

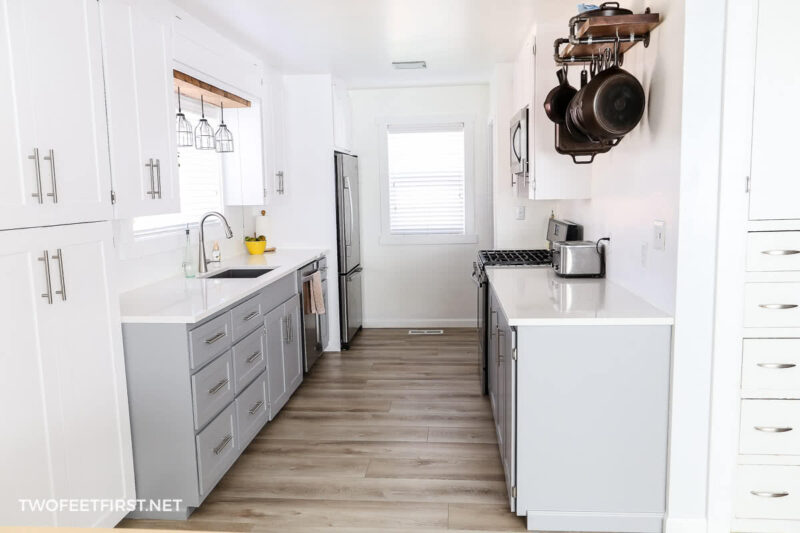
Here is the finished kitchen makeover. I still cannot believe I waited three years and only spent $150 later to have this gorgeous result.

FULL PROJECT VIDEO:
Are you someone that does better with visuals? Check out the full project video below and don’t forget to subscribe on YouTube so you don’t miss out on future projects!

Installing a subway tile backsplash in your kitchen is a great way to give it an instant update.
Imagine how spectacular your kitchen will look with a crisp, clean subway tile backsplash – get started now by following this tutorial!
The time invested in installing a subway tile backsplash yourself will be well worth it when you see how amazing your kitchen looks after completion.