Not getting enough light from your vanity light fixture? Find out how to move a light fixture to a new location while keeping the old intact!
It was a proud moment for us. We built and installed our own industrial vanity light. It was a gorgeous piece of art that was also functional.
But a few days later, we noticed something wasn’t right. The bulbs glowed too closely to our faces and cast shadows instead of providing helpful light.
Do you have a light above a bathroom vanity that needs to be moved higher, lower, or somewhere else on the wall?
We needed to move our new vanity light 5” higher for ideal placement.
SIDE NOTE: There is electrical involved in this project, so please make sure you turn OFF the power to the lightbox. I am not an electrician and you should be aware that there are dangers in doing this project yourself. Please be careful!

I decided to keep the old lightbox in place because it is already installed at the standard height of 80″ off the ground. Later, if we decide to change the light down the road, we could use the old lightbox at the standard height.
Disclosure: This post contains some affiliate links or referral links for your convenience. It is a way for this site to earn advertising commissions by advertising or linking to specific products and/or services. Click here to read my full disclosure policy.
How to move a light
MATERIALS:
- lightbox
- screws or nails
TOOLS:
- drywall saw
- razor blade
- screw driver
- small level
- safety glasses
- face mask (for dust)
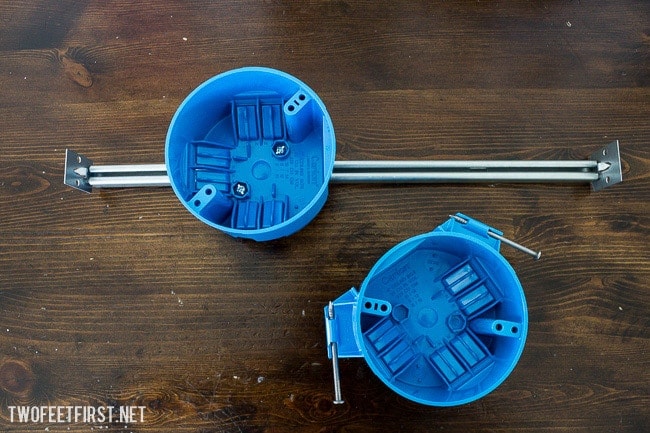
CHOOSING THE RIGHT LIGHTBOX
The first thing I did was buy my supplies. I was not sure what I would find behind the drywall so I bought two styles of light boxes: one for placement by a stud and the other that can be placed anywhere between two studs.
There are light boxes made for remodeling that would be easier to install but some sit on just the drywall. The light that I am installing has some weight to it so I needed one mounted to a stud.
VERY IMPORTANT: Turn OFF the power to the wires by turning off the breaker. After I turned off the power, I disconnected the light from the lightbox.


MARK THE NEW LIGHT PLACEMENT
Next, I took one of the new light boxes and traced an outline of a circle where I wanted the new box placed (5” higher). I then traced where the wires were coming into the box. In my case, they came from the ceiling.
CUT THE NEW HOLE FOR THE LIGHT FIXTURE
I then used my drywall saw to cut very carefully next to the lightbox, toward the ceiling to go around the circle I traced. I watched the wires to make sure I was not touching them (they moved if I got close).
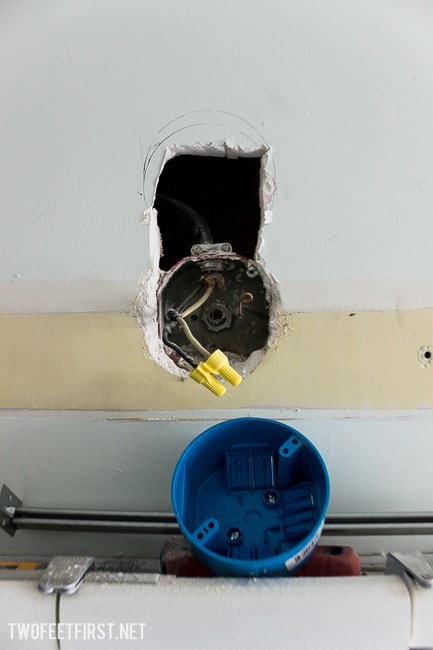
I discovered that my wires came from the lightbox up a few inches, then travelled to the left to attach to a stud about 4″ away. So now, I knew that I would be using the new lightbox that would fit between two studs. This also meant that I would need a larger hole to install this box.
I continued cutting around the circle I traced, plus a couple of inches further, until I could remove the wires from the old lightbox. I then moved the wires out the way to avoid sawing into them.
At this point, I cut out the circle plus enough room to get the new lightbox into place. This is what it looked like:

INSERT THE NEW LIGHTBOX
Next, I inserted the lightbox into the hole and aligned it into place. I then took 4 screws and attached the frame of the box to the studs (my screws were at an angle because my hole was too small to get a straight shot).
After securing the lightbox, I inserted the wires into the box. The last thing I had to do was patch the hole. You can see how to patch a hole in drywall in this post plus I have another tutorial on how to sand drywall to avoid dust in this post.
And here is our light at its new height after everything was adjusted.
The moment we turned it on, we knew it was finally at the right height.

What do you think? What would you suggest I do differently next time? If you are wondering, see how to make the swivel vanity light here. See you for the next ADVENTURE!


You did an amazing job! How hard was it to patch the wall once you were finished? I plan to move my light fixture up about 6 inches so that I can then move my vanity mirror to account for the vanity raise. I’m hoping it turns out ok! Lol
Hi Domi! Thank you for that sweet comment! Patching the wall was not very hard, I actually have a tutorial on how to do that, which is from this same project! The process is not hard but it does take time because you have to let the mud dry. Hope this tutorial helps and I hope you love your new vanity better.