It’s so easy to make a DIY rolling pin for your next kitchen masterpiece or everyday cooking – you can even customize it!
When you bought your first rolling pin, did you just grab the first thing you saw in the store?
Chances are, you chose a classic wooden rolling pin, with a bar and two contoured handles at the ends.
But that’s just one type in a sea of rolling pins!
By far, my favorite is the wooden dowel rolling pin.
This all-purpose tool gives you better control, requires less arm pressure and is easy to clean. Plus, you can use the ends to crush food into smaller pieces.
But this type of rolling pin can be more expensive than the basic pin with handles. As lovely as it looks in the store, I can’t bring myself to spend that kind of money on a kitchen tool. I’d rather spend it on the food!
Then, one day, it hit me (the idea, not the rolling pin). I can make my own rolling pin! I found out it’s very easy to make.
Oh, have you watched the mesmerizing videos on how to make a rolling pin or wooden bowls? I can’t be the only one who watches random wood crafting videos.
In these tutorials, the machine that is used is amazing! It’s called a Wood Lathe (the process is also called wood turning). It’s one of those machines I would need if I had my own workshop and enough money for all the tools I wanted. Maybe someday…
But enough dreaming! Let’s get back to creating a simple rolling pin, one that anyone can make.
I’ll show you how it turned out and you’ll see the second one I made with a little more detail.

Disclosure: This post contains some affiliate links or referral links for your convenience. It is a way for this site to earn advertising commissions by advertising or linking to specific products and/or services. Click here to read my full disclosure policy.
DIY rolling Pin
MATERIALS:
- 1.5″-2″ wooden dowel (we used a 2″ maple)
- 120 Grit Sandpaper
- 320 Grit Sandpaper
- Mineral Oil (found in the pharmacy, less than $3)
NOTE: You could use beeswax with mineral oil to sill the wood.
TOOLS:
- miter saw
- safety glasses
- face mask (for dust)
- ear protection
For your dowel, you can use any type of hardwood that’s available (maple, walnut, oak, ash, beech, teak, etc.).
STEP 1: CUT THE WOOD DOWEL
Select a 1.5-2″ wood dowel and cut it to the desired length you want your rolling pin. Some stores will even cut the dowel for you.
We purchased a 2″ maple dowel from our local woodworking store for $16. The dowel was 36″ (3ft) so we decided to cut the dowel in half so we could have two rolling pins at 18″.
STEP 2: SAND THE DOWEL
Sand the dowel with 120 grit sandpaper, followed by 300 grit sandpaper.

Clean the dowel when you’re finished, making sure there is no dust from sanding.
STEP 3: APPLY OIL TO THE DOWEL
Apply mineral oil to the dowel making sure to cover the entire surface.
Think of it like applying stain to the wood.
Let the dowel sit overnight.

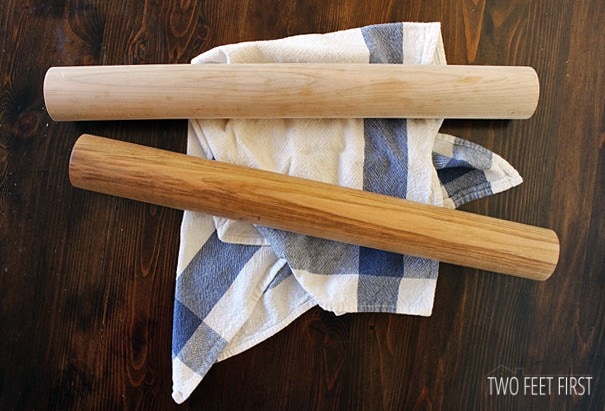
Here is the difference between one dowel with mineral oil (bottom) and one without (top). Notice how it brings out the colors in the wood.
STEP 5: REPEAT THE PROCESS
Lightly sand the dowel again with the 300 grit sandpaper. Wipe clean then apply another coat of mineral oil. Let the dowel sit again overnight and apply a third coat of oil if needed.
The rolling pin is ready to use.

**Like all wooden rolling pins, it will need to be re-oiled occasionally. And never put it in a dishwasher to clean or sit in water. The rolling pin above was only wiped with a dry paper towel to remove the flour.**
Quick and simple, right?
ADDING MORE DETAIL (OPTIONAL)
Now, let’s add a little more detailing to the rolling pin. How about beveled edges for a timeless look?

To get this look, you will need a chop saw.
After completing step 1 earlier, move the chop saw blade to a 45-degree angle.
Mark the end of the dowel into 8 equal parts. I used our apple slicer, which has never been used to cut apples because we always forget. So, if you have an apple slicer, lightly press down until you have little indentations in the wood.

If you notice in the picture below, I pressed some areas a little harder than needed.

Now, time for the chop saw! Place a marking straight down on the saw.
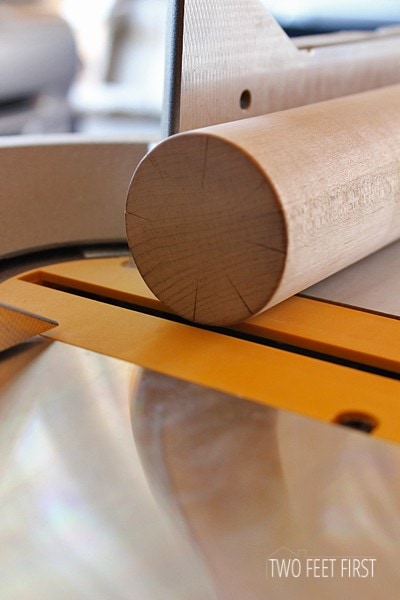
I preferred the edge of the dowel to be even with the hole that the blade enters (cover the hole).

Now, make the cut.
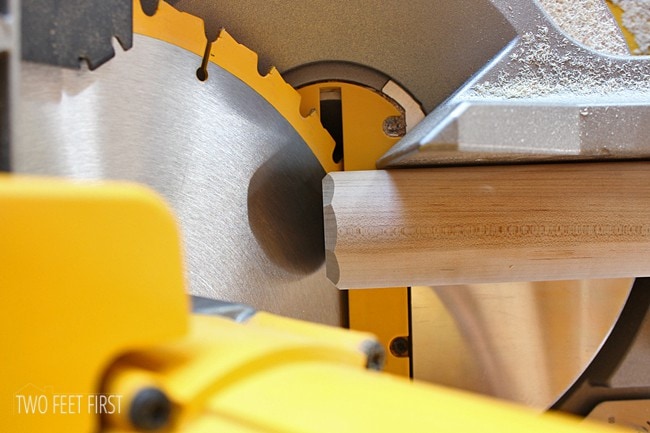
Continue this around the whole dowel until you have 8 cuts (you could do more or less).
Then, repeat the process for the other side of the dowel.

After cutting, go back to step 2 and complete all the steps to finish the rolling pin.
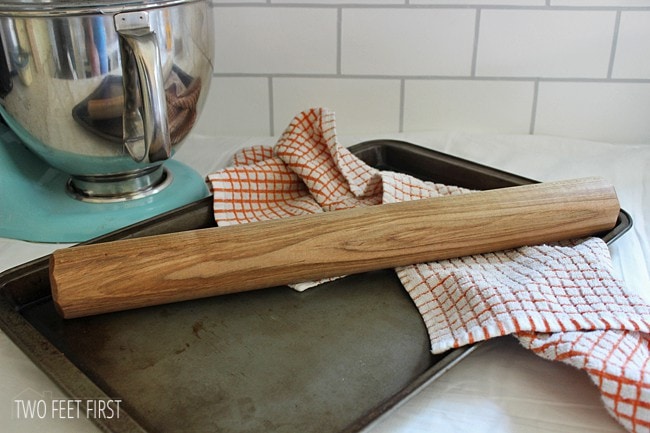
And that’s how to make a simple but sturdy rolling pin for less than $10 each. What do you think?


Hi Megan, I just found you through Karen’s Up The Hill Link Up. :)
This is genius! I love the rolling pin!!
I have two in my collection, one was my grandmothers and one I found at an antique store. I have never seen one like you made before, and love the design and the price!
Kimberley
Hi Kimberley! Thanks for checking out my blog. We are loving the new rolling pin and the price is amazing. It’s always nice having something that was grandma’s, it makes it mean so much more!