Learn how to make a homemade alternative Christmas tree with this step-by-step tutorial to create your own DIY wall mounted Christmas Tree, perfect for any room in your home.
Every Christmas, I have the same problem: what kind of tree are we getting?
I love the smell of real trees – the fresh, natural scent is always welcome but not the dry pine needles on the floor or the constant watering. And buying a new one each year is expensive!
I could invest in an artificial tree but I do not want to store these bulky pieces in my basement for 11 months out of the year.
So I finally came up with a solution with a DIY wall mounted Christmas tree.
This alternative fabric Christmas tree takes the hassle out of the holidays (and out of my basement) and I love it!

Let me share how you can create this simple, homemade fabric Christmas tree.
Disclosure: This post contains some affiliate links or referral links for your convenience. It is a way for this site to earn advertising commissions by advertising or linking to specific products and/or services. Click here to read my full disclosure policy.
DIY WALL MOUNTED CHRISTMAS TREE
MATERIALS:
- two yards of green utility fabric or green felt (this will be enough for about a 6-foot tree)
- Christmas lights
- Command small decorative hooks
- Command poster strips
- yellow paper or fabric for star
- printer paper to make the pattern
TOOLS:
- fabric scissors
- ruler
- clear tape
- sewing pins
TIP: Look for a fabric that does not fray. Also, some fabric should not be ironed so keep that in mind when you’re shopping!
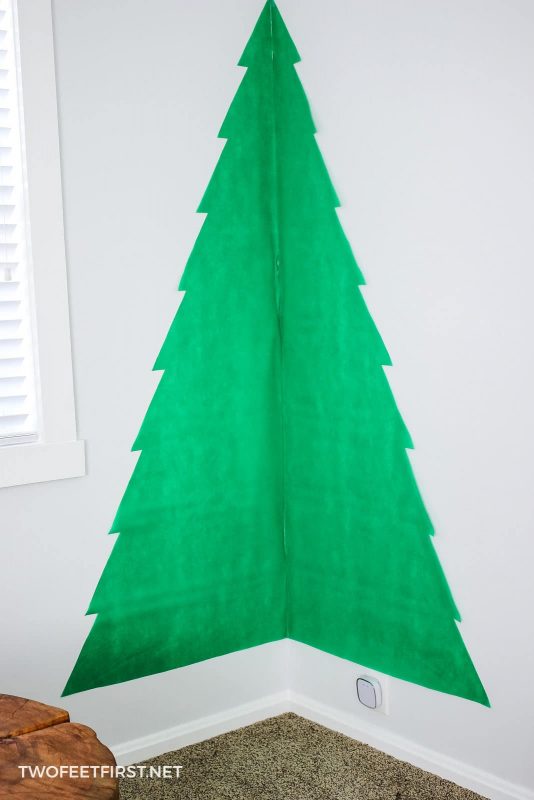
You can place this wall-mounted Christmas tree on any wall or corner of a wall. I decided to place mine in the corner of my living room.
STEP 1: CREATE YOUR CHRISTMAS TREE PATTERN
Using regular printer paper and a ruler, create the shape of your tree.
Starting at the top corner of one paper, measure and mark 9″ at a 30-degree angle. Then, draw a 1-1/2″ line back to the side of the paper. This is the first branch of the tree.
Starting at the last marked line, continue this pattern for the whole Christmas tree. Add more paper with clear tape to expand the pattern.
Once I had the height I wanted, I cut the Christmas tree shape from the paper. This is the tree pattern I used:

STEP 2: CUT YOUR FABRIC
Now, take the pattern and place it onto the green fabric.
SIDE NOTE: You will want to have two pieces of fabric folded together or if the pattern is too wide, cut a single layer of fabric, then cut the other side of the pattern.
Pin the pattern to the fabric so. it does not move around. Then, cut the fabric according to the pattern.
STEP 3: ATTACH THE FABRIC TO THE WALL
It’s now time to secure the fabric onto your desired wall.
Place the fabric onto the wall and leave about a 10″ gap at the bottom of the fabric to the floor. You can have more space or less, depending on how you want it to look.
I would recommend taping the fabric first to the wall so you can adjust the fabric if needed. Once you are happy with the placement, use the Command poster strips to secure the fabric to the wall according to the directions on the package.

I placed one strip at the top and two at the bottom corners of each fabric piece (6 in total).
STEP 4: INSTALL WALL MOUNTED CHRISTMAS LIGHTS
I personally do not think a Christmas tree is complete without Christmas lights so I had to add them and I wanted to make the tree look 3D.
Installing the wall mounted lights was easy using the Command small decorative hooks.

SIDE NOTE: We also used these hooks to put lights around our windows.
I placed one hook at each branch and installed according to the instructions on the package. I also placed one at the top of the tree.
TIP: Place the hooks onto the wall, not on the fabric.
Starting at the top of the Christmas tree, I hooked the strands of lights, then I moved down the tree in a zig-zag pattern until all the hooks were used.

STEP 5: CREATE A STAR AND ADD ACCESSORIES
Once the lights were installed, I cut a star out of paper. My son colored it yellow and I taped the star to the wall at the top of the Christmas tree.

And that’s how to make a DIY wall mounted Christmas tree! Don’t you love the glow and the 3D effect of the lights?
If you like, you can add ornaments to the lights but I would recommend only placing ornaments that are lightweight. Maybe you can make some homemade wooden picture ornaments. Or you could hang Christmas cards from the tree!
We love the look of this Christmas tree and so does everyone else who visits. It almost reminds me of a Christmas tree you would find in Dr. Seuss’ Whoville.
And the best part is that it solves my Christmas tree problems – no more mess, it costs less than $20, and takes barely any room to store all year.
I hope this homemade wall-mounted Christmas tree will help you decorate your home for Christmas!


Megan,
You are SO clever! I love this idea for our kid’s rooms. Thank you for all he step by step details and measurements.
I hope you have a lovely Christmas.
Thank you, Meegan!
I LOVE this so much!! I love the creativity, the price tag, the slim storage! Such a creative way to have a tree and to use 3M hooks. (3M should put you in their commercial next year!!). Merry Christmas, my friend :)
LOL, that would be amazing! Thanks, Eileen!
What an absolutely brilliant Christmas tree idea!!!
I really like it, thanks, Lidia!
What a great project, I love the space saving idea of this awesome tree! The lights are perfect to give it dimension.
Thank you, Toni!
What a fantastic alternative to a real Christmas tree! I love how it looks 3D with the lights on in the dark. I also love how easy it looks to put up. Perfect!
Thank you, Amy!