A STEP-BY-STEP TUTORIAL ON HOW TO CREATE A DIY LIGHTED OUTDOOR CHRISTMAS TREE FOR YOUR HOME THIS HOLIDAY SEASON.
It’s the holiday season and the whole block is ready for it!
All the neighbors’ lights are up, the reindeers and Santas on the lawns are glowing and you can almost hear the Christmas carols in the wind!
Outdoor Christmas decorations are a must – it’s the first thing your visitors will notice.
But when it’s your turn to decorate, do you have the patience to untangle the lights and sort out all the inflatables from last season? Or the money to buy new decorations?
This year, ditch the messy lights and try something new – a festive holiday decoration you build yourself!
Here is a simple way to decorate by creating a homemade, outdoor Christmas tree with lights. It’s easy to build, affordable, and it looks good both during the day and at night!

Disclosure: This post contains some affiliate links or referral links for your convenience. It is a way for this site to earn advertising commissions by advertising or linking to specific products and/or services. Click here to read my full disclosure policy.
DIY LIGHTED OUTDOOR CHRISTMAS TREE
MATERIALS:
- 3-1/2″ cedar fence pickets
- 1″ exterior wood screws
- 1-1/4″ exterior wood screws
- wood stakes
- green spray paint (I used hunter green)
- Christmas lights
- 1″ wire nails
TOOLS:
- miter saw
- drill with 1/8″ drill bit
- clamp
- spray grip tool (optional)
- safety glasses
- face mask (for dust)
- ear protection
SIDE NOTE: The amount of supplies will depend on the number and size of trees you make. The larger ones I created used about three cedar pickets.
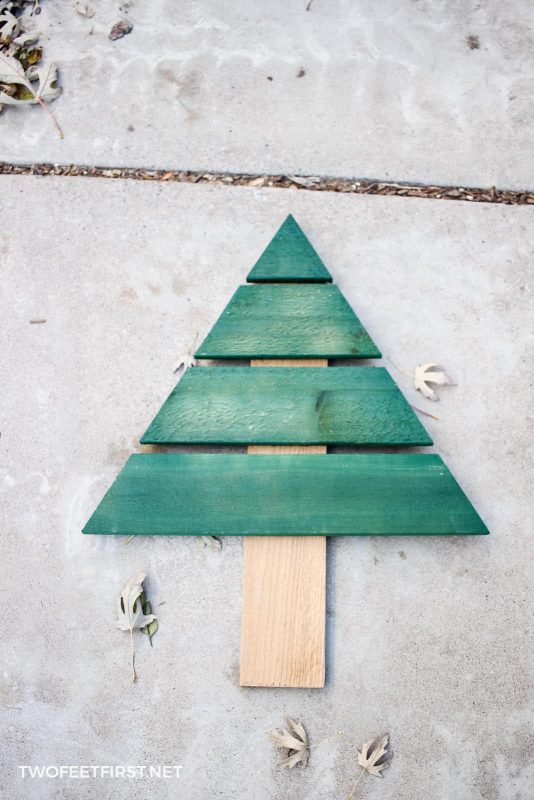
STEP 1: CUT THE CEDAR PICKETS
Decide how tall and wide you want your tree, depending on where you will place it. This will help you determine the angle to cut your boards. I decided to cut two trees at 30 degrees and the last one at 25 degrees. The smaller the degree, the skinnier the tree will be.

Once you decide on the angle (degree), it’s time to start cutting.
Take one board and cut the end at this angle. Then, flip the board and cut the end again so that you have a point of the top triangle. This is your top branch of the tree.

Next, place the wider part of the triangle (bottom) on the uncut board (where you just cut your last piece). It will look something like this:

See how the angles of the boards are going different directions? Also, notice how the pieces are NOT aligned at the edge; there is about a 1/4″ space. This is the space you want in between the two boards once the tree is assembled. If you want a different look, give this a wider gap.
When you have the spacing you want, mark the other end of the top board but only on the wider side. You only mark the wider side because the angle of your next cut will go a different way. You will see what I mean when you go to cut the board.
Now, move the top board and place the marked board on the miter saw. Adjust the angle of the blade to match the marked line on the board. Then, cut along the line you marked.
Once the board is aligned, make your cut.
Then, use this board to create the next board (branch) just like you did before. Repeat this cycle until you have the number of boards needed to create the height of tree you want.
TIP: Place the cut boards on a flat surface to see how tall it is.
Next is cutting the center of the tree that holds it all together. Using a cedar board again, cut the tip of the board to a point (make two angled cuts).
Then, decide on the length – this would be the size of the branches with the spacing plus at least 3″ for the base. When you have decided, cut the board to that length with a straight cut.

STEP 2: PAINTING THE BRANCHES
After you have cut all the wood, place the branches (angled cut boards) on an old sheet, cardboard, or newspaper so you can spray paint them.
TIP: Place the branches like they would be on the tree to keep the boards together and in order.
Once the boards are laid out, spray paint with a green spray paint in slow, even coats.

I only applied one coat of paint because I was going for a specific look, so apply as many coats as you would like.
Let the paint dry according to the instructions on the container.
STEP 3: BUILDING THE CHRISTMAS TREE
After the paint has dried, it’s time to assemble your Christmas tree.
Take the board that is the center of the tree and the top branch (the triangle piece). Clamp the two boards together so that the green part of the top branch is facing out, centered, and the centerboard is hidden.
Take the drill with the 1/8″ drill bit attached and create a hole from the centerboard to the branch. Make sure you do not drill through the branch completely.

TIP: It’s always a great idea to pre-drill because if you do not, you can split a board.
Then, use the 1″ exterior screw to attach the two boards together.
SIDE NOTE: If you only use one screw, the branch will move, two screws will hold it in place.
Once the first branch is attached, move to the next branch but this time, space the top branch the distance of the gap you determined in step 1. Make sure the green part of the branch is facing out and the branch is centered, then clamp the board to the centerboard.
Attach the two boards together, like the previous one, then drill a hole and use 1″ exterior screw. Repeat this process until all the branches are added to the tree.
Next, attach a wood stake to the back of the tree using the same method (drill hole) but this time, use the 1-1/4″ screws.

SIDE NOTE: You will need to decide on how much of the stake will go into the dirt.
STEP 4: ADDING THE LIGHTS (OPTIONAL)
I found that the easiest way to add Christmas lights is to place a 1″ nail onto the back end of a branch. This nail will not be completely nailed into the board. After the nail is added, the Christmas lights will wrap around the nail and look something like this:
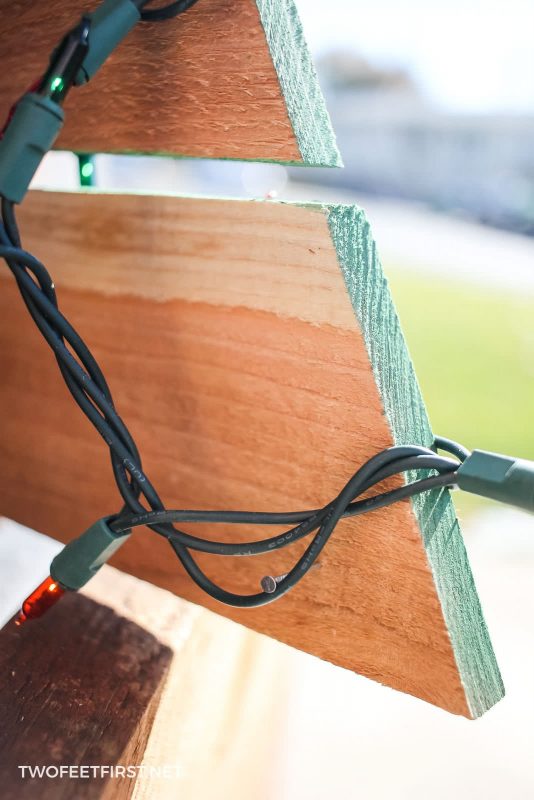
I did this to make sure the lights would stay in place but they could be removed if wanted.
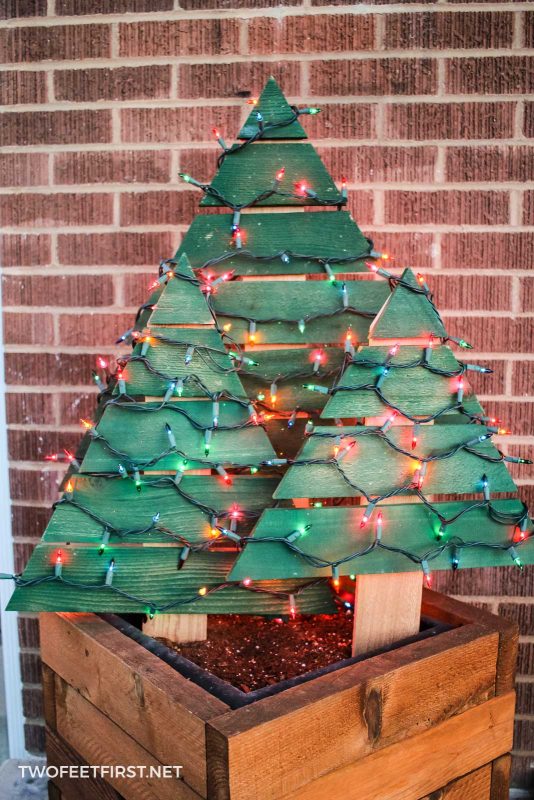
And that is how to DIY a lighted outdoor Christmas tree in four easy steps.
I hope the tutorial will help you create your own homemade outdoor Christmas decoration just in time for the holiday season!


These are so cute and so creative! I love the idea of adding a stake to them in order to use them in a planter. :)
Thank you, Amy!!
Beautiful Outdoor Decor! Love your use of lights in every project.
Thanks, Anam! Yes, I think I have a love for lights, lol.
Great idea! These look awesome!
Thank you, Amy!
These trees look great and I love how you have them displayed with lights.
Thank you, Sarah!
These are really REALLY cute!
Thank you, Carmen!
I love how the colored lights look on these little trees… I bet you could make an entire forest of them! So sweet!
Thanks, Betsy! I debated on making a bunch for the front yard, maybe I will make a forest!
Love this! I love that you included the predrill tip, it makes all the difference. I learned the hard way haha!
Yes, predrilling is a very important step in any wood project!
This is a so pretty!! I love the simplicity and the rustic touch of this project! Great step by step tutorial, you always explain things so well!!
Thank you, Brooke!