A STEP-BY-STEP TUTORIAL ON CREATING A DIY HOLIDAY WOOD SIGN WITH LIGHTS, THE PERFECT CHRISTMAS HOME DECORATIONS.
When it comes to Christmas decorations, don’t you love getting creative?
If you want, you can change up the theme every year. But if you’re like me, you stick with what you love and add a few more items to your collection each season.
So when the holidays get closer, I start to think about what I can make this year. It has to be simple enough to coordinate with my other decorations but it also has to be unique.
And what’s more unique than a rustic DIY holiday wood sign with red marquee letters?
And did I mention that they can light up too?
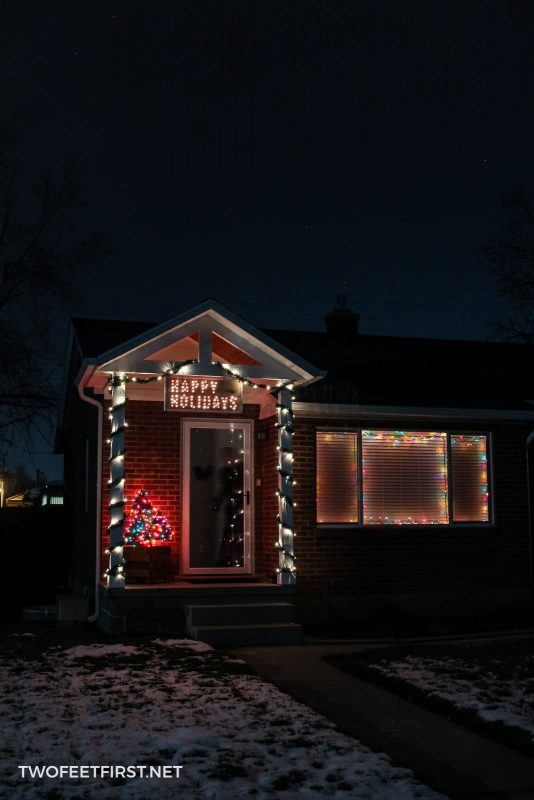
This holiday sign would be fantastic for any room in your home or even for the front porch.
In this project, we’re going to cut out these cute, wooden letters using the Jig Saw so get ready to have some fun with it!


Disclosure: This post contains some affiliate links or referral links for your convenience. It is a way for this site to earn advertising commissions by advertising or linking to specific products and/or services. Click here to read my full disclosure policy.
MATERIALS:
- 1/4″ x 2ft x 2ft MDF sheet (or 6″ letters)
- 6″ or 6.25″ paper cutouts letters
- 1″ x 8″ x 6ft board
- 1″ x 2″ x 6ft primed board
- 1″ x 2″ x 4ft primed board
- #220 grit sandpaper
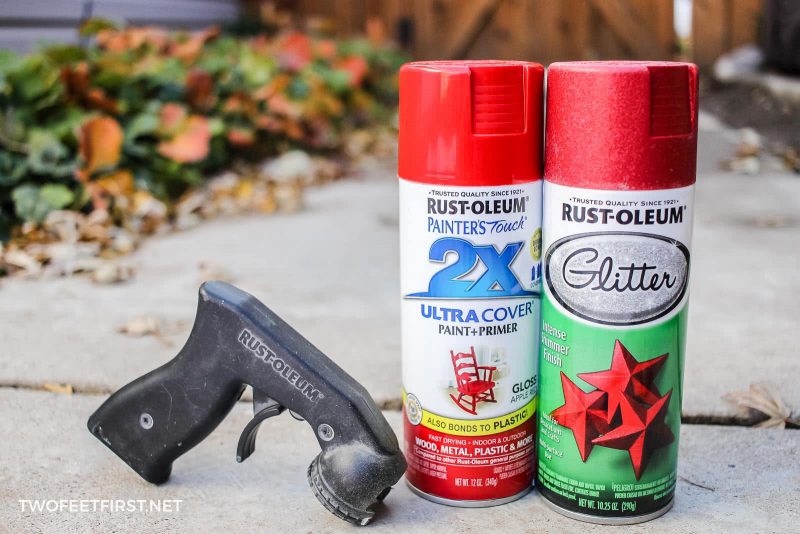
- red spray paint (or different color)
- red glitter spray paint (or different color)
- liquid nails
- white paint
- tung oil
- 100 Christmas lights
- 1-1/4″ screws
- 1/4″ plastic wood staples (something to hold lights in place)
TOOLS:
- Jig Saw
- drill with 3/8″ & 5/16″ drill bit
- spray grip tool
- miter saw
- Kreg Jig K5
- hammer
- safety glasses
- face mask (for dust)
- ear protection
STEP 1: MAKE WOODEN LETTERS
To save money, I made my own wooden letters. Plus, I could choose the font I wanted and my Jig Saw made the cuts quickly and neatly.
I prefer using MDF for this project. You could use plywood but MDF is easier to cut and sand and looks more finished.
Videos make it easier to see the process so have a look at the steps I took to create handmade, wooden letters.
For the paper cut-out of each letter, I used Impact font at 575 size. For the marquee style of lettering, block letters look good and they’re easier to cut out.
The first step was tracing all the letters onto the MDF sheet.
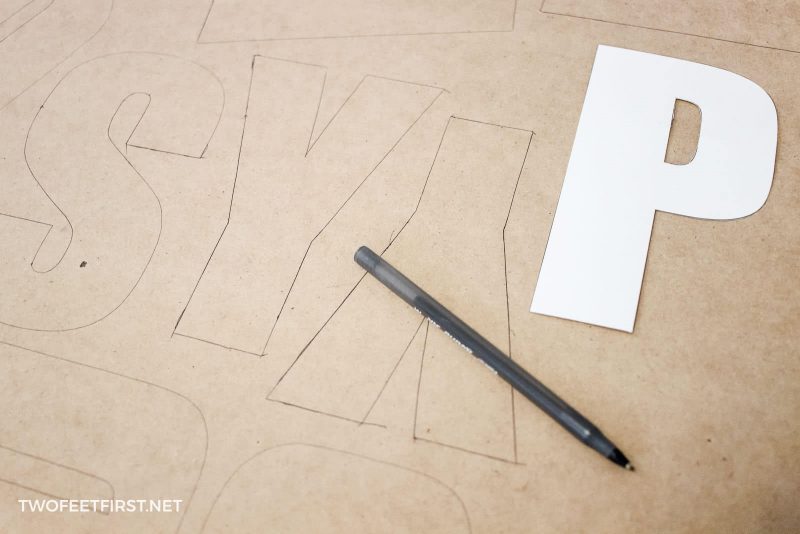
TIP: MAKE SURE YOU ARE TRACING THE RIGHT SIDE UP.
Then, I took the drill with a 3/8″ drill bit (large enough to fit the blade of the Jig Saw) and drilled a hole through the middle of any letter that needs an inside piece cut out (example: A, P, O, & D).
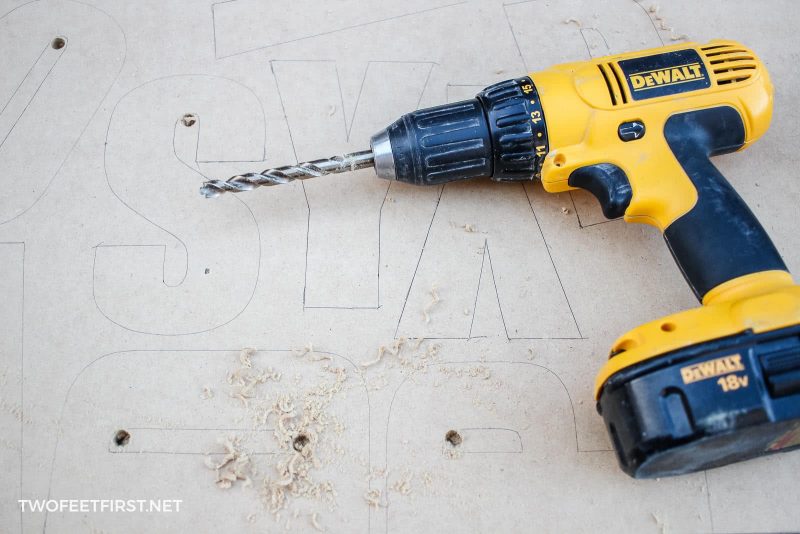
Next, I cut out each middle section from those letters with the Jig Saw, using the drilled holes as my starting point.

Then, I cut out each letter completely.

IF ADDING LIGHTS:
This is the best time to drill 5/16″ holes into the letters for the lights.
To give you an idea of where to drill the holes, place small screws with the heads down onto the letters so you can see what it will look like.
Remember, you only have 100 lights so I would recommend drilling no more than 92 holes or you will need another strand of lights.
Once you are happy with the placement, mark the spot with a pencil.
SIDE NOTE: I tried to drill my holes after the whole sign was assembled and it was a disaster, so please drill the holes before painting the letters.
Once everything is marked, drill a hole through each mark.
TIP: It will help to clamp the letters in place on a scrap board.
Once each letter was cut, I took #220 grit sandpaper and sanded each letter around the edges.
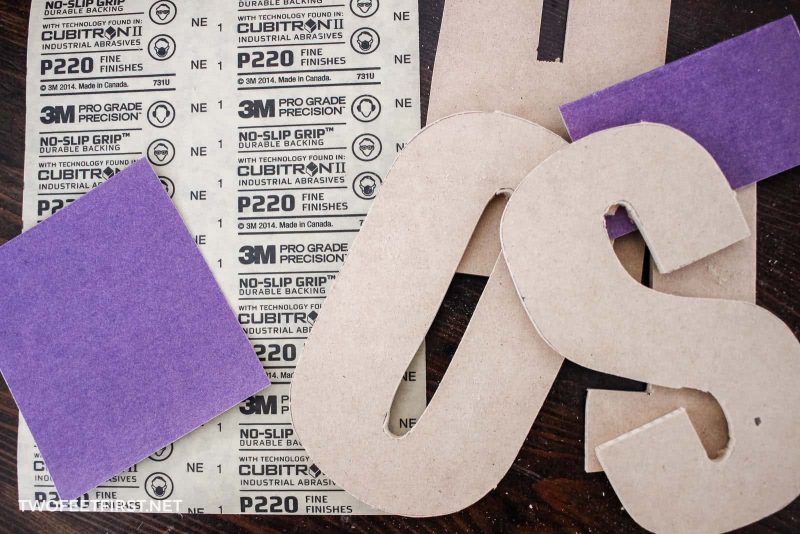
SIDE NOTE: I wiped each letter with a cloth to remove the dust.
And that’s how I created my wooden letters.
STEP 2: PAINTING
SIDE NOTE: This was a step I had to repeat because I thought the glitter spray paint would be red enough for the letters. But I was wrong! Learn from me and make sure you use a solid color before spraying the glitter paint.
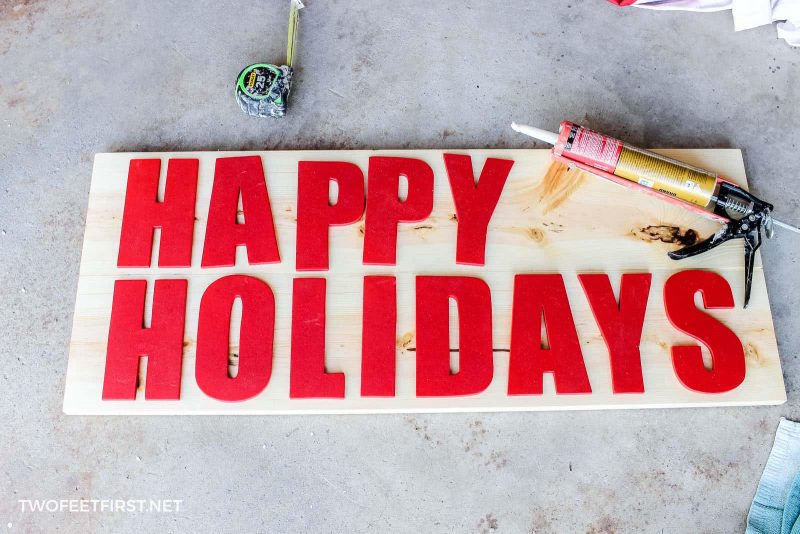
Start by painting each letter, even the edges, with the red spray paint. Make sure you apply light coats and use the spray grip tool so you do not paint your fingers too. Two coats of red paint is usually enough.
Once the red paint is dry, apply the red glitter paint the same way (I only painted the front of the letters this time). Again, I applied two coats of glitter paint.
After painting the letters, you will need to paint the 1″x2″ boards with white paint (remember, the boards are already primed). But, before you paint, cut the boards at 16″, 16″, 36″ & 36″ (you will be cutting the 6ft board in half). Sand the ends if needed; then, start painting. I always like to apply two coats of paint for a streak-free finish.

STEP 3: BUILD THE FRAME
Take the 8″ board and cut it in half, at 36″ (will be closer to 35-15/16″ because of the blade). After the boards are cut, Kreg Jig one side of one board in four places. These pockets will be used to attach the boards together – see image below for example.
Now, sand the boards using #220 grit sandpaper.
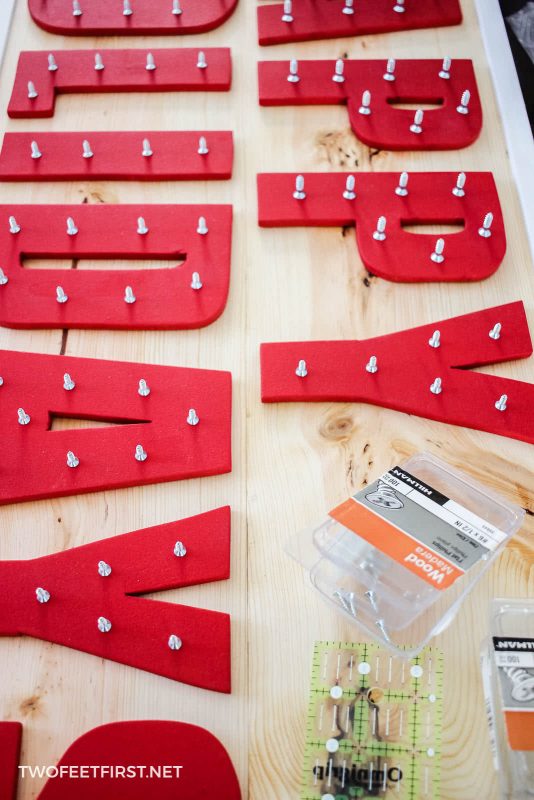
Next, attach the two boards together. You can use clamps but if you do not have the correct size, like me, use a wall. Make sure the boards are aligned and attach them together using the 1-1/4″ screws.
Here is what my method looked like:

SIDE NOTE: In the picture, I have eight pocket holes; this is because I had my Kreg Jig set incorrectly and had to redrill the holes.
After, you need to add Kreg Jig pockets all around the frame. Make sure these are added on the same side as the last pockets. Place three on the 16″ sides and four on the 36″ sides. These pockets will be facing out and are how the white trim will be added.
Then, take the Tung Oil and apply the finish to the front of the boards. I do this the same way you would apply stain (with a rag) and I add 2 coats.
Once the Tung Oil is dry, it’s time to attach the 1″x2″ trim boards.
Place a sheet on a flat surface (to prevent scratching) and put the 36″ trim piece down. Then, take some scrap 1/4″ MDF pieces (or your letters) and place those on the surface.
Next, place the wooden frame (two 8″ boards that are attached) on top of the scrap pieces with the pockets facing up.
Align the frame and the trim piece by using a wall or clamps, then attach with 1-1/4″ screws. Attach the other 36″ trim piece the same way.

Finally, attach the side trim pieces in the same way.
And that is how you create the frame for your sign.
STEP 4: ATTACH LETTERS ON THE FRAME
Now that the frame is created, the letters can be glued in place. Arrange the letters on the frame. I placed each word on one board, left-justified.
SIDE NOTE: I glued the letters on during the last step but I would recommend waiting so that you do not scratch the paint of the letters.
IF ADDING LIGHTS:
Once you are happy with the arrangement of the letters, take a pencil and mark the frame where each drill hole will be. After you have marked each location, take a 3/8″ drill bit and drill a hole on each mark.

Sand the wood of the frame if needed and wipe the board clean.
Then, arrange the letters on the frame again, making sure the drill holes all align.
Remember: You should already have drill holes in your letters for the lights before you painted the letters. I didn’t drill holes until later, and I regretted it.
Once you are happy with the arrangement, use Liquid Nails to glue each letter in place.

TIP: PRESS THE LETTERS ONTO THE FRAME AND HOLD IT THERE FOR 30 SECONDS. ALSO, IF ANY GLUE SEEPS OUT FROM AROUND THE LETTERS, USE A Q-TIP TO REMOVE THE EXTRA IMMEDIATELY.
After all the letters have been glued, let the frame sit for 24 hours to let the glue dry completely.
If you are not adding lights, the sign only needs a hanging device and it’s ready to hang or sit on your fireplace mantel.

STEP 5: ADDING THE LIGHTS
Once the letters are attached to the frame, it’s time to string the lights. I would recommend placing all the lights first to check the best layout.
Here is what my layout looked like:

Some areas needed an extra light in the space to make the distance to the next hole.

Once you are happy with the layout of the lights, use 1/4″ wood staples (they are plastic with a nail) to secure the wire of the lights to the wood.

Place as many staples as needed.
Your sign is now complete!!

SIDE NOTE: I plan on hanging my sign outside so I will place a painted wood back to cover the wires. I will share a picture once it’s complete.


Here’s what it looks like all lit up!
I love how the grain of the wood adds character to the sign. It’s rustic, glamorous and cozy and it was a fun project to make.

If you are looking for more holiday decorations, here are some more projects you will love:


This is so cute and I LOVE the lights!!!! I need to make one! Pinning!
Thanks, Samantha, I am happy with the way it turned out!
oh my goodness, I LOVE this!!! It’s so bright and cheery!
Thank you, Carmen!
Oh wow this looks amazing. The lights make it look Beautiful.
Thank you, Anam, I was hoping the lights would bring it all together.
This looks great! It will be perfect displayed outside!
Thanks, Amy. Now I am trying to decide the best way to hang it without drill a hole into my porch…
Wow! This wood sign is amazing! thank you for the step by step tutorial. You thought of everything.
Happy Holidays!
Thank you, Meegan. Happy Holidays to you too!
Thank you for sharing such a great idea for a sign! And thank you for including the mistakes you made too, that’s the real side to DIY most won’t talk about, but I truly appreciate the heads up! Love the way it turned out.
Thanks, Brooke! I agree most people pretend everything worked out great but it sometimes does not go as planned and we do need to share those times!
Oh my gosh, this is so cute! I’m super impressed that you cut all the letters yourself. And the lights just take it to the next level. Love it!
Thanks, Amy! I was wondering how cutting the letters would be but it was easier then I thought. I will probably do it again for another project!
This is the best!! I am going to try to make one!
Thanks, Jessica!
I love this sign, it’s so bright and fun. Great tutorial for adding the lights, thanks.
Thanks, Sarah!
Great project! Really great tip for how to find the perfect placement for the lights. It looks great and I love the red letters against the wood backing
Thank you, Toni!
This is insanely good!!!!!!
Thanks, Lidia!
Super cute! I love it with the lights!
Thanks, Kristen!
Dag- I’m not going to lie- this is freakin’ awesome! I love this sort of marquee look! Your work paid off on this one for sure.
Thank you so much, Christine!
I love the lights. Christmas lights make me so happy!
Thanks, Kenya!
I love how this turned out! The Christmas lights are a great touch.. it turned out so nice!
Thank you, Betsy!
This turned out amazing, Megan!! Send me one, please :) :)
Thanks, Eileen. I would love too but I think shipping could be exciting, lol.