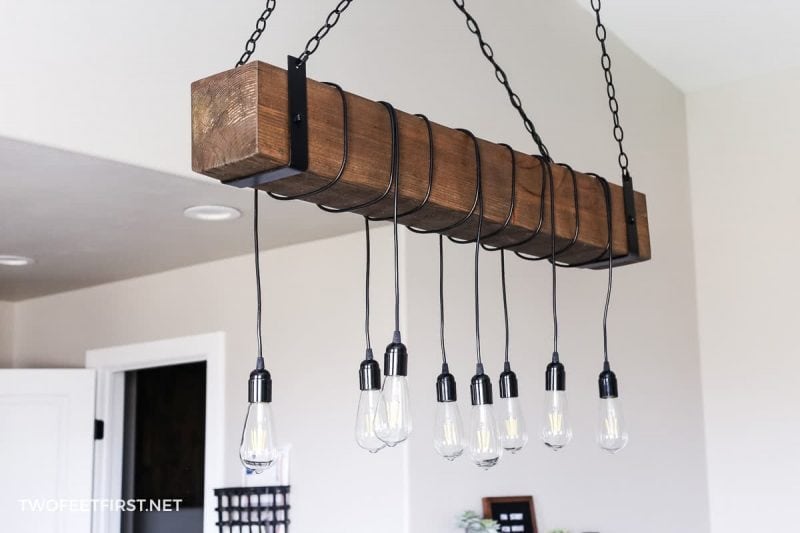
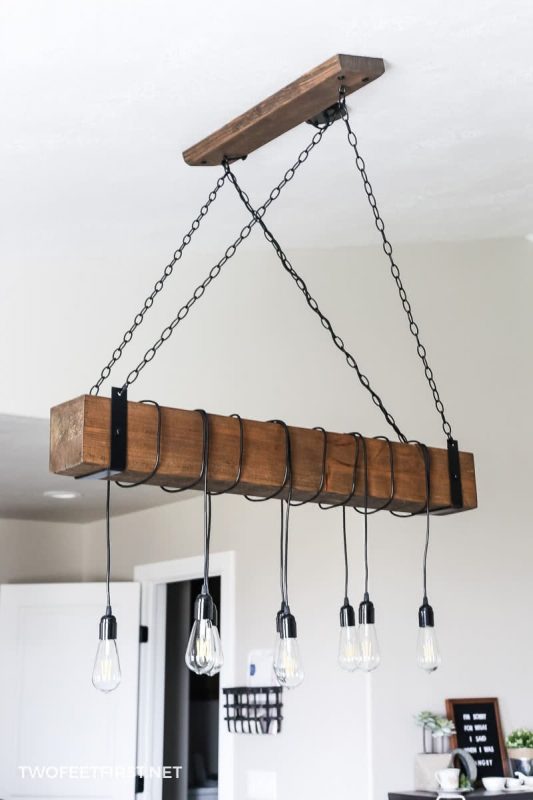
A tutorial on how to create a DIY farmhouse beam chandelier for your kitchen or dining room.
I had the privilege of making this rustic light fixture for my sister-in-law. She had the vision of this custom chandelier drawing inspiration from a bunch of wood beam chandeliers on Etsy.
Disclosure: This post contains some affiliate links or referral links for your convenience. It is a way for this site to earn advertising commissions by advertising or linking to specific products and/or services. Click here to read my full disclosure policy.
This DIY farmhouse wood beam chandelier was easy to design and construct and it turned out amazing! I want to share the process with you so you can create your own custom wood beam chandelier for your dining room.
WHAT’S THE COST TO BUILD A BEAM CHANDELIER?
For this farmhouse chandelier, the cost will be around $120 if you build the light fixture yourself.
There is an additional cost of $25 to make your own metal bender (if you don’t have one already) and a few other tools. I’ll talk more about this later in the post.
I also saved money by using a scrap 8″x8″ beam that my brother already had at his house.
I would guess the cost of a beam would be about $30 (this could be a bit higher or lower, depending on the size and type of wood you find).
So, your total cost will be closer to $150.
Now, let me share the supplies and tools I used.
DIY FARMHOUSE WOOD BEAM CHANDELIER
MATERIALS:
- 4ft beam (mine started at 8″x8″, I will explain below)
- 2″x width of beam x27″ board (for ceiling)
- 1/8″x1-1/2″x48″ flat steel bar
- six: 1/8″ quick links
- four: 5/16″x1-1/2″ hex head lag bolts
- four: 5/16″ metal washers
- four: 1/4″x4″ hex lag screw
- six: 1/4″ metal washers
- black chain
- single hole black canopy
- two: 1/4″x 2″ eye bolts
- black spray paint
- eight pendant light fixture
- black cloth wire
- wire connections (for wiring)
- 1/4″ black staples (for holding wires in place)
- stain and wood finish
- #220 sandpaper
TOOLS:
- miter saw &/or table saw or/& circular saw
- metal brake (see below)
- drill
- 5/16″ metal drill bit
- wire stripper
- pliers to break chain links
- tape measure
- 3/4″ spade bit
- 1/4″ wood drill bit
- stud finder
- orbital sander
- hacksaw
- metal file
- ladder
- safety glasses
- face mask (for dust)
- ear protection
SIDE NOTE: There is electrical work involved in this project, so please make sure you turn OFF the power to the lightbox. I am not an electrician and you should be aware that there are dangers in doing this project yourself, so please be careful.
STEP 1: MARKING YOUR CEILING FOR PLACEMENT
To mark your ceiling placement, determine where you want the center of your beam on your ceiling. This placement will most likely be centered over a table or island.
This center point will be the center for your ceiling support too.
Now you need to determine where the trusses (studs) are in the ceiling and which way they are running. You have to attach the ceiling support to at least two trusses in four places to hold the weight of the beam.
SIDE NOTE: Your trusses should be 24″ apart.
After you find the two trusses by your center point, mark them. You want to make sure you are finding the center of each truss. Most stud finders find the end of the truss and most trusses are 1-1/2″ in size. So the center is 3/4″ from an end.
Hopefully, these trusses are centered to your beam center. If not, you can make your wood ceiling support longer to adjust to this or move your center spot. Ours was centered so our wood ceiling support board was cut to 27″.
Now, mark the middle of the trusses for where the end of the wood ceiling support will sit. This will be the distance from one wall to your first marked beam center plus 3″ (half of the size of the wood support).
You’re now ready to move to the next step.
STEP 2: CUTTING THE BEAM TO SIZE
Like I stated before, the beam I am using is a 8“x8″ beam my brother had leftover at his house. But we felt that an 8″x8” beam was too big for the space.
We decided to cut down two sides of the beam to make it 6″x6”. But this was a little more difficult because the table saw we were using can only cut 3“deep (total of 6″). We were off by 2″ on one side.
To remove the extra 2″, we used a 2″ spade bit and chisel.
TIP: It would have been easier to use an Oscillating Dremel but we could not find my dad’s tool anywhere, so we improvised.
Once one side was cut to the 6″, the other side could be cut on the table saw. This second cut is the 2″x6″ board for the ceiling support. We cut this board to 27″.
SIDE NOTE: We knew that our center ceiling point was exactly centered between two rafters (studs). These rafters should be 24″ apart, so we added 3″ to this measurement to give us the length of this support.
The beam will be heavy. To lighten it slightly and to give it a place to put wires, we hollowed out some of the middle. We used a big drill attached to a 2″ bit. But a circular saw and chisel would work just as well.

After the beam and ceiling board was cut to size, I sanded the wood with #220 sandpaper using an orbital sander.
TIP: To give the cut sides a weathered look, I took a hammer to them. See my tutorial on how to make a new wood board look old to give you an idea of what I mean.
After the wood is smooth, I stained the wood using a mixer of half Jacobean and half Classic Grey by Minwax. Once the stain dried, I then finished it off with 100% Tung Oil.
STEP 3: CREATE THE METAL BRACKET FOR THE BEAM
Now that the wood is all ready, it’s time to create the metal bracket that wraps around the beam.
I tried to find something online that I could buy but couldn’t find the style I wanted. So I created my own custom beam bracket.
To do this, you will need a way to bend metal. You can use a vise (heavy duty clamp) or a metal brake. I decided to make a metal brake that I could use for other projects, like creating shelf brackets.
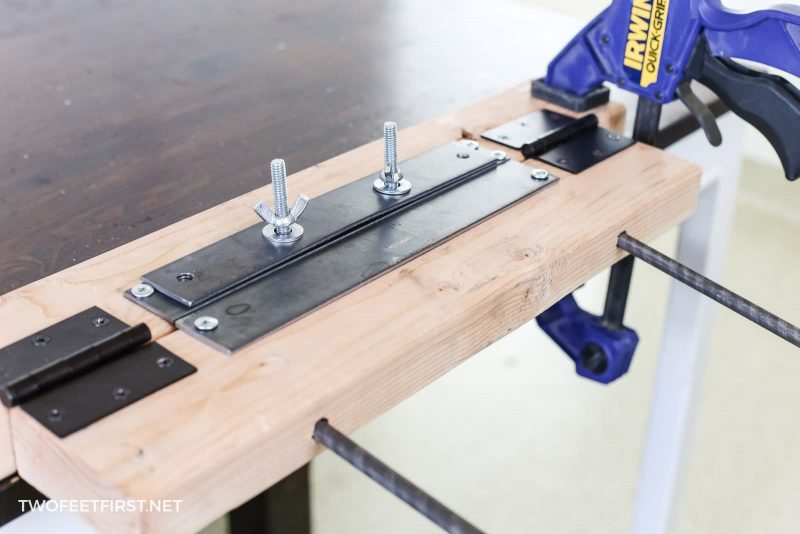
You can find the DIY tutorial on how to make a metal brake here.
Once you have a way to bend metal, you can create the bracket for the beam. To make this process easier, I have created a how-to video on bending the brackets.
The design for this bracket has two bends in the 1-1/2″ flat steel bar to make one bracket.
SIDE NOTE: Wipe the metal clean with a cloth before bending to help remove the black stuff.
THE FIRST BEND:
The end of the brackets will have a hole to attach the chain to the bracket so the first bend needs to be 1″ plus the width of the beam. So if your beam is exactly 6″x6″ (be sure to measure), you will make a line 7″ from the metal edge; this is your bend mark.
Now, place the metal bar inside the metal brake, making sure the top plate of the brake is at the marked line. Tighten the wing nut bolts, check to make sure the metal bar is square to the brake, (will give you a straight bend), then fully tighten the bolts using a wrench.
After, bend the metal until it’s at a 90-degree angle. Remove the metal bar from the brake.

THE SECOND BEND:
The second bend is where the beam will sit. And the easiest way to mark this bend is by using the beam. Place the flat metal bar (there will be one bend) on a flat surface. Then, place one end of the beam onto the metal bar so that it is snug against the first bend.
TIP: Remember what side of the beam you are using for each bracket. Use a different end for each bracket so the bracket fits perfectly for both sides (labeling helps!).
Mark the metal bar where the beam ends. This line is where your second bend will be.
Place the metal bar onto the brake so that the last bend is facing up and align the bar to the top plate of the brake on the marked line. Tighten the bolts, check to make sure the metal bar is square in the brake, then fully tighten the wing nut bolts with a wrench.
Bend the metal bar until it’s at a 90-degree angle, then remove from the brake.
CUT THE METAL:
After the second bend, you need to cut the metal to finish the bracket. To complete this, place the metal bends around the same end of the beam you used earlier. Then, mark the metal, on both sides, where the beam ends.
Remove the metal from the beam, then measure the distance from the marked line to the shorter end of the metal. This mark should be right around 1″.
Once you have the distance, mark the other side of the metal bracket to this distance. This will be from the marked line to the new distance (about an 1“).
TIP: Make sure these distances are the same on both sides of the bracket.
The new marked line will be where you cut the metal. Use the metal brake or clamps to clamp the metal bar in place. Then, using a hacksaw (or another type of saw that cuts metal), start cutting the metal at the line.

SIDE NOTE: If you are using a hacksaw, it can take 5 minutes to cut through the metal.
After the cut is made, use a metal file to file the edges so they are not sharp.
And now you have the bracket. Complete the last three steps again to create the second bracket.
DRILL THROUGH THE METAL:
The brackets now need a way to attach to the metal chain and the beam. To do this, you will need to drill four 5/16″ holes into each bracket. Two of these holes will be for the chain and the other two for the beam.
Let’s talk about the chain ones first. These 5/16″ holes need to be at the end of the metal, 3/8″ to be exact. Mark each end of the bracket so it’s 1/2″ from the end and centered in the middle of the metal (3/4″ from the side).
These marked spots will be where you drill a 5/16″ hole (2 per bracket but four all together). Clamp the bracket to a surface so that it doesn’t move around. Then, using the 5/16″ metal drill bit, drill a hole onto the marked spots.
TIP: Use a shop-vac to collect the metal shavings.
Next, you will drill the holes to attach the bracket to the beam. This hole has to be centered on the beam. Remember our beam is 6″ so centered will be 3″. To make it easy, measure 3″ from the bend to the end of the bracket. Place a mark in the center of the metal (3/4″ from side) at this 3″ mark.
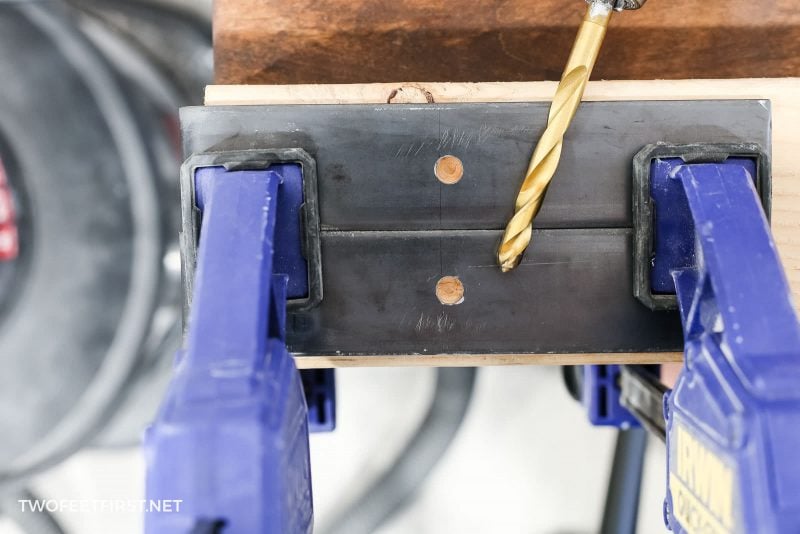
Again, clamp the bracket so it does not move, then drill a 5/16″ hole using the 5/16″ metal drill bit.
TIP: Use the metal file to smooth the drill spots.
Complete this step for each side of the brackets.
PAINT THE METAL:
Now that the brackets are created, it’s time to paint all the metal that is not already black. This will be the two brackets, six quick links, four 1-1/2″ screws, four 5/16″ washers, four 4″ screws, four 1/4″ washers, and two eye bolts.
TIP: If you labeled the brackets, place tape over the label only on the inside where the beam will sit. Everything else needs to be painted.
Place these items on a paintable surface, like an old sheet or drop cloth.
TIP: Use an egg carton to place the bolts and washers to spray paint.
Then, spray paint the pieces according to the directions on the can. Remember lighter coats are better when applying spray paint.
TIP: It helps using a spray grip accessory tool so you do not get paint on your fingers.
Apply at least two coats on each side, more if needed. Then, let everything dry for 24 hours.
STEP 4: ATTACH THE BRACKETS TO THE WOOD BEAM
Now, let’s start putting this light fixture together.
To attach the brackets to the beam, place one bracket around the end of the beam.
TIP: Remember how you made each bracket to fit one side. Place the correct bracket on that side.
Adjust the bracket so it is 2-1/2″ away from the end of the beam. Then, mark where the 5/16″ holes are on the beam.
SIDE NOTE: I completed this step before staining the beam.

Remove the bracket and pre-drill a 1/8″ hole on each marked spot.

Replace the bracket onto the beam, align the holes and make sure the bracket is 2-1/2″ away from the end of the beam. Then, using the 5/16″x1-1/2″ screw, with a 5/16″ washer, attach the bracket onto the beam.

TIP: If the bolt has black paint worn off during attaching, spray some black paint into a plastic cup. Then, use a cotton swab to repaint the bolt.
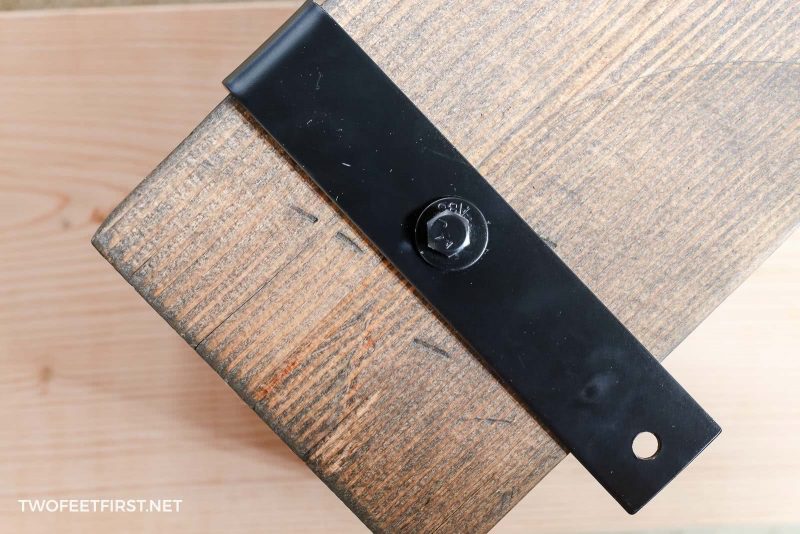
Attach the other three 5/16’x1-1/2″ screws the same way.
STEP 5: SECURE THE WOOD CEILING SUPPORT
Now it’s time to attach the 2″x6″ wood ceiling support.
Remember, in step one you determined the location of where the center of your beam will be plus the center of the trusses. You are now going to prep the 2″x6″ wood ceiling support to attach to these marked locations.
SIDE NOTE: Our center point was centered between two trusses, so adjust these steps to fit your space.
On the front of the wood ceiling support, mark each corner of the board 1-1/2″ from each side; there will be four marks. These four marks will be where the wood is attached to the ceiling.
Then, mark two more spots on the board, 3-1/2″ from each end to the center of the board (3″). These marks are where the eye bolts will be placed to hold the metal chain.
After, drill a 1/4″ hole through the wood at each of these marks using a 1/4″ wood drill bit.
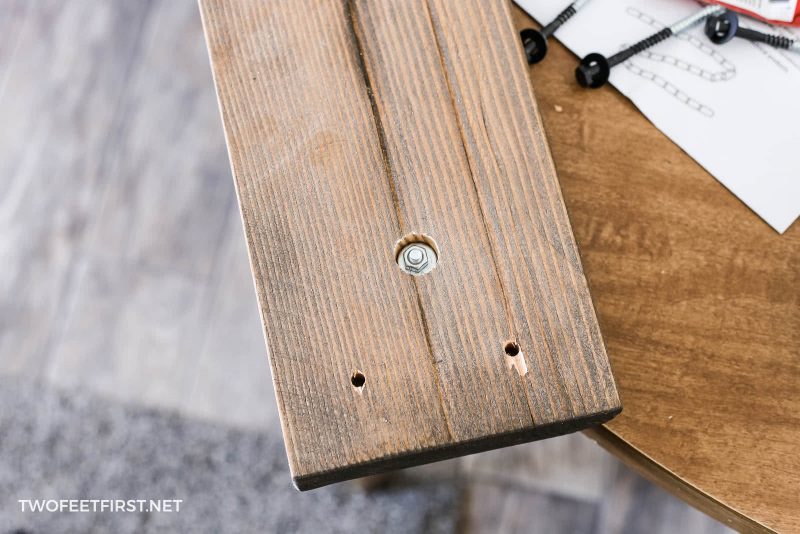
Once all the holes are drilled, flip the board over and on the two 3-1/2″ center holes. Drill a 1/2″ deep hole using the 3/4″ spade bit. This is so that a 1/4″ washer can be placed and you can tighten the nut onto the eye bolt.

Then, insert the eye bolt through this same hole but through the front of the board. On the back of the board, place the unpainted 1/4″ washer and nut from the eye bolt. Tighten the nut until the eye bolt is flush with the board.
Complete this step for the other eye bolt. After both eye bolts are installed, you can now secure the wood ceiling support to the ceiling.
TIP: This next part is a two-person job!
SIDE NOTE: You will need all four 4″ screws plus four 1/4″ painted washers, a drill with the correct hex attachment to secure the screws, plus a 1/8″ drill bit.
Place the wood ceiling support onto the ceiling and align the sides of the board on the marked lines. Also have the pre-drilled holes aligned for the center of the truss.
Take one of the screws and push it through each of the pre-drilled holes. Make sure you apply pressure so that it indents into the drywall.
TIP: Make sure the board does not move!
Remove the board and drill a 1/8″ hole in each indented spot. Make sure each drill is hitting the trust by checking the bit for wood shavings. If you are not getting wood shavings, adjust the location of the wood support until you are on a trust.
After, place the support back onto the ceiling in the same spot. To do this, place a 4″ screw with washer through the wood and into the pre-drilled ceiling hole. Tighten this screw into the truss about halfway. Then, attach another 4″ screw and washer the same way to make sure you’re still aligned.
TIP: Only place two screws, then check to make sure the board is level, adjusting if needed.
Finish installing all the screws and washers, making sure the screws are completely tightened to the wood. You are now ready to assemble the lights onto the beam.

STEP 6: ATTACH THE HANGING LIGHTS TO THE BEAM
To position the lights, place the beam somewhere you can test the light placement; a ladder works great for this! Then, start wrapping the pendant lights around the beam.
SIDE NOTE: We placed the end ones first then spaced all the others equally between.
Adjust the placement and height of the lights until you are happy.

TIP: Have every other light hang from a different side of the beam.
Then, take the black staples and nail the end of each light’s wire to the top of the beam. Once they are all nailed, start nailing the end of the wires into the hollowed out part of the beam.
After, trim the wires, leave about 4-5″ (more if you want), and wire the lights together starting at one end then moving to the other end. Before wiring the last end, make sure to wire in the cloth wire.
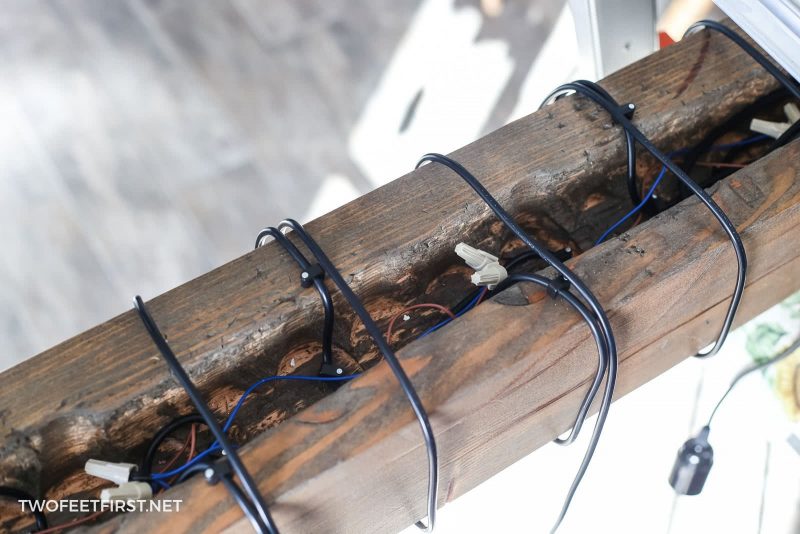
TIP: Use the black staples to keep the wire inside the hollowed out part of the beam.
SIDE NOTE: Because I am not an electrician, I am not sharing how to wire the light.
STEP 7: HANGING THE BEAM WITH METAL CHAIN
Now your beam is ready to be attached to the ceiling using chains.
Take the 1/8″ quick links and attach them to the metal brackets ends. Then, raise the beam to the height you want. Lucky for us, the top of the ladder was the perfect height.
Then, attach one end of the metal chain to one quick link. After, attach a quick link to the eye hook on the ceiling, string the chain up to that quick link and attach. Using pliers, unlink the chain link next to the link that was just attached. Then, attach the next unbroken link onto the eye hook link.
Next, string the chain to the opposite quick link and attach.

TIP: All the chain lengths should be the same length, so you can count the chain links to make sure they’re even.
Again, use the pliers to unlink the chain link. Do this same process for the other side of the beam; adjust any of the links if needed to make the beam level.

STEP 8: WIRING THE LIGHT FIXTURE
This is the last step! Take the cloth wire and weave it up through the chain and into the canopy.

TIP: Make sure to leave extra wire at each end so you can secure the wire into place with the black staples but also have extra if you ever need to adjust anything.
Then, wire the light into the light box and secure the canopy into place.
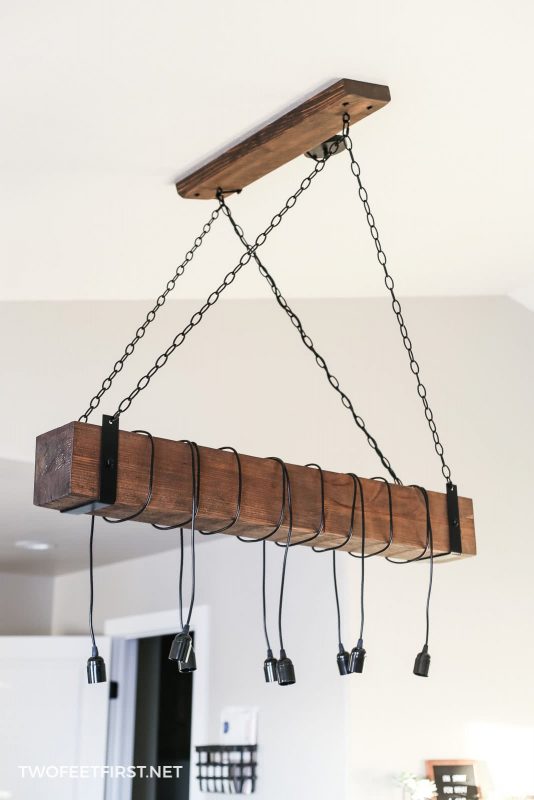
And that’s how-to make your own custom DIY farmhouse beam chandelier.
I think this wooden light fixture fits the space perfectly. I just wish I had the space for my own beam light fixture!
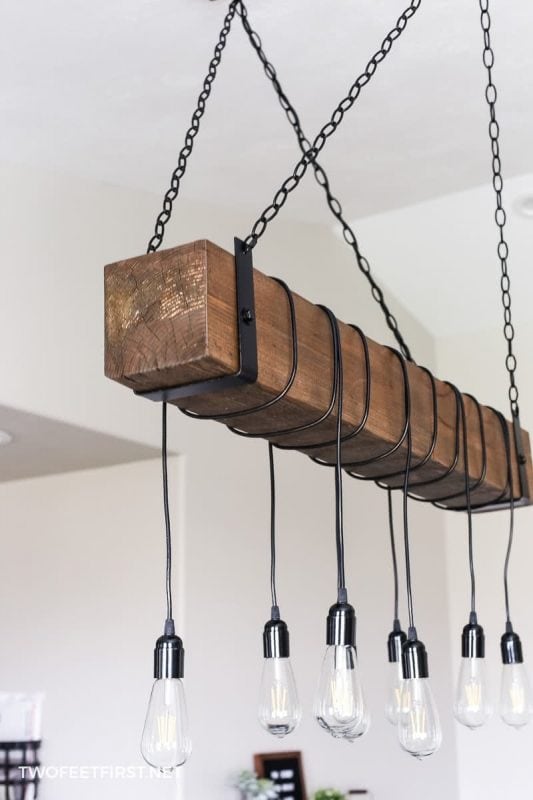
If you are looking for another DIY light build, see some of our other pendant light:
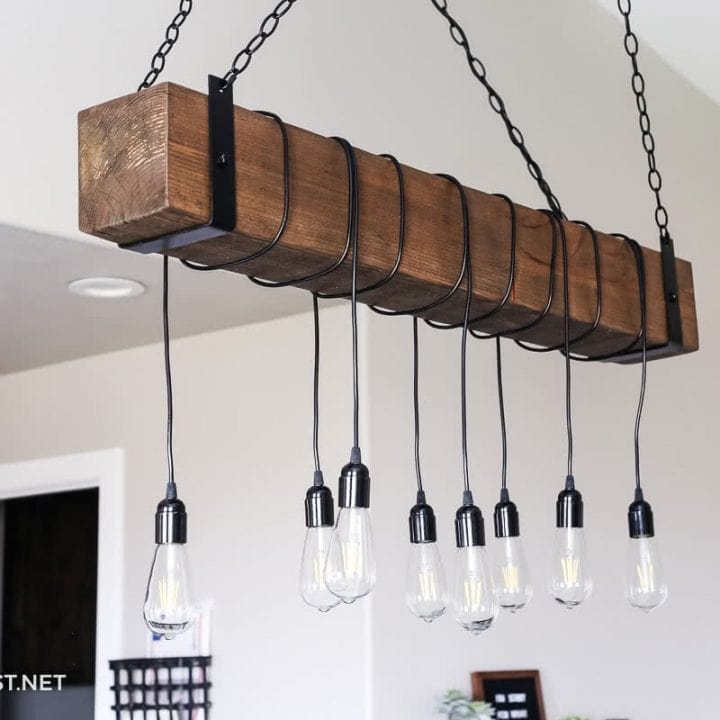
DIY Wood Beam Chandelier
Use this tutorial on how to create a DIY farmhouse wood beam chandelier for you home.
Materials
- 4ft beam
- 2"x width of beam x27" board
- 1/8"x1-1/2"x48" flat steel bar
- six: 1/8" quick links
- four: 5/16"x1-1/2" hex head lag bolts
- four: 5/16" metal washers
- four: 1/4"x4" hex lag screw
- six: 1/4" metal washers
- black chain
- single hole black canopy
- two: 1/4"x 2" eye bolts
- black spray paint
- eight pendant light fixture
- black cloth wire
- wire connections (for wiring)
- 1/4" black staples
- stain and wood finish
- #220 sandpaper
Tools
- miter saw &/or table saw or/& circular saw
- metal brake
- drill
- 5/16" metal drill bit
- wire stripers
- pliers to break chain links
- tape measure
- 3/4" spade bit
- 1/4" wood drill bit
- stud finder
- orbital sander
- hacksaw
- metal file
- ladder
Instructions
- Mark the ceiling for placement of the ceiling support and beam.
- Cut the beam to size and hollow out the middle of the beam plus stain the wood.
- Create the metal brackets to wrap around the beam.
- Attach the brackets to the beam.
- Secure the wood ceiling support to the ceiling.
- Attach the hanging pendant lights to the beam.
- Hang the beam to the ceiling support with metal chain.
- Wire the light fixture!


That’s pretty smart! I’ve often considered a project like this for our bonus room. Pinning so I’ll remember how to do it later.
Thanks, Teri!!
This is great looking! Thanks for sharing the video and the link to make that brake too- we have been talking about renting one for a project but this seems straight-forward to DIY. Thanks!
Thanks Christine, I am glad the video helped!! Plus I love the metal brake, I use it all the time, lol!
Oh my goodness!! The wood beam chandelier is just PERFECT!! I love it!! It’s just wonderful!!
Thank you, Christine! I love it too, just wish it was in my house.
This is amazing! I love that you made this, it is so beautiful!
Thanks, Amy!
Wow! I am completely impressed. From the buying list to the step by step tutorial-yo have covered it all. I am loving this style for any home.
Thank you for sharing!
Thank you, Meegan!
That turned out so good! I’ve been considering trying my hand at making some sort of chandelier like that and this tutorial is going to come in super handy!
Thanks, Tylynn!! Cannot wait to see what you come up with!
This is so pretty, Megan! You did an AMAZING job – love all the details and video :)
Thank you, Eileen!
This turned out Amazing and so Unique as well!
Thanks, Anam!
This is so freaking cool!! It looks intense. I don’t know that I could take this one on…
Thanks, Kenya! It wasn’t that bad, the hardest part was trying to decide exactly how to put it all together but luckily that is exampled in this tutorial! The biggest thing to remember is that it is a two person job.
Oh my gosh I can’t believe this is a DIY project, it turned out beautifully. Great tutorial!
LOVE THIS!!! do you think it could work outdoors in a screened in patio? full roof coverage.
Thanks, Ginny. I would think it would but I would make sure that NO water can get into the space. Good luck!
I want this kind of chandelier. I love the concept and I want it to be on my ceiling too.