A simple tutorial on how to easily display pictures in your home by creating DIY clothespin picture frames.
Do you dream of creating an inspiration wall of your favorite photographs?
And what if you could quickly change them whenever you wanted?
Maybe colorful vacation snapshots, adorable family photos or a collage of your favorite candids from the past year…
The possibilities are endless if you have a photo collection that you can easily exchange for another, for a fresh look.
But photo frames are expensive to purchase. And who wants the pain of squeezed fingers when you take down, open up the backs and insert new photographs in a dozen photo frames?
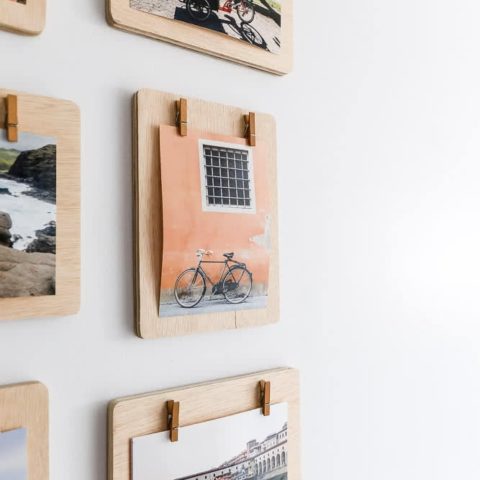
One solution is creating DIY wooden clipboard frames. These frames are made from plywood (or any type of wood you want to use) and small clothespins.
Then, all you need to do is press the clothespins and swap the photos – that’s it!

I installed these clipboard frames in our hallway because they are so easy to use and don’t take up space into the hall.

Disclosure: This post contains some affiliate links or referral links for your convenience. It is a way for this site to earn advertising commissions by advertising or linking to specific products and/or services. Click here to read my full disclosure policy.
DIY wooden clipboard frames
MATERIALS:
- 1/2″ or 1/4″ plywood sheet
- #220 grit sandpaper
- Small decorative clothespins
- Gorilla glue or another type of super glue
- 3m command picture strips
TOOLS:
- table saw or circular saw
- miter saw
- orbital sander (optional)
- level
- ruler or tape measure
- safety glasses
- face mask (for dust)
- ear protection
STEP 1: CUT AND SAND PLYWOOD
The amount of plywood you need to purchase depends on the number of frames you want and the size of your pictures.
In the example, I used 5×7 pictures in both landscape and portrait. The space from the top of the frame to the picture is 1.25″, where the other three sides have a .75″ gap.
To make the cutting process easier, here are the cutting sizes for a 4×6, 5×7, and 8×10 picture.
- 4×6: landscape is 7.5″ wide x 6″ tall and portrait is 5.5″ wide x 8″ tall
- 5×7: landscape is 8.5″ wide x 7″ tall and portrait is 6.5″ wide x 9″ tall
- 8×10: landscape is 11.5″ wide x 6″ tall and portrait is 9.5″ wide x 12″ tall
Decide on how many frames you want. Then, determine the amount of wood you will need. I used less than a 2 foot by 4 foot plywood piece for twelve frames.
SIDE NOTE: I spaced each frame 2″ apart on the wall, and I would not recommend having the frames spaced closer than that.
Now that you know your cut sizes, cut your plywood pieces. I used a table saw to cut the plywood into strips, then a miter saw to cut to size.
After cutting, sand the wood with a #220 grit sandpaper.
SIDE NOTE: I also rounded the corners of my frames with an Orbital Sander
If you want to paint or stain the wood, do so now. I left mine unfinished for a natural look.
STEP 2: SECURE THE CLOTHESPINS ONTO THE WOOD
Now that you’ve created the frame, you can secure the clothespins into place.

TIP: I would recommend using two small clothespins per frame.
Place each clothespin about 1/4″ from the top of the frame and 2″ from the side if it’s landscape or 1.5″ if the frame is portrait. Use a pencil to lightly mark the frame to these measurements.
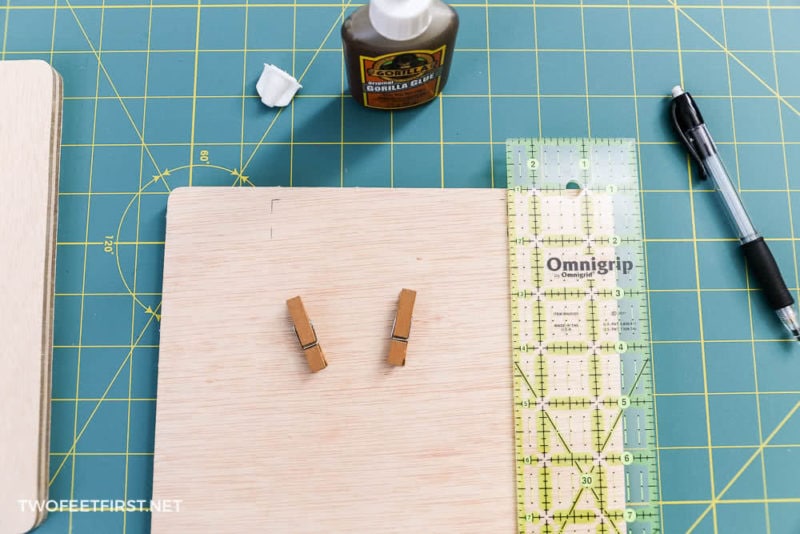
Then, take one clothespin and apply a small amount of glue to one side.

Place the clothespin onto one of the marked locations of the frame. The top of the clothespin is 1/4″ from the top of the frame and either 2″ or 1.5″ from the side.
TIP: Make sure the push part of the clothespin is at the top.
Place all the other clothespins the same way. Then, let them dry according to the instructions of the glue.

TIP: The original gorilla glue I used foams as it dries. Use a Q-tip to wipe this away as it dries.
STEP 3: ATTACH THE CLIPBOARD FRAME TO THE WALL
There are many ways to attach a picture frame to a wall but my favorite way does not require any nail holes.
If you want a more detailed tutorial, visit my post on how to install pictures without nails. Here is the quick version.
- Place two velcro strips together; you need at least four strips per frame.
- Place one strip onto the back of one side of the frame. Apply pressure for 30 seconds, then attach a strip to the other side the same way.
- Attach strips to all your frames. Then, let them sit for at least one hour to connect fully.
- Wipe the wall with rubbing alcohol and allow time for it to dry. Then, attach the strips on the back of the frame to the wall, again applying pressure for 30 seconds.
- Remove the frame from the wall by angling the bottom of the frame up. Then, allow everything to sit for at least one hour.
- Place the frames back in place on the wall.
Things to note about installing the frames:
- Waiting for one hour is very important for the strips to connect fully. I found that if I did not do this, the strip would come off the frame.
- Have a plan on where you want to install the frames and mark the wall with a pencil. (I spaced my frames 2″ from each side.)
- I drew lines for where each top and side of the frames would sit to make the process easier.
- Use a small level to make sure your traced lines are level while you’re installing the frames.
STEP 4: INSERT YOUR PICTURES
Now that your frames are all on the wall, place your pictures into the clothespins.
Then, step back and enjoy your new gallery wall or clipboard wall.
Now, whenever you want to replace them with new photos, it takes less than 5 minutes and so easy to do!

I hope this tutorial will help you quickly create clipboard frames to update pictures on your wall easier in the future.

Interested in more projects? You will love these other home decor projects of ours:
DIY Wooden Clipboard Frame
Easily change pictures with these DIY wooden clipboard frames.
Materials
- 1/4" or 1/2" plywood sheet
- #220 grit sandpaper
- Small decorative clothespins
- Gorilla glue or another type of super glue
- 3m command picture strips
Tools
- table saw or circular saw
- miter saw
- orbital sander (optional)
- level
- ruler or tape measure
Instructions
- Cut plywood to size and sand the edges of the wood.
- Secure two mini clothespins to each plywood frame using glue.
- Attach the clipboard frame to the wall.
- Insert your pictures using the clothespins and enjoy your photo display on your wall.


Oh my goodness!! What a fun wall project!! I’m going to show this to my daughter and I’m sure she will ask for some! Beautiful!
Thanks, Christine!