Learn how to make decorative pillow covers that you can change seasonally for less than $20.
A simple way to update your home decor is by changing your throw pillow covers, and you can do this seasonally. A folded cover takes up very little storage space! But why not make the pillow cover more personal and make your own. This is how to make decorative pillow covers for your home for less than $20.

Also, welcome to this months At Home DIY challenge! Every month for a whole year, I am participating in a different challenge, and this month it’s a “$20 Home Decor Challenge”. After my how-to tutorial there is a link to 30 + other DIY home bloggers projects, so be sure to check those out.
Now back to how to make decorative pillows for $20.
Here is a list of the supplies you will need.
DIY Decorative Pillow Covers
Disclosure: This post contains some affiliate links or referral links for your convenience. It is a way for this site to earn advertising commissions by advertising or linking to specific products and/or services. Click here to read my full disclosure policy.
MATERIALS:
- two pillow forms
- fabric (or pillow cover)
- stencil
- waterproof paint (outdoor works great)
- painter tape
- foam brushes
- small cardboard box
TOOLS:
- ruler
- sewing machine (making pillow)
- iron with ironing board
- seam gauge
STEP 1: Make your pillow cover
There are many ways to make a pillow cover, but today I will be sharing how to sew a pillow cover.
The easiest way to sew a cover is by sewing an envelope pillow cover, no zippers, and only four straight stitches. Plus its only one piece of fabric.
To determine how much fabric you need for the pillow covers, you need to decide on the size of your decorative pillow.
SIDE NOTE: The standard throw pillow sizes are 16 “x 16” , 18 “x 18″, and 20″ x 20”. I am using 16″ x 16″ for this example.
Once you have decided on a pillow size, take the size (16″ x 16″) and double it plus add 6″. So for a 16″ pillow, you would have 38″. This is the length of your fabric.
For the width of the fabric, take the pillow size and add 1″. A 16″ pillow would be 17″, making your fabric piece 17″ x 38″.
Here is how much fabric you would need for two pillows in the standard pillow sizes (using 44″ fabric).
- 16″ x 16″ – cut 17″ x 38″ – 1 yard of fabric
- 18″ x 18″ – cut 19″ x 42″ – 1.25 yards of fabric
- 20″ x 20″ – cut 21″ x 46″ -1.5 yards of fabric
SIDE NOTE: If you are wondering should I wash the fabric before sewing the covers? Yes, you should always prewash fabric before sewing if you ever plan on cleaning it in the future.
Sewing an envelope pillow cover is very simple, and I have a full detailed tutorial on how to sew an envelope pillow if you need. But here is a short instruction on how the pillow is made.
Cut your fabric to size, then on the smaller sides sew a basic double-fold hem.
This hem is made by folding the raw edge of your fabric 1/4″ up (wrong sides together), iron. Then fold again, 1/2″, and press with an iron.
SIDE NOTE: Using a seam gauge makes this easier.
Topstitch your double hem with a seam allowance of 3/8″ on the right side of the fabric.
With right sides of the fabric together, fold one hem 1/3 across the fabric. Then told the other hem over the last hem until the fabric is the same size as your pillow (16″).
Pin the raw edges together and stitch with a 1/2″ seam allowance. Then turn the fabric right side out.
STEP 2: Decorate the pillow cover
It’s now time to decorative your pillow with your desired stencil. I decided to make a cover with a saying and another with a pineapple. So decide what you want.
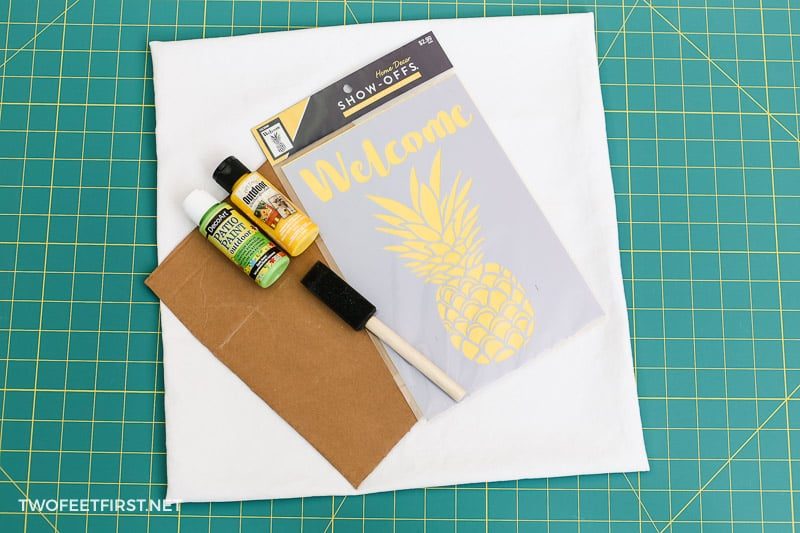
SIDE NOTE: I found my pineapple stencil from Hobby Lobby plus its the same stencil I used to create a welcome pineapple mat.
Once you have your design, place the pillow cover on a flat surface. Insert the cardboard into the pillow to stop any paint from seeping onto the back.

Center your stencil onto the center of the fabric and secure into place with painter’s tape or an adhesive spray.

SIDE NOTE: You can use a vinyl stencil that will stick to the fabric, a Circut machine is excellent for this.
Using waterproof paint, dab the paint onto the stencil.

TIP: Dabbing helps to prevent the paint from seeping under the stencil.
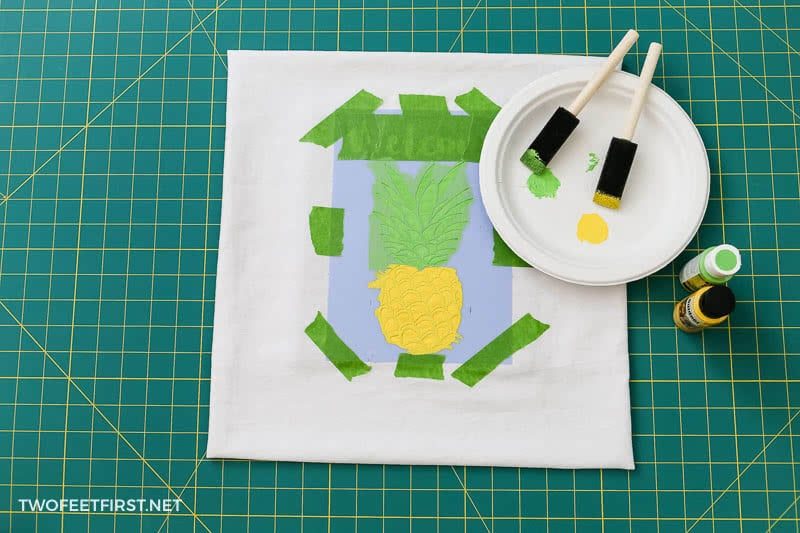
Allow the paint to dry for about 10 minutes before removing the stencil. Then allow the paint to dry fully.

Once the paint has dried, remove the cardboard and insert the pillow form into the cover.
TIP: If you are using old pillow forms that are now flat, make them look new by adding more stuffing or use an old pillow stuffing.

Place the throw pillows where you want and enjoy your decorative pillows!

Be sure to take a peek at the other DIY bloggers $20 projects.


Interested in more Decorative Pillow Covers? Here are some other posts you might enjoy: Sew a Tassel Pillow Cover by The DIY Mommy | Make a Sharpie Pillow Cover by Twelve On Main
Or you will love these other home decor projects of ours:
And don’t forget you can see before and afters in our full house tour by clicking HERE.

How to Make Decorative Pillow Covers
Make a decorative pillow cover for less than $20 plus update your home decor seasonally.
Materials
- two pillow forms
- fabric (or pillow cover)
- stencil
- waterproof paint (outdoor works great)
- painter tape
- foam brush
- small cardboard box
Tools
- ruler
- sewing machine (making pillow)
- iron with ironing board
- seam gauge
Instructions
- Make your pillow cover.
- Place your stencil in the center of the pillow cover.
- Dab waterproof paint onto the stencil.
- Let the paint dry then remove the stencil.
- Insert the pillow cover into the pillow form.
- Enjoy!


These turned out so cute! Love that pineapple stencil :)
Thanks, Eileen! I love the pineapple too!!
Now I want to stencil all the things! You’ve given me a really good idea for creating some fabric to recover my dining room chairs! Thank you!
You are so welcome, Teri. Thanks for stopping by!
I really love the pillow covers!! Looks like they are really fun to make too!