A step-by-step tutorial on a DIY shade sail installation, the perfect way to add shade to a backyard or patio.
In Utah, we’re used to our cold, snowy winters. But when July rolls around, the scorching sun makes it hard to do anything in our backyard because we have no shade.
My husband was tired of not being able to enjoy our yard during the hot summer months, so we decided to change that. His solution was a large rectangular sun shade sail – it’s easy to install, covers a large area and you can quickly remove it when not in use.
And I am going to share how you can install a shade sail to your outdoor space.
WHAT IS A SUN SHADE SAIL?
A shade sail is made from a flexible membrane (fabric) that is stretched between anchor points to create outdoor shade. The design resembles a ship’s sail.
Shade sails provide protection from the sun and are fantastic alternatives to a covered patio, pergola, or outdoor umbrella. Plus, you can easily remove them in the cooler months.
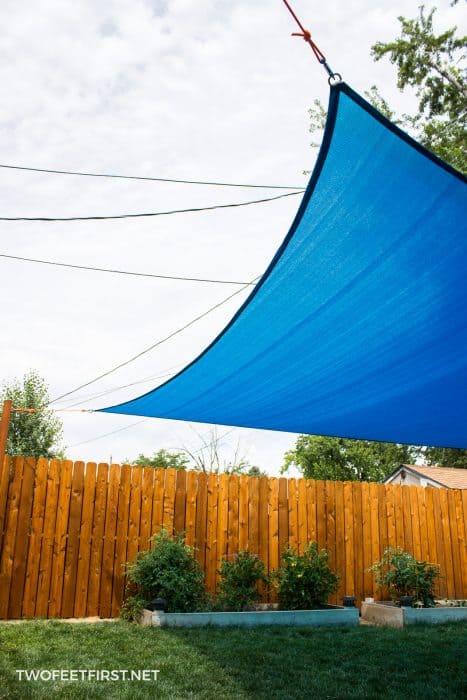
Shade sails come in different shapes and sizes. The sail we installed is a rectangle, but they also come in a triangle. The size of our shade sail is 16’x20’ and as you can see it covers a lot of our backyard, which we LOVE!
WHAT DOES IT COST TO INSTALL A SHADE SAIL?
The cost of installing a shade sail will depend on the size of the shade you purchase. But if you decided to install the same shade sail we did, your cost would be about $250 for all the supplies and materials.
Here’s a cost breakdown on the materials:
- shade sail – $75 (remember, ours is large!)
- hardware – $23 (to hang the shade sail)
- carabiners – $14
- rope – $24 (we purchased 2 bags)
- posts – $80
- gravel/concrete – $10
- forms – $20
TOTAL – $246
So, for a total of $246, we now have a shaded backyard. Most outdoor umbrellas cost about that, but they don’t offer such a large amount of shade!
Now, let me show you how you can install your sun shade sail.
Disclosure: This post contains some affiliate links or referral links for your convenience. It is a way for this site to earn advertising commissions by advertising or linking to specific products and/or services. Click here to read my full disclosure policy.
DIY SHADE SAIL INSTALLATION
MATERIALS:
- shade sail (we purchased this 16’x20′ one or here is a triangle one)
- 4”x4”x10’ post (we used cedar to match our fence)
- rope (we used this polyester rope) or a chain
- carabiner (we got one for each point and purchased at REI)
- diamond pad eye (we purchased these in a sail hardware kit)
- turnbuckle (we purchased these in a sail hardware kit)
- concrete
- 10” concrete tube form
- 2″ deck screws
- gravel
- scrap board w/screws (installing post)
TOOLS:
- ladder
- drill
- something to mix the concrete
- safety glasses
- face mask (for dust)
- ear protection
Something to NOTE: You can use a building as an anchor point instead of building a shade sail post. This is a great way to add some shade to a patio for a fraction of the cost of building something. You would simply use screw-in eye hooks to anchor it to the building.
We first started with a triangle shade but later realized we needed a lot more shade than that. Save yourself some time: measure your space and decide on the amount of shade you want before purchasing a sail.
TIP: Call your local dig number (#811) a couple of days before you plan on digging any holes into your yard.
STEP 1: INSTALL THE SHADE SAIL POSTS
After we received our 16’x20’ shade sail, we laid it on the ground of our backyard. Once we were happy with the location of the shade sail, it was time to get to work.
From each point (or tip) of the sail, we placed a stake at least 2 feet away. The stakes mark where a post will be.
SIDE NOTE: We placed our stakes along our fence line, so the stakes were farther away than 2 feet in our backyard.
Also, if you are anchoring to a building, you will want to have a distance of about 1 foot from the building to the points.
After marking where each post will go, we dug a hole about 2 feet deep and wide enough for the cement forms. These will help to reinforce the base of the shade sail posts. The cement form has a length of 48 inches (4ft) and we cut the form in half to make two that were 2ft each.

SIDE NOTE: You do not have to use the cement forms; if you decide not to, dig the hole one foot wide by 2 feet deep.
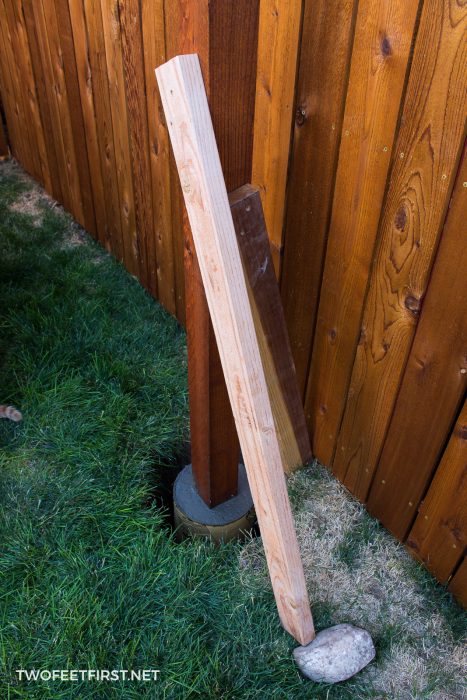
Once the hole was big enough for the form to fit, we placed it inside the hole. Then, we set the 4×4 post on top of the gravel inside the cement form and poured 2-3 inches of gravel into the form base.
SIDE NOTE: I stained all the 4×4 posts to match our fence before installing them, using Ready Seal in Natural Cedar.
We installed these posts the same way that we installed the post for our gate/fence so you will find more detailed instructions on that tutorial.
Next, we leveled the post and secured it in place by leaning some scrap boards against it.
After, we mixed the concrete in a plastic tub (you can use a wheelbarrow) and placed it into the forms. We then let everything sit for at least 24 hours to dry.
Once the concrete had dried, we carefully removed the form from the concrete.
SIDE NOTE: You can leave the form or strip it away; we chose to remove it.
Then, we filled in the rest of the hole with dirt, making sure to compact it as we went.

STEP 2: ATTACH THE SHADE SAIL TO THE POSTS
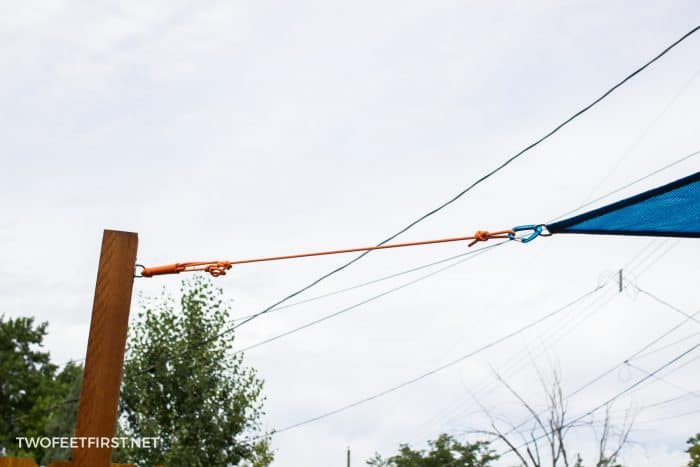
Next, we installed the anchor hardware to the poles, specifically the diamond eye pad. We decided to place ours at the top of each cedar post.
After, we took the rope and tied a loop knot on one end; this loop knot will be attached to one end of the shade sail with a carabiner. There will be one of these for each corner of the shade.

Next, the shade sail should be unfolded and lying exactly where you want it.
For two sides, we tied another loop knot the distance needed to hook the Turnbuckle to the rope and eye pad hardware on the pole.
SIDE NOTE: The Turnbuckle can be tightened later using the screws.
The turnbuckle looks like this when installed:

For the other two sides, we decided to make a loop in the middle of the rope, then weave the end of the rope through the eye pad hardware and back to the loop. The rope is then tightened to make the shade tight.
Here is how this side looked after it was tightened:

SIDE NOTE: I wrapped the extra rope around and around then weaved the end through the middle to give it a finished look.
And that is how we installed a shade sail in our backyard.
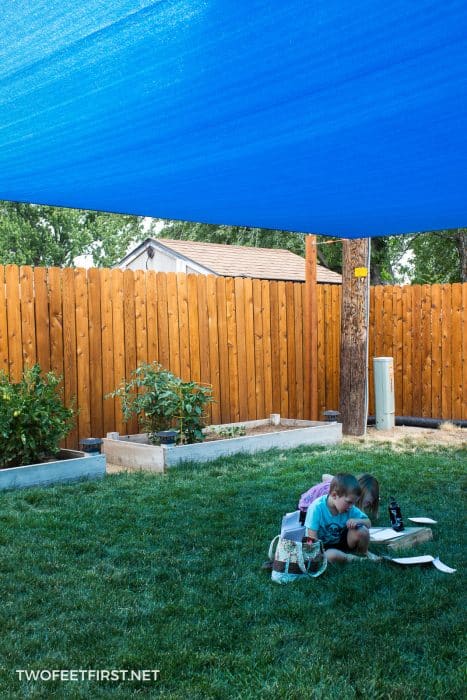
We love having shade in our backyard at any time of the day now. And if we need to adjust it, we just tighten the shade again after the fabric and rope are stretched out. An added bonus is that in the winter we can remove the shade sail and store it away until the warmer months!
I hope this DIY shade sail tutorial will help you have more shade in your yard!

DIY Shade Sail Installation
Add shade to an outdoor space by installing a DIY shade sail.
Materials
- Shade Sail
- 4”x4”x10’ post
- rope
- carabiner
- sail hardware kit
- concrete
- 10” concrete tube form
- 2" deck screws
- gravel
Tools
- ladder
- drill
Instructions
- Install the shade sail posts into the ground with concrete.
- Attach the shade sail to the post with the sail hardware, rope, and carabiner.
- Enjoy the shade in your backyard.


Great idea! My sisters has been trying to figure out how to get more shade in her yard. I’ll have to show her this.
Thanks we enjoy it, I hope this will help your sister!