Cording Basket Pattern
This post may contain affiliate links. Please read our disclosure policy.
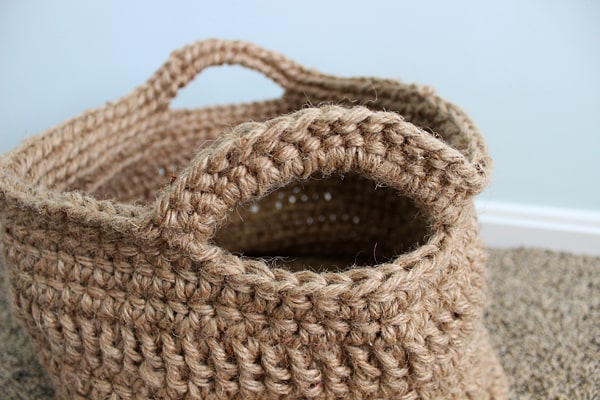
My kids have lots and lots of stuffed animals… Why is that everyone’s favorite thing to give a baby?? That’s OK because my kids love playing with them. But I have been really tired of them laying all over the floor. I wanted to make a basket for my living room but I decided this was a better option. This cording basket can be used for almost everything.

And this basket has handles…
Some links in this post are affiliate link for your convenience, click here to read our full affiliate policy.
I got the idea from the Ombre Basket Pattern. But I wanted to use cording and this is the cording I used for the project.
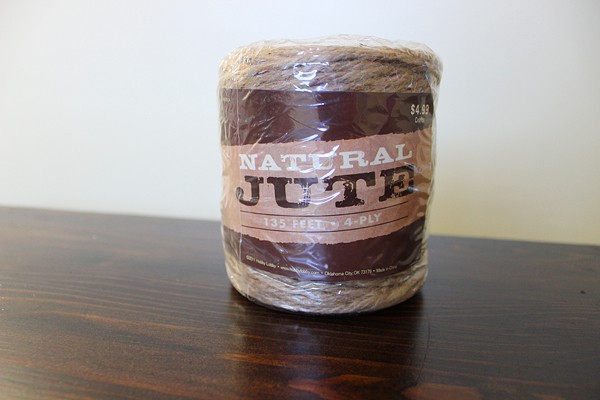
The dimensions of the basket and approximately how much cording I used:
- 11” height x 16” diameter; used #4 – 135 ft of cording
Basket Pattern
KEY:
Single crochet = sc
Stitch = st
Slip stitch = sl st
Chain = ch
Half Double Crochet = hdc
Double Crochet = dc
Triple Crochet = tc
Ch 5. Join using the magic ring ending with sl st.
Row1: Ch 1, 2hdc in same ch, around, finish with sl st in first st.
Row2: Ch 1, 2hdc in same ch, hdc in next st, follow pattern around, finish with sl st in first st.
Row3: Ch 1, 2hdc in same ch, hdc in next 2 st, follow pattern around, finish with sl st in first st.
Row4: Ch 1, 2hdc in same ch, hdc in next 3 st, follow pattern around, finish with sl st in first st.
Row5: Ch 1, 2hdc in same ch, hdc in next 4 st, follow pattern around, finish with sl st in first st.
Row6: Ch 1, 2hdc in same ch, hdc in next 5 st, follow pattern around, finish with sl st in first st.
Row7: Ch 1, 2hdc in same ch, hdc in next 6 st, follow pattern around, finish with sl st in first st.
Row8: Ch 1, 2hdc in same ch, hdc in next 7 st, follow pattern around, finish with sl st in first st.
Row9: Ch 1, 2hdc in same ch, hdc in next 8 st, follow pattern around, finish with sl st in first st.
Row10: Ch 1, 2hdc in same ch, hdc in next 9 st, follow pattern around, finish with sl st in first st.
Row11: Ch 1, 2hdc in same ch, hdc in next 10 st, follow pattern around, finish with sl st in first st.
Row12: Ch 1, 2hdc in same ch, hdc in next 11 st, follow pattern around, finish with sl st in first st.
Next round will be the first round of basket body. If you want the basket to be larger continue pattern until desired diameter. You will be working into the back of each hdc.
Row13: Ch 1, sc under the line or ridge on the back of the first st of previous round. This will leave the two loops of the stitch creating seam separating the bottom & side of basket. Continue working sc around, join with sl st.
Row14: Ch 1, 1 hdc in next hdc, finish sl st
Row15: Ch 1, 1 hdc in next hdc, finish sl st
Row16: Ch 2, 1 dc in next st, around, finish sl st
Row17: Ch 2, 1 dc in next st, around, finish sl st
Row18: Ch 1, 1 hdc in next hdc, finish sl st
Row19: Ch 1, 1 hdc in next hdc, finish sl st
Row20: Ch 2, 1 tc in next st, around, finish sl st
Row21: Ch 1, 1 hdc in next hdc, finish sl st
Row22: Ch 1, 1 hdc in next hdc, finish sl st
Row23: Ch 1, 1 hdc in next hdc, finish sl st
Row24: Ch 1, sc in each st around, finish sl st
Row25: Ch 1, sc in next 13 sts, ch 10, skip next 10 sts, sc in next 27 sts, ch 10, skip next 10 sts, sc around, finish sl st
Row26: Ch 1, sc in next 13 sts, 14 sc under the ch 10 sp, sc in next 27 sts, 14 sc under the ch 10 sp, sc around, finish sl st
Row27: Sc in each st around. Join and finish off.
Weave ends
The cost of this basket was $13 because I used 40% off coupons at Hobby Lobby…
I want to make another basket but I want to only use hdc on the sides to see if the basket will be stronger. Anyone else want to make a crochet basket with handles?

This basket is awesome! I am so making like a million of these for all the toys scattered everywhere in our house. I might try it with just the hdc like you said you’re thinking of doing. What size hook did you use?
That is exactly what I want to use them for… The size hook I used was “K” but that’s the biggest hook I had on hand. If you have a bigger one, I would try that one because the cording got a little big in some areas. Let me know how it goes!
I like this made in the jute cording – great idea! Thanks for sharing your how-to.
Thanks Kate!
Visiting from SITS, and I love this! Pinning now :)
Thanks for visiting Emily!
I love this! Thanks so much for linking up with us at The Makers. I just shared this on my facebook page. :)
Thanks Alexis and thanks for hosting an amazing link party!!
Saw your bin on the DIY Dreamer feature list. Love this!! Adorable.
Thanks Marni!