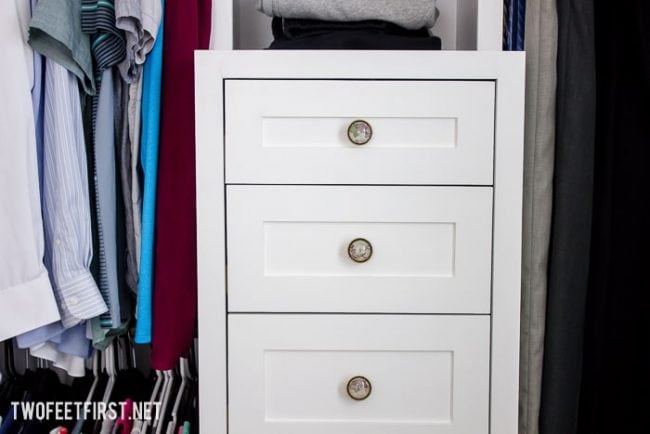
A step-by-step tutorial on how to build shaker drawer fronts for cabinets or furniture.
When it’s time for you to build sleek, high-quality drawer fronts for your cabinets or furniture, consider the Shaker design.
You would never think that a basic five-piece door with an unadorned recessed center panel would be one of the most enduring, universally appreciated designs for cabinets and furniture.
In fact, such a minimalist look is exactly what the Shaker community in the 1800’s embodied as their way of life. They valued simplicity, work ethic, functionality and craftsmanship and their timeless furniture will suit any design, from traditional to modern.
As you will see below, DIY shaker drawer fronts are quick and easy to build, and don’t require a router or pricey wood materials.
My how-to tutorial will show you how you can build shaker drawer fronts for furniture or cabinets using MDF (medium-density fibreboard) or, in this tutorial, a closet system with drawers.
Can you make durable, elegant cabinet drawer fronts out of simple MDF?
Yes, you can!
MDF is a cheaper material to build with and it will reduce the amount of prep work needed to give you a smooth surface.
BUT if you choose to work with MDF, you must paint it. By doing so, you will protect it from water and it will last for years.
If you are still not sure about MDF cabinet drawer fronts, see my post on would I paint my kitchen cabinets again, four years later because I used this same method to update my kitchen cabinets. If you are wondering about that process, you can find the full detailed tutorial on how to update kitchen cabinets without replacing them by adding trim.
As a note, this drawer front tutorial is for an inset drawer front so it will be flush with the trim or cabinet frame.
Disclosure: This post contains some affiliate links or referral links for your convenience. It is a way for this site to earn advertising commissions by advertising or linking to specific products and/or services. Click here to read my full disclosure policy.
HOW TO BUILD SHAKER DRAWER FRONTS
MATERIALS:
- 1/2″ MDF sheet (base)
- 1/4″ MDF sheet (trim)
- wood glue
- 5/8″ finishing nails
- spackling paste
- #220 grit sandpaper
- paint and primer
- handles (we used map knobs from Etsy)
- 5/8″ screws (to attach the front to the drawer)
- white caulk
TOOLS:
- miter saw
- table saw (you can use a Kreg Rip-Cut with a circular saw)
- orbital sander
- paint brush & roller (or use a paint sprayer)
- air compressor with a nail gun
- drill
- level
- safety glasses
- face mask (for dust)
- ear protection
STEP 1: Find the exact size for the drawer fronts
Before cutting, you need to measure your cabinet opening (or closet drawer organizer opening) to give you the exact size of your inset drawer front.
Measure the distance from the top to the bottom of the opening to determine how tall the opening is (measure from the left corner, right corner, and center). These three measurements should be equal or very close but take the smallest number (mine was 49.5″).
Now, decide on the number of drawers you want and their sizes.
In my closet organizer, I wanted six drawers (sizes 10″, 9″, 9″, 8″, 7″), so I needed to figure out the exact measurement of the last drawer front.
To find the size of the last drawer front, take the number you just found (mine was 49.5″) and subtract 43.875” (this is the five other drawers plus a 1/8″ gap between each). This number will be the size of your last drawer front (mine was 5-5/8″).
Next, measure the width of where each drawer front will be.
TIP: You want to measure where the actual drawer front will be. Thus, it helps to have the actual drawer installed beforehand and work on one drawer front at a time.
SIDE NOTE: If you are wondering how to build drawers, I have a full tutorial on building the drawers for the closet organizer through the link provided.
Measure the distance from side to side of the opening (measure top, bottom, and center) and subtract 1/4″ (the 1/8″ gap between the sides). These measurements will be the width of each drawer, so write them down with the size of the drawer. It will look something like this when your front is assembled.

SIDE NOTE: The size of my sides were all around 14-3/4″ but some were a little larger or smaller. By measuring and cutting each to their measurement, you will have a professional look in the end (no significant gaps).
STEP 2: Cut the MDF
After measuring, the next step is to cut the 1/2″ MDF into strips (round the cut up if needed). I cut my strips at 15″ so it would work for each drawer front.
Also, cut the 1/4″ MDF into strips for the trim. When creating drawer fronts, I would recommend your trim pieces be 2″ for drawers but for doors, use a 3″ trim.
SIDE NOTE: Before leaving the hardware store (Home Depot or Lowes), have them cut your MDF sheets.
Then, using a miter saw or table saw, cut the drawer sizes from the 1/2″ board.
Here are the cut measurements we used: 10” – 9” – 9” – 8” – 7” – the last measurement of 5-5/8″.

Next, cut the width of each drawer to size you measured.
After cutting, check the fit on the cabinet or closet system. Finally, sand all the pieces with the #220 grit sandpaper.
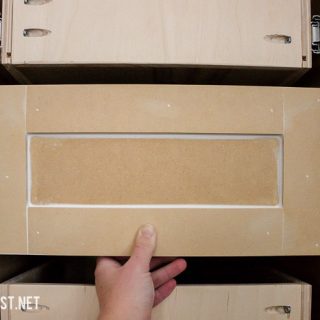
STEP 3: Cut MDF trim for sides of the drawer front
Before cutting the 1/4″ strips, prep them by sanding the edges with the #220 grit sandpaper. This should go quickly because MDF sands easily.
Next, place the 1/4″ strip flat on a solid surface (the ground). Then, place the 1/2″ base piece on top of the 1/4″ strip.
Adjust the 1/4″ strip to be flush with the size of the base piece (example 10″ side).
Once the two are flush, mark the 1/4″ strip where the 1/2″ base ends.

Now, cut the 1/4″ piece right next to the marked line.
TIP: It’s better to leave a little extra because it will be sanded down later.
After cutting, place the trim piece on top of the base piece to check the fit.
Complete this step for each side of each drawer fronts, but make sure to keep the pieces together.

STEP 4: Install the trim to the drawer base
Now you’re ready to attach the trim to the base.
Working on one drawer at a time, place the trim piece off to the side (right side down). Then, wipe both the trim piece and the base with a dry cloth. This will remove dust to help the glue adhere.
Apply some glue to the trim pieces, making sure to stay 1/4″ away from all sides.

Place the trim piece onto the base, making sure the edges are flush.
Then, with your nail gun and 5/8″ finishing nails, fasten the trim into place (I used three nails per trim: edges and center).
TIP: Test your nail gun with scrap pieces beforehand to make sure it inserts the nail correctly.

Repeat for the other trim piece. Then, add the trim pieces to all the additional drawers.
STEP 5: Install the inside trim pieces
Now that the side trim pieces are all attached, it’s time to add the inside trim pieces. To do this, take the 1/4″ strip and place the edge against the newly added side trim piece so that it crosses over the other side trim piece.
You can use a square or just your eyes to mark the strip right where the inside trim piece will hit the side trim piece so that it will fit into the opening.

Take the piece over to the saw and cut right next to the line or marking.
TIP: It’s better to cut a bit larger because you can always trim the extra.
After cutting, check the fit of the inside trim piece and adjust if needed. The goal is to have a minimal gap.
Once the inside trim piece fits perfectly, start on the other side.
After both inside trim pieces are cut to fit, wipe them with a cloth and attach them the same way as the side trim pieces (glue & finishing nails).

Now, repeat the steps above for all the other drawers fronts.
STEP 6: PREPPING THE DRAWER FRONT
Once all the trim is attached, sand the drawers with #220 grit sandpaper to smooth out all the edges.
Next, use a putty knife with spackling paste (or wood filler) to fill in the holes and gaps where the trim pieces connect. Let the paste dry.

Once it has dried, sand the whole drawer front with the #220 grit sandpaper.
When everything is sanded, use a vacuum to remove all the dust or use a dry cloth.
Next, apply a white sealant (caulk) to the inside of the drawer where the trim hits the base.

Let the caulk dry completely. Then, add two coats of primer and two coats of paint to the drawer front (front and back).
SIDE NOTE: I put three coats of paint on the front of the drawer fronts.
TIP: To seal the paint, apply two coats of Polycrylic to give you a long-lasting, protective finish.
Once the paint has dried, pre-drill the holes for the handles.
TIP: Place painter’s tape over the paint to help protect the finish during this step or drill the holes before painting.
STEP 7: Installing the drawer fronts
Now that the drawer front is painted and the hardware holes are drilled, it’s time to install it onto the existing drawer.
Take the drawer and drill a slight hole for the screw head on the four corners of the front inside of the drawer (leave at least .5″-1″ space from the ends). This is where the screws will be placed to attach the front.
TIP: Make sure the slight hole is only deep enough for the screw’s head; it will be level with the drawer after installed.

Take four 5/8″ screws and loosely screw them into the holes you just created (so that they are in place).

SIDE NOTE: The size of the screw will depend on the size of the drawer. I am using 1/2″ drawers.
Add the drawer onto the slides and close them into place. You will need to leave a 1/8″ space on the edges of the frame to the drawer front.
Place your spacer onto the frame and place your drawer front into place.
TIP: I found that a nickel and dime taped together gave me the perfect spacer.

Once the front is positioned correctly, clamp the drawer front onto the drawer (I checked my level and gaps after clamping).

Then, drill the handle hole into the drawer.

Add the handle hardware completely, and again, check that the drawer front is level and the spacing is correct.
Then, tighten the screws on the drawer to the drawer front.
This drawer is now complete.
Follow these steps for all the other drawers.

Now, you are completely finished. You incorporated a classic design that will complement any aesthetic, it’s easy to repaint if you feel like changing things up and you did it all yourself!
I hope you learned an easy way to build drawer fronts but remember, this tutorial will only work if you are painting the wood. Do you have any tips or questions about how to make an MDF shaker drawer fronts?

DIY Shaker Drawer Fronts
See how easy it is to build DIY shaker drawer fronts plus these don’t require a router or pricey wood materials.
Materials
- 1/2″ MDF sheet (base)
- 1/4″ MDF sheet (trim)
- wood glue
- 5/8″ finishing nails
- spackling paste
- #220 grit sandpaper
- paint and primer
- handles (we used map knobs from Etsy)
- 5/8″ screws (to attach the front to the drawer)
- white caulk
Tools
- miter saw
- table saw (you can use a Kreg Rip-Cut with a circular saw)
- orbital sander
- paint brush & roller (or use a paint sprayer)
- air compressor with a nail gun
- drill
- level
- safety glasses
- face mask (for dust)
- ear protection
Instructions
- Find the size of the drawer front.
- Cut the 1/2" MDF to the size of the drawer front. Also, cut the 1/4" MDF into strips that will be the trim.
- Cut the 1/4" trim for the sides of the drawer base.
- Install the side trim pieces to the base.
- Attach the inside trim pieces to the base.
- Prep the front by sanding, filling in nail holes, and apply caulk.
- Paint the drawer front with primer and paint.
- Install the front to the drawer.