Have you checked out all the sheds for sale but none of them are what you’re looking for?
Whether they’re too expensive or not the right configuration, the fact remains: you need more room for all the stuff you have.
And what better way to do that than to tackle it yourself? It’s easy to accomplish if you take your time.
When we started building our shed, however, we never expected that the roof would be the most challenging part.
A lean-to shed must be designed with a slope that will allow proper water drainage. You want to prevent any leaks inside the shed.
Even though we faced some obstacles along the way, we learned from our mistakes. I’m going to share with you an easier way to build a lean-to roof for a shed, including placing metal roofing material on top.
Steps before building a lean-to roof for a shed
- You need a shed plan. In another post, I share how to create a shed plan, which will help you build the roof in this post.
- Before you can build any part of the shed, you need to establish a foundation. For our shed build, we decided on and installed a paver foundation for the shed. In addition to the pavers, we added gravel around the area to keep grass away and help with water draining off the shed roof.
- Next, you need to build the shed floor.
- Now, it’s time to build the roof!
Please remember that we are not professionals and we cannot be responsible for the outcome of your project.

Disclosure: This post contains some affiliate links or referral links for your convenience. It is a way for this site to earn advertising commissions by advertising or linking to specific products and/or services. Click here to read my full disclosure policy.
BUILDING A LEAN-TO ROOF FOR A SHED
MATERIALS:
- 2×4’s (framing)
- 7/16″ sheathing
- 3.5″ framing nails
- 2″ framing nails
- ice and water shield
- 1″ roof nail with plastic cap
- soffit (we used the extra siding for this)
- fascia
- USING SHINGLES:
- shingles
- drip edge
- nails for shingles
- USING METAL ROOF: (what we used)
- metal roof panel (they come in 3ft x length & we purchased the Charcoal)
- metal gable trim
- 1 1/2″ Galvalume screws
- 3/8″ screws
- rib inside closure (you need one for each metal roof panel)
- rubber sealant tape
TOOLS:
- miter saw
- circular saw
- tape measure
- pencil
- chalk line (optional)
- air compressor
- framing nail gun
- hammer
- drill (for a metal roof)
- tin snips
- square (optional)
- razor blade
- safety glasses
- face mask (for dust)
- ear protection
BUILDING THE ROOF – THE FRAMING
The framing of the roof will be made with the standard 2×4 but there is something important you need to do to each board that sits on the shed framing. Let me explain:

When you look at this sketch, do you notice how the 2×4 overlaps the wall framing? You have to cut a notch in each 2×4 with this overlap so the board will sit nicely on the wall.
To make this notch, I created a template with a scrap 2×4. Your template will be different but the key is making a slight notch, as shown in the picture below.
SIDE NOTE: We only notched out one side but later, we realised that we should have done both.
Once I created the template, I traced it onto the 2×4 I would be using. Then, using the circular saw, I cut out the notch.
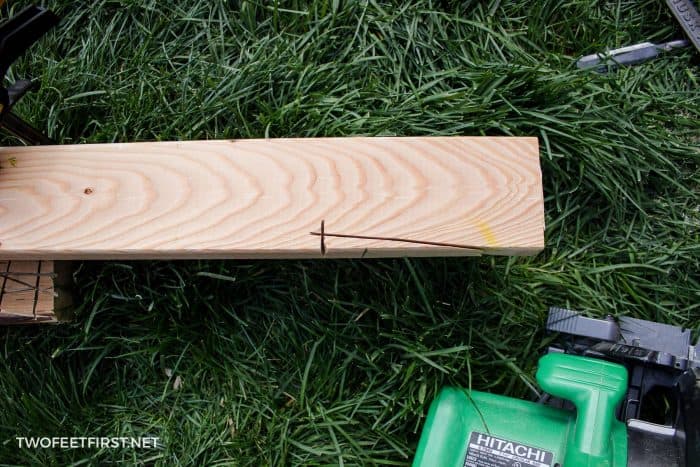

SIDE NOTE: After completing this step, we purchased a jigsaw – this saw would have made the cut easier.
When all the 2×4’s are cut (that need to be), build the roof framing according to your blueprint (plan).
TIP: It will be easier to build this in place (on top of the shed) but if you can’t, build it on the ground and then put into place before adding the sheathing.

After the framing of the roof is built (and in place), square it up. Here is a quick link to a video from Youtube to help you see how easy it is to square up framing.
Then, add the sheathing. Don’t skip this step – you need sheathing for a roof!
SIDE NOTE: You will want to add some bracing between the roof and wall (where the triangle is!). To do this, cut scrap 2×4 to fit into place; then, attach using screws or nails (we used our Kreg Jig K5 to create pockets and used 2.5″ screws).

ADDING THE METAL ROOF
In this part of the tutorial, I will be explaining how to install a metal roof for a shed.
The first thing you need to create is a drip edge. This helps to divert the water away from the building.
This will only be placed on the shorter and taller sides of the shed (something else will be placed on the other sides). And this edge will extend a couple of inches onto the other sides.
SIDE NOTE: You could get away without adding this but I highly recommend it.
To install the drip edge, use tin snips to cut a triangle from the side that sits on the plywood where the metal will wrap around the corner.
TIP: The point of the triangle is where the metal will wrap around.
Also, snip the other side (directly across) to prevent it from flattening.
Using the 2″ nails, nail the drip edge to the plywood, making sure the edge is against the 2×4 frame.
Here is an example of what I am talking about:

Using a hammer, flatten the drip edge so it’s flush with the framing ONLY on the wall sides (not the shortest and tallest sides).
Next, you will place the ice and water shield, which will also help to keep water out. This stuff comes in a roll and it sticks into place. Use a razor blade to cut it according to the size of the roof.
Next, add the metal panels. You will want the metal to extend 1″-2″ past the framing (it will run from tall side to short). If needed, cut the metal roof panel to the length you need with tin snips (hopefully you won’t have to!).
TIP: Plan ahead and build the roof to the size of the metal panel!
Place the starting panel onto one edge of the roof.
SIDE NOTE: The side of the panel that has a slightly flat side is to place on the roof. The other side is for overlapping the panel. Place the rib inside closure inside the groove (both overhangs will have this).
TIP: You can use rubber seal to help it stay in place – some are sticky already.

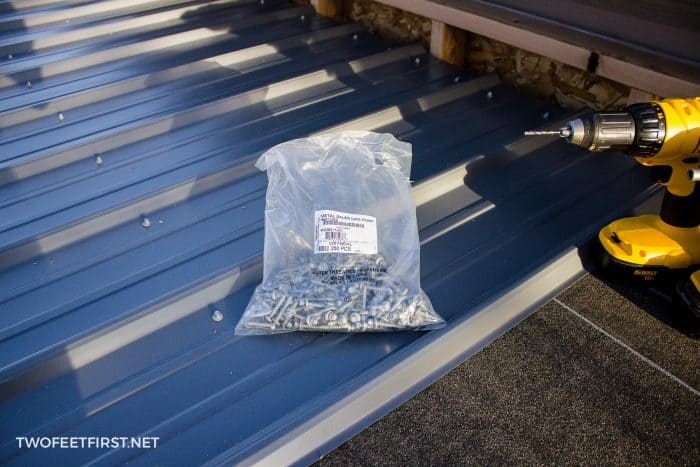
Using the 1-1/2″ Galvalume screws, attach the metal panel to the roof. These screws will be attached to the flat part of the panel. Tighten only until the foam pad slightly squishes (you will understand when you are attaching).
Here is an example of the screw placement.

To add the next panel, apply the rubber sealant to the top of the overlapping groove (bump). Then, place the next panel, making sure the edges are level. Attach the same way as the last panel but use the 3/8″ screws to attach the two panels together on the bump.
Continue this process until all the panels are installed.
Now it’s time to add the gable trim to the other wall sizes. Make sure the gable trim is the size you need – if not, cut to fit (it will go edge to edge). Place the rubber sealant on the closest bump of the metal panel.
TIP: We added the gable trim after we finished painting the whole shed to avoid getting paint on the trim.

Next, place the gable trim and attach using the 1.5″ screws. Also, attach on the side (along the framing front).

And that is how we built a lean-to roof for a shed and installed a metal roof.
Now that the roof is installed, it’s time to install the siding and trim onto the shed.

Build a Lean-to Roof for a Shed
Are you wondering how to build a lean-to-shed roof? Here are the steps on how you can build one.
Materials
- 2×4’s (framing)
- 7/16″ sheathing
- 3.5″ framing nails
- 2″ framing nails
- ice and water shield
- 1″ roof nail with plastic cap
- soffit (we used the extra siding for this)
- fascia
- USING SHINGLES:
- shingles
- drip edge
- nails for shingles
- metal roof panel (they come in 3ft x length & we purchased the Charcoal)
- metal gable trim
- 1 1/2″ Galvalume screws
- 3/8″ screws
- rib inside closure (you need one for each metal roof panel)
- rubber sealant tape
Tools
- miter saw
- circular saw
- tape measure
- pencil
- chalk line (optional)
- air compressor
- framing nail gun
- hammer
- drill (for a metal roof)
- tin snips
- square (optional)
- razor blade
- safety glasses
- face mask (for dust)
- ear protection
Instructions
- Build the frame of the roof using 2x4 but make a notch in the 2x4's to allow the frame to sit on the wall of the shed at an angle.
- Install the metal roof by install drip edge, ice and water shield, installing the metal panels, and gable trim.
Notes
Visit the article for more details.