A step-by-step guide on how to build a floating deck close to the ground for your backyard oasis.
It’s been a stressful day but as you look out into your backyard, the blue skies and the warm sunshine are inviting you to a quiet retreat outdoors.
Ideas for a delicious picnic lunch float around in your head and you decide to whip up a quick meal to dine al fresco.
But suddenly, you remember….there’s nowhere to sit out there! You don’t have a deck or patio to enjoy this little escape.
Put that smile back on your face – it’s time to finally build a deck so you can enjoy the sun and everything your backyard has to offer.
Let me show you how you can stop wishing for that backyard oasis and help you build a floating deck.
What is a floating deck?
A floating deck, also called a free-standing deck, is a platform that is not attached to any structure.
When looking at outdoor spaces, we knew we wanted a patio but didn’t like the idea of reinforcing a concrete patio to the foundation of our house. Our solution? A floating deck!
Can I build a deck directly on the ground?
Yes, you can build a deck directly on the ground but there are some prerequisites.
A ground-level deck is meant to be low to the ground so if a deck is within 10” off the ground, it must be built with ground-contact wood (pressure-treated). Also, the ground under the freestanding deck will get wet so the substructure (blocking) needs to be high enough to allow ventilation for the ground to dry out.
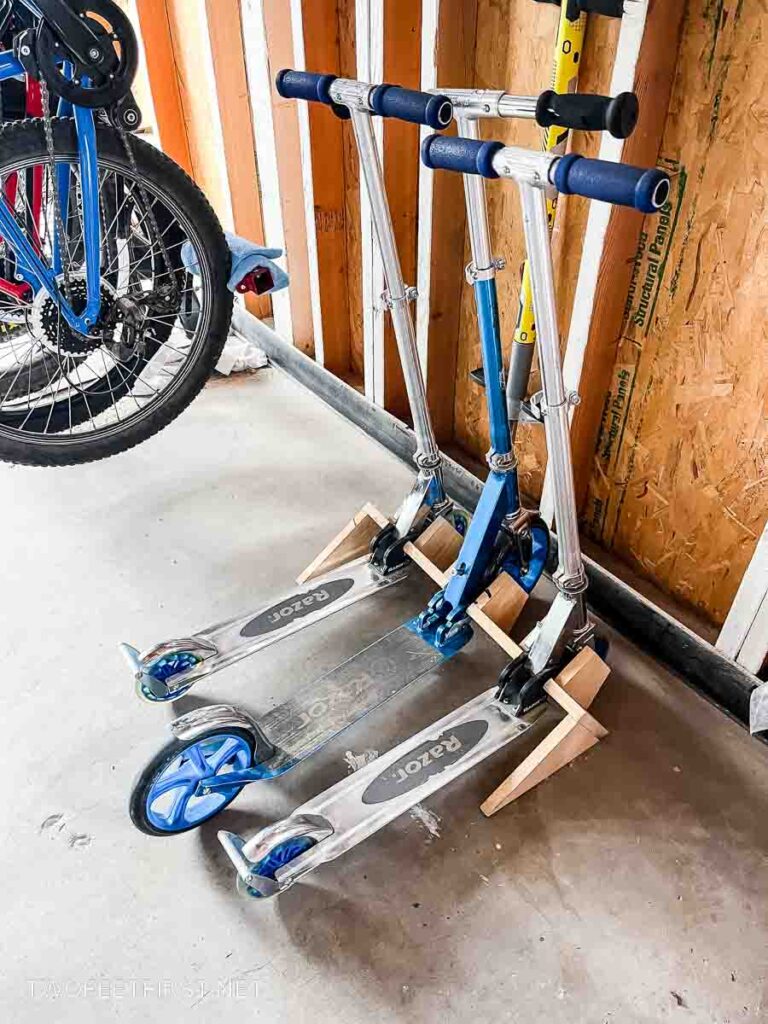
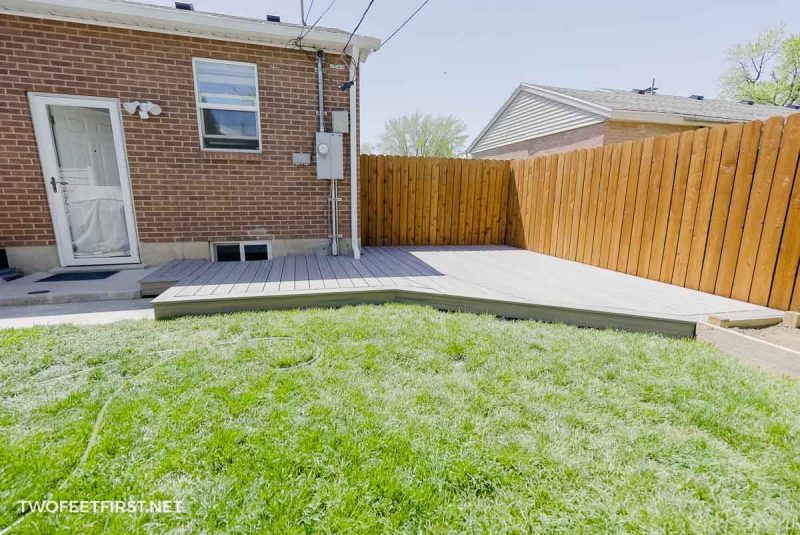
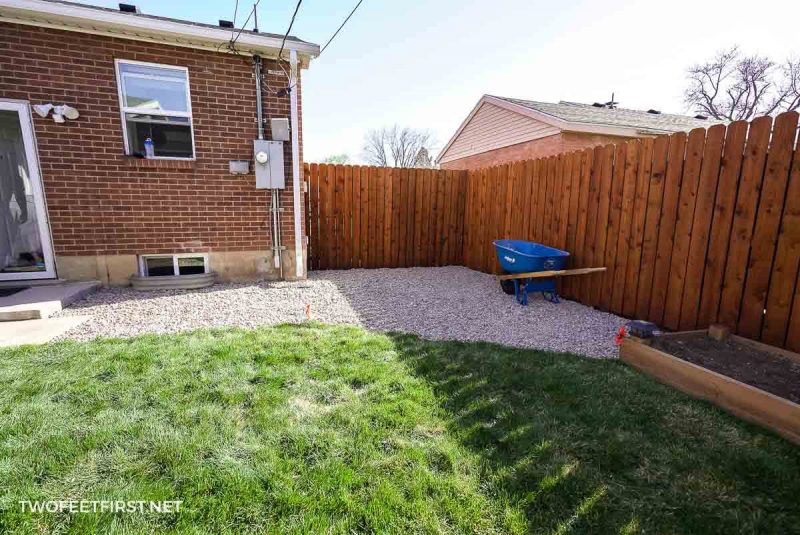
Let’s start off by showing you what the space looked like before we installed the deck:

We’ve already come a long way – here is what this space looked like when we purchased our home:

Disclosure: This post contains some affiliate links or referral links for your convenience. It is a way for this site to earn advertising commissions by advertising or linking to specific products and/or services. Click here to read my full disclosure policy.
How to build a floating deck
Materials
- composite decking (we used Trex Enhance in Rocky Harbor)
- Tuffblocks
- 2”x6” pressure-treated lumber
- 3” exterior screws (can be used with pressure-treated lumber)
- hidden fastener
- deck screws that match the decking
- landscape edge guard
- gravel
- weed barrier fabric
- joist tape
- joist hangers
- angled joist hangers (if needed)
- hanger screws
- #60 or 80 grit sandpaper (optional)
Tools
- miter saw
- jig saw
- drill
- level
- square
- sliding t-bevel
- tape measure
- pencil
- clamps
- orbital sander (optional)
- wheelbarrow
- shovel
- rake
- tamper (optional)
- pencil
- safety glasses
- face mask (for dust)
- ear protection
Check your local code
Be sure to check your local building code to see if a floating deck is allowed in your area and if you need a permit to build one. Usually, if the floating deck is under a certain size, no permit is needed.
Create the plan
Before you start, you need to create your plan for the floating deck.
For my plan, I measured the area where we wanted our deck. Then, I used a program called Sketchup (they have a free online version) to design the layout.
This build would have been easier if the deck was square or rectangular but our deck was not.
Please note that the deck boards will be perpendicular to the joist (framing). Decide on which direction you want the decking boards, then design the framing to work with the direction.
For example, we wanted the decking boards to start at the house and run to the backyard (south to north). Thus, the joist needed to run perpendicular to that (east to west).
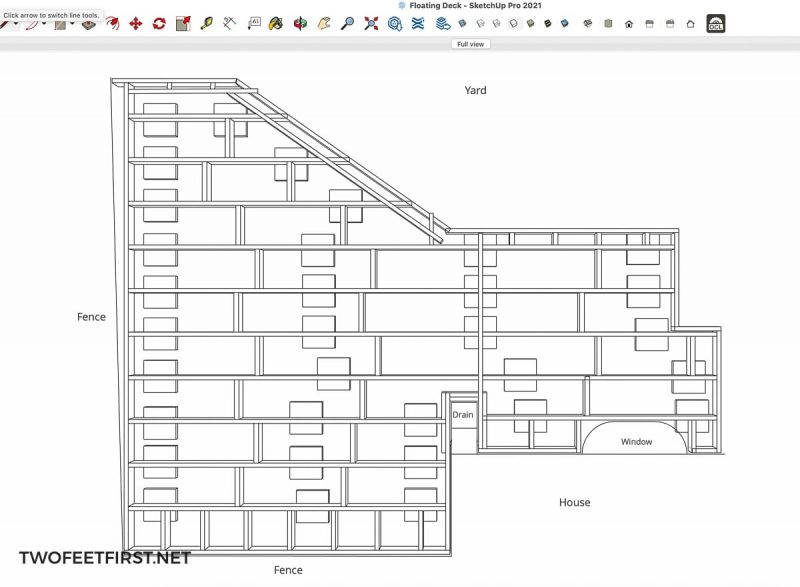
I will go into more detail about the spacing for the framing, blocking, and decking in the steps below.
Prepare the foundation
There are many ways to create the foundation of a floating deck. We used a system called TuffBlocks because they are easy to install and low-profile. It would allow the deck to be inches from the ground.
SIDE NOTE: TuffBlocks, sturdy plastic anchors for the deck posts, are designed to allow the proper ventilation under the deck, allowing air to circulate.

We decided to place a 2” gravel base for the foundation to allow for water drainage from the deck. This would also make it easier to level the TuffBlocks.
To begin, we removed 2” of dirt from the area.

We also installed plastic landscape edging to separate the gravel and grass. This will hold the gravel in place and also keep the grass out.

Once the 2” of dirt was removed, I installed a weed barrier to help keep the weeds away.

Then, we added the gravel to the area, making sure it sloped away from the house to allow water to drain away from the home.

Now, the base of the foundation is ready for the blocks. These blocks will be placed and leveled during the next few steps.

Setting the blocks
The next step is framing the floor of the deck. While you are doing this, you will also need to place the blocking.

Let’s talk about the spacing requirements for this type of blocking. You can find the company’s instructions on the TuffBlocks website. Here are the highlights:
- It’s recommended to have a TuffBlock no more than 12” from the edge of the outside framing to the center of the block.
- Within a span of a floor joist (one board of the framing), the blocks should not span more than 50”.
- You need a TuffBlock on every joist of the framing. Each joist will be spaced 16” on center. (We will talk about that more in a later step.)
The layout is also very important:
- The outside framing of the deck will have at least two long joists where the blocking will sit.
- Then, there will be rim joists running perpendicular to these boards to support the block and tie the other joists together.
- You should also install additional rim joists parallel to the long joists to allow you to hide the blocking from view (sometimes called a double-end joist). This is done by using ‘sleepers’, which are short boards running between the joists to provide extra support.
- Depending on the size of the deck, there could be a center beam running between the two outside boards.
Here is a diagram of our deck framing from our planning:
Now, let’s start building the framing so we can place the blocking.
Build the outside frame
To start building the framing of the floating deck, you first need to secure the perimeter framing, or the outside edge, of the deck.
If you are building your deck close to another structure, like we are, you will need to allow some spacing between the framing and the structure.
The spacing needs to be around 1”-2”; I decided to have a space of 1”.
Another spacing issue to consider is if you plan on having fascia around the framing. If so, identify the areas that you plan on using this additional board.
In our case, we used a regular, square-edge decking board as our fascia. Thus, we needed an additional 1” board in some areas and we wanted a slight ½” overhang of the top decking board.
Start building your outside perimeter of the framing by measuring the distance and subtracting this spacing, if needed; then, cut the outside rim joist boards to these measurements.

I checked the fit of the boards before attaching them together by pre-drilling two to three ⅛” holes through the side board. Then, I use 3” exterior screws (that can be used with pressure-treated lumber) to secure the boards together. I continued this process for all the perimeter boards of the framing.
You will notice that we installed the double-end joist as well. Our sleepers, small boards between the two joists, were no more than 8” long.

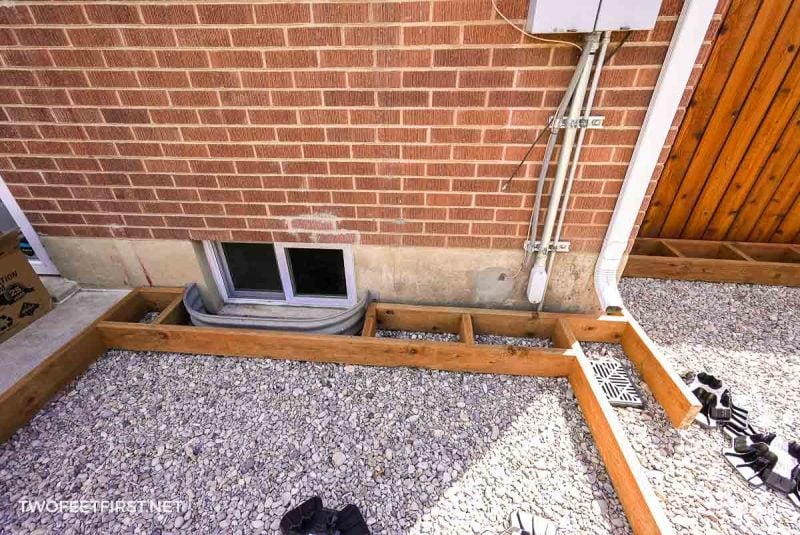
Also, we have a beam running down the middle of the framing. This is because the length of the one side of the deck was 12 feet long and we didn’t want the distance any longer without extra support.

Remember to set the TuffBlocks in place while you are building the perimeter of the deck.
SIDE NOTE: If you are building a rectangular or square deck, you should square the deck frame now. Here is a great tutorial on how to square framing.

Check the blocks
Once the outside frame is built, check the placement of the blocks. Then, confirm that the deck framing is level and making contact with each block. If necessary, add or remove gravel under the blocks to adjust the height.
Install the remaining joists
Now it’s time to work on the middle section and install the rest of the joist boards.
These boards will be installed using joist hangers. For our deck build, we used two different types: face-mount joist hangers and framing angle hangers.


Mark the rim joist on your framing so that these new joists will be spaced 16” on center.

After measuring the distance between the end joists, cut the pressure-treated lumber to fit in these locations.
If you need to cut a board at an angle, it is helpful to use a sliding t-bevel to get the angle.

To cut the joist at an angle, we placed the board onto the framing in the general location where it would be installed. Then, we measured the board so that it would be 16” on center from the last joist.
From there, we used the t-bevel to determine the angle and then we measured the length of the board. Next, we cut the board to length using the sliding t-bevel to give us the angle at the saw.
After, place the cut joist in the location with the TuffBlock at the ends and in the middle, if needed.
SIDE NOTE: Remember that the blocking should be no more than 12” from the outside edge to the center and they need to be spaced no more than 50” apart.
Attach the cut joists to the end joist with a joist hanger and the recommended screws.
SIDE NOTE: I found it helpful to use clamps to hold the board in place. Also, I attached one screw through the end joist (or beam) to the joist, then attached the hanger.
I also bent the angled joist hanger to fit the angle of the end joist in some areas.
Install all the joists with a joist hanger.

Install any additional supports
Once all the joists are installed, it’s a good idea to add additional bracing to help support the deck.
You do this by installing extra sleepers (sometimes called blocking) between the joists. These are installed by measuring the distance between two joists, cutting the lumber to that size and setting into place with two to three 3” screws on each end, just like the outside framing.
You will also need additional bracing if you are adding decorative trim to the outside edge of the decking, also known as a picture frame. To create this type of border, we added another bracing board about 5” from the rim board to allow the decking a place to secure to.
We only decided to do this after we had already started installing the decking boards.

We also sanded the edges of the joists and made sure everything was level.
Apply a sealant tape

After all the framing is installed, seal the joist with some joist tape.

This tape helps protect the joists from moisture. Although we are using pressure-treated lumber, it doesn’t hurt to take one more step to ensure that the framing will last for many years.
Install the fascia
If you want your deck to look custom and professional, I would recommend doing the next two steps because it brings it all together.
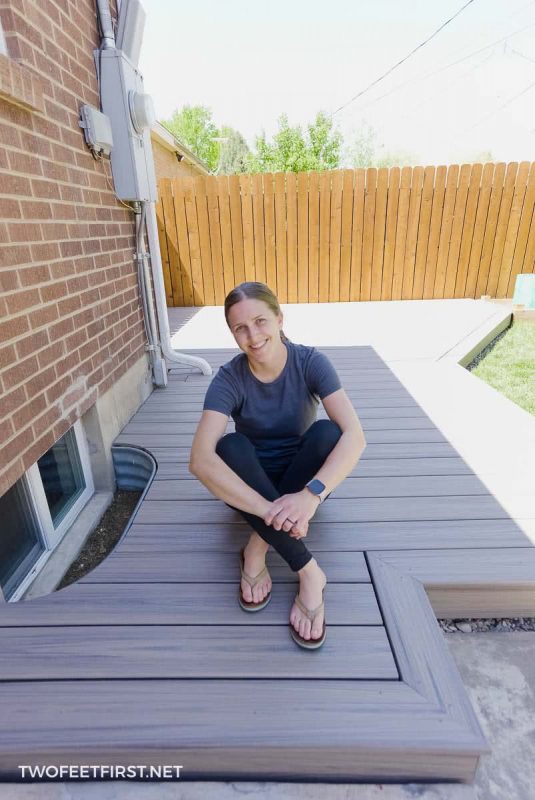
There are different types of material that can be used for decking. In this tutorial, we are using Trex composite decking.
And within Trex, there are different styles and profiles. We are using the Enhance Naturals in the color Rocky Harbor. We are also using two different profiles: Square-Edge and Grooved-Edge.
The Square-Edge boards we will be using for the fascia and the picture frame border. We will use the Grooved-Edge boards for the main part of the decking.
Also, the decking boards needed to have gaps between other decking boards but also structures. For example, the boards around our house and fence needed a gap of ¼”-½”. Because of our temperatures being so cold in winter, our gap needed to be ½”.
Make sure you keep this in mind when you install all the deck boards and adjust accordingly.
The fascia will be placed on the front of the framing to hide the pressure-treated lumber.
To install the boards, we measured one section and cut the square-edge board to that measurement with a 45-degree angle. This allows the boards to fit together in a seamless finish.
After, we checked the fit by clamping the board into place and cutting the next section. We then placed the next section to see if any boards needed to be adjusted.

Then, we secured the first board to the rim joist using 2-¾” deck screws matching the color of the decking. You need to place at least two screws in a row and space them about 18” apart. I recommend pre-drilling the holes first, then attaching the screws.
TIP: Drill the screws in slowly and stop drilling when the screw is flush with the deck board.
Again, make sure to read the directions for the manufacturer of your decking.
Repeat this process for all fascia boards.
Create a picture frame border
Once the fascia is up, it’s time to install the picture frame border around the deck. It’s called a picture frame because it frames out the deck.
We only added the picture frame to the areas that were not against the house or fence.
For most corners, you would cut the square-edge boards at a 45-degree angle. However, if you have framing without 90-degree corners, you will need to adjust the cut of that area.
For the first cuts of our picture frame, we measured the distance from the house to the first corner. We subtracted ½” to allow the gap required for the decking being next to the solid wall. We also wanted a ½” overhang on the picture frame so it ended up being the same measurement.
We cut the square-edge decking board at 0-degrees to be placed against the house. Then, we measured and cut the board to the dimensions from before but this time, we cut the board at a 45-degree angle where the measurement was at the farthest point of the cut.
SIDE NOTE: Make sure you are cutting the board at the right angle so you don’t waste a board.
We tested the fit of the board and clamped it into place. Then, we measured and cut the next board but this time both edges would be at an angle.

Place this board to check the fit, adjusting either board if needed. Then, secure the first board into place by pre-drilling two ⅛” holes at one end of the board.
TIP: Make sure you are drilling into the framing!
After, use the 2-¾” deck screws to secure the board into place. Secure the other end of the board the same way.
TIP: Drill the screws in slowly and stop drilling when the screw is flush with the deck board.
Continue adding screws about every 18” until the board is secured to the framing.
Continue the process of measuring, cutting and securing the square-edge decking board until you have installed the whole picture frame.
SIDE NOTE about different angles: Because our deck has different angles, some of our picture frame trim was not a 45-degree cut. To determine the cut, I used the t-bevel tool and scrap boards. I tested the angle on the scrap boards first before making the cut on the actual decking board.
Install the deck boards
Now that the picture frame is installed, it’s time to install the rest of the decking boards.
We are using Trex hidden fasteners to give us a clean, seamless look.
Starting on one side of the deck, measure the distance from the picture frame border to the house, in our case. But you need to adjust this measurement to allow for the gap against the house and the gap when boards are next to each other.
For our deck, the gaps are ½” (house to board) and ¼” (board-to-board), so we subtracted ¾” from this measurement.
TIP: I used a scrap ¼” board to give me the gap next to the picture frame when measuring and installing the boards.
Cut a grooved-edge deck board to this measurement, then test the fit, adjusting if needed.

To start the first row of the main decking, you need to secure the start clips to each joist, ¼” away from the picture frame.

Then, place the board that you just cut into the clips using the groove. Make sure you have the appropriate gaps at the ends of the board.
Next, take the hidden fasteners with a scrap grooved-edge deck board and secure a fastener onto the center of each joist. DO NOT fully tighten the fastener; the screw head should be flush with the top of the deck board. Use the scrap deck board to keep the fastener in place.
Once there is a fastener on each joist, measure and cut the next board.
Place this board into place, making sure the fasteners are within the groove of the board and the board has appropriate gaps on each end.
Again, take the hidden fasteners and secure the new board into place at each joist. Remember not to fully tighten the screws.
After, go back to the previous row of fasteners and fully tighten each one.

Continue this process until the last deck board.

If you need to cut around an item, like a window well, use a Jig Saw to cut out the area.
TIP: I found it helpful to use painter’s tape to see the markings. I also used a piece of paper to create a template to trace the design onto the deck board.
For the last board, you may need to cut the width of the board to fit into the space. If you are cutting the width, it is recommended to use a square-edged board. You will need to fasten the board to the joints with a standard decking screw, the same one you used for the picture frame.
SIDE NOTE: The last installed groove-edged board will have hidden fasteners. You will need to create a groove in the side of the square-edged to allow the fasteners to sit properly in the board. You can use a router, or if you have one, a biscuit joiner (this is what we used).
How much does it cost to build a floating deck?
Obviously, the size of your deck is a big factor in determining the cost of building a deck.
SIDE NOTE: I want to note that none of the materials were sponsored. We purchased all the supplies ourselves.
The cost of our deck, which is about 200 square feet, was $2,778 for all materials.
Here’s the breakdown of the cost of materials:
- Trex composite decking = $1,272
- TuffBlocks = $315
- 2”x6” pressure-treated lumber = $523
- 3” exterior screws = $33
- Trex hidden fastener = $124
- deck screws that match the decking = $10
- edge guard = $20
- gravel = $75
- weed barrier fabric = free (we had some on hand)
- joist tape = $93
- joist hangers = $28
- angled joist hangers = $4
- hanger screws = $32
Additional costs
- delivery charge = $89
- tax = $160
FULL PROJECT VIDEO:
Are you someone that does better with visuals? Check out the full project video below and don’t forget to subscribe on YouTube so you don’t miss out on future projects!

Now take a step back and admire your hard work. And then grab your lunch – it’s time to relax on your new backyard deck!

Build a Floating Deck
Do you want a backyard oasis? It's time to start looking at building a floating deck for your backyard. Here are the steps on how to build a floating deck.
Materials
- composite decking (we used Trex Enhance in Rocky Harbor)
- TuffBlocks
- 2”x6” pressure-treated lumber
- 3” exterior screws (can be used with pressure-treated lumber)
- hidden fastener
- deck screws that match the decking
- edge guard
- gravel
- weed barrier fabric
- joist tape
- joist hangers
- angled joist hangers (if needed)
- hanger screws
- #60 grit sandpaper (optional)
Tools
- miter saw
- jig saw
- drill
- level
- square
- sliding t-bevel
- tape measure
- pencil
- clamps
- orbital sander (optional)
- wheelbarrow
- shovel
- rake
- Tamper (optional)
Instructions
- Create the plan of your deck.
- Prepare the foundation of the floating deck, we used TuffBlocks and gravel.
- Set the blocks for the framing
- Build the outside frame of the deck.
- Check that the blocks are level.
- Install the remaining joists within the framing.
- Add any additional supports between the joists.
- Apply sealant tape to the joist.
- Install the fascia to hide the pressure-treated lumber.
- Create a picture frame border.
- Install the deck boards to the framing using hidden fasteners.
- Enjoy your floating deck!
Notes
Be sure to check your local building code to see if a floating deck is allowed in your area and if you need a permit to build one. Usually, if the floating deck is under a certain size, no permit is needed.