Are you looking for a simple, yet inexpensive storage solution for your bikes in the garage?
When you’ve run out of floor space in your garage, you can always look upwards – ceiling racks are quite handy.
But maybe you don’t feel like doing a biceps workout lifting several bikes onto overhead racks….or constantly hitting your head on dirty bike tires as you navigate through your garage.
Today, we are going to build something sturdy and convenient for your bike storage in your garage. You’ll see how you can create a convenient and affordable system, not just for one bike but multiple bikes.

Let’s get rolling!
Disclosure: This post contains some affiliate links or referral links for your convenience. It is a way for this site to earn advertising commissions by advertising or linking to specific products and/or services. Click here to read my full disclosure policy.
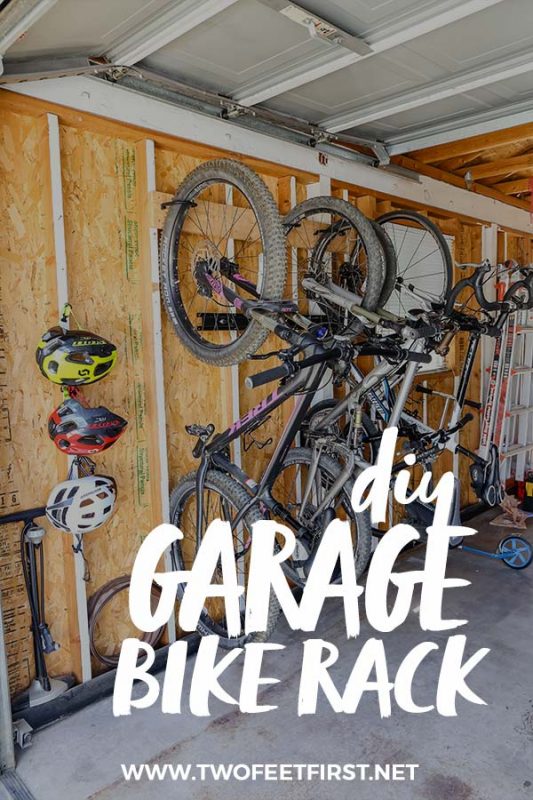
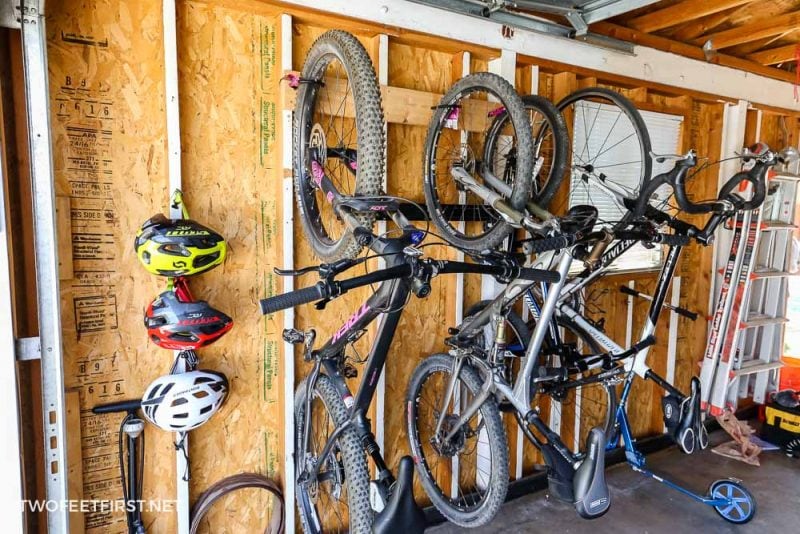
DIY garage bike storage
MATERIALS:
- 2”x6” board
- 2-½” wood screws or 3” if you are installing over drywall
- screw-in bike hanger
TOOLS:
- miter saw (if needed)
- drill
- drill bits
- level
- clamps (optional)
- pencil
- safety glasses
- face mask (for dust)
- ear protection
STEP 1: Prep the board
To create this bike rack, first determine where you want to place it and how wide it needs to be (depending on how many bikes you want it to hold).

SIDE NOTE: To determine the ideal space, plan on the bikes extending approximately 44” out from the rack on the wall.
The 2×6 board will be secured to studs in the wall so pick a spot in the garage where you can fit the rack but also have studs to attach the board.
Now, decide on how many studs you need to secure your board to so that the rack can support the weight of the bikes. If your board is 8 feet, I would recommend no less than four studs. Of course, this will also depend on the number of bikes the rack will hold.
After you have your location, cut the 2×6 to the width you need for your space or if you can use the full 8-foot board.
Next, mark the board where the center of each stud will be on the top and bottom of the 2×6.
TIP: If you have drywall on your garage, use a stud finder to determine where the studs are, then mark their locations (ends). After marking the wall, mark the board as well.
Now, place the 2×6 board on top of two scrap boards on a flat surface. This is to make the 2×6 board slightly higher than the surface so that you can drill holes into the wood and not hit the ground.
After, pre-drill ⅛” holes into the 2×6 board where you marked the center of the studs. You will want a pre-drilled hole about a 1” away from the top and bottom edge.

Next, you need to determine where to place the hooks to hold the tires of the bikes.
This is done by marking the board 2-¾” away from a side (center of the board) at certain spacing. I would recommend you space your hooks 12” apart to 24” and have the first and last hook start/end a 1-½” from the edge of the board.
SIDE NOTE: If you space the hooks 12” apart, you might need to alternate the tires of the bikes so one is the front bike and the next is the back tire on the hook. I spaced mine 12” and I didn’t need to rotate the tires but this will depend on the size of your bikes.

Once you have marked the center of the board for where the hooks will be placed you are ready to move to the next step.
STEP 2: SECURE THE BOARD TO THE WALL
Take the 2-½” screws (or 3” if you are installing the rack over drywall) and drill them into the 2×6 board in the pre-drilled holes. Only drill them as far as the board; this will help when you install the board onto the wall.

Next, place the 2×6 board onto the wall in your predetermined location.
TIP: It helps to use clamps to keep the bottom of the board in place.
Use a level to align the board properly.
TIP: Again, clamps work but you can also use the help of a second person.
Once the board is level, secure the screws into the studs in the wall.

STEP 3: INSTALL THE HEAVY DUTY HOOKS
Now that the 2×6 board is secured to the wall, you can drill the holes to install the hooks to the board.
Drill holes onto the premarked spots where each hook will be placed (remember it is in the center of the board). The size of the hole will be based on the hook you are using.
TIP: The hooks usually come with instructions on what size of drill bit to use.
When all the holes are drilled, you can then attach the hooks by screwing them into the holes you just drilled.
TIP: Screw the hooks until the coating is at the board and the hook is sideways (left and right)

STEP 4: PLACE THE BIKES ONTO THE RACK
Now that the hooks are in place, you can place your bikes onto the hooks.

TIP: It’s easier to install the bikes from left to right or right to left. Getting a bike from the middle is a little difficult. Place the most used bikes on the ends.

There are other bike storage solutions that you can have in your garage and some might be a better solution for you depending on your garage.
But this heavy-duty wall mounted garage bike rack is a simple way to fix your bike storage problem and I hope it will help you as much as it has helped me.
I hope this tutorial will help you organize your garage by finally having a bike rack storage that works for you.
THE FULL PROJECT VIDEO:
Are you someone that does better with visuals? Check out the full project video below and don’t forget to subscribe on YouTube so you don’t miss out on future projects!


DIY Garage Bike Rack
Looking for a simple way to organize bikes in a garage? You can easily DIY a bike rack for cheap to finally have a place for bike storage with this tutorial.
Materials
- 2”x6” board
- 2-½” wood screws or 3” if you are installing over drywall
- screw-in bike hanger
Tools
- miter saw (if needed)
- drill
- drill bits
- level
- clamps (optional)
- pencil
- safety glasses
- face mask (for dust)
- ear protection
Instructions
- Mark the 2x6 board for placement on the wall to secure the board the studs.
- Mark where a hook will be placed to hold a bike on the 2x6 board.
- Secure the 2x6 board to the wall using screws, make sure the board is level.
- Install the heavy-duty hooks onto the board.
- Place the bikes onto the hooks.