This is another one of those Christmas present projects that I can now share with you!! Sometimes it is hard to decide what the grandparents would really like for Christmas. We decided we wanted the kids to do something from them but what? Then we thought of maybe a wooden ornament, the kids loved the idea because we were letting them paint a picture on the one side and then adding their picture to the other. And here is what they looked like finished.
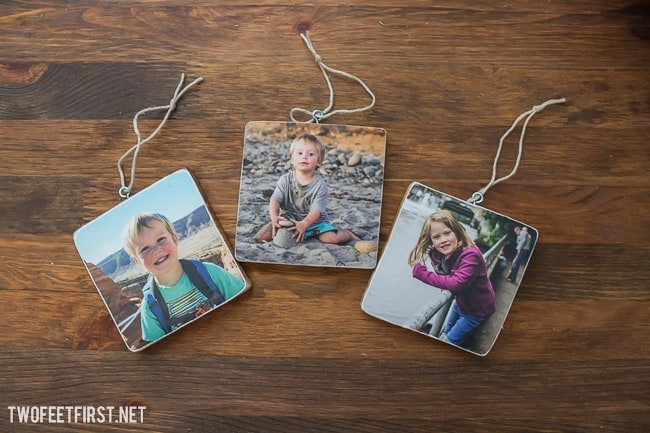
What do you think? I really like the idea of using them to display pictures in a room, maybe I will do that another day.
Disclosure: This post contains some affiliate links or referral links for your convenience. It is a way for this site to earn advertising commissions by advertising or linking to specific products and/or services. Click here to read my full disclosure policy.
Here is a list of materials needed:
- 1/2″ square piece of wood (it can be any size)
- a picture (make sure the back is not glossy)
- Elmers glue
- screw eye
- string
- clear spray paint
- paints (optional – to paint one side)
- foam paint brush
- scissors
- #220 grit sandpaper
For our wood pieces, we decided to use a scrap 4×4 board that we cut to 1/2″. Next we sanded the wood smooth with the #220 grit sandpaper. After we wiped the wood clean to make sure no dust was left on the wood.
After we had our kids paint their pictures on one side of the wood. Once their paintings were dry, I sprayed a coat of clear spray paint over just that side.
While that dried, I cut my picture to the size of the wood, ours was 3.25″x3.25″. NOTE about the picture: I got mine from Costco and had no problem with them but I did use one from Target and I found that that one did not adhere to the wood because of the glossy back.

Next I applied the picture to the wood with the glue. To do this, I added a small amount of glue to the back of the picture plus some on the wood.

Then using the foam brush I painted the glue all over, you want the glue to cover both completely but only have it be a light coat.

Then add the glue sides together, pressing to remove any bubbles. Place something heavy on the wood to help the picture dry in place.

I let mine dry this way for about a day. Then I took the #220 grit sandpaper and lightly sanded the edges of the picture to make it flush with the wood and to give it a weathered look. I decided to take a sharpie and put the year on the bottom of the frame. After I then sprayed the picture and sides with the clear spray paint.
Once that dried, I added the screw eye to the top of the frame. I first drilled a slight hole, just to get it started, then I used my hand to screw the screw eye into place.
After I added some string and the wooden ornaments were done.
What do you think?