DIY Wood Bench
This post may contain affiliate links. Please read our disclosure policy.
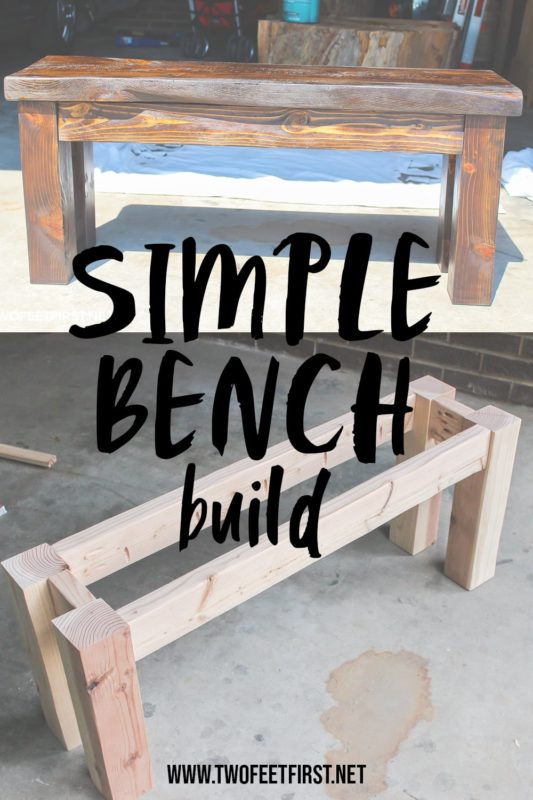
A step-by-step tutorial on how to build a DIY wood bench for your kitchen table.
You can spend months designing and renovating your entire kitchen but sometimes, you just can’t change the size of it.
Lately, we’ve been bumping our chairs constantly around our table in the kitchen. With three kids around a small table, passing the salt is like a battle of elbows.
If you have not noticed, our kitchen is not the largest kitchen. And because our kitchen space is so limited, we cannot get a bigger table.
We needed a space-saving solution that would also be easy to access (no cumbersome chair backs) so we decided to build a wooden bench. I found many great tutorials (like this tutorial from Kruse’s Workshop) on how to DIY a wood bench.
Of course, we changed the measurements to make the bench the size we needed, and we used a solid 2″ salvaged board for the bench top.

Do you want to build your own bench? Our bench measures 18″ tall x 12″ wide x 41″ long. If you would like to make your bench longer/shorter, here is how I figured my measurements.
Example: My table measures 42-1/2″ from leg to leg (that is the inside of the legs). I took 1-1/2″ off that measurement to give me the length I needed, which is 41″ for the top board. Then, for the sides, take another 8-1/2” to 9″ off the top board measurement to give you the length; you will need this length twice.
Disclosure: This post contains some affiliate links or referral links for your convenience. It is a way for this site to earn advertising commissions by advertising or linking to specific products and/or services. Click here to read my full disclosure policy.
BUILD A WOODEN BENCH
MATERIALS:
- 4″ x 4″ x 6′ Board (legs)
- 2″ x 4″ x 6′ Board (sides)
- 2″ x 12″ x 4′ Board (top)
- 2-1/2″ Screws
- Wood Conditioner
- Stain
- Polycrylic (Varnish)
- Towels/Brushes (applying the stain/conditioner/varnish)
TOOLS:
- Orbital Sander/Sandpaper
- Kreg Jig K5 (Optional)
- drill
- miter saw
- safety glasses
- face mask (for dust)
- ear protection
CUT THE BOARDS
First step is cutting all the boards you will need.
Cut List::
- 4″ x 4″: cut #4 at 16″
- 2″ x 4″: Cut #2 at 3-1/2″2” x 4”: Cut #2 at 32-1/2″
- 2″ x 12″: Cut at 41″
ADD POCKET HOLES
We decided to try a new tool for this project and bought a Kreg Jig K5.
If you plan on doing any wood building projects, I would suggest buying one of these to make your life a little easier. We made pockets on only the 2″ x 4″ pieces of wood, to hold the wood to the legs and top piece. See the picture below for an example.
Make sure you follow the instructions for your jig.

SAND THE WOOD
After you add your pockets, you will then sand all the wood.

For this project, we are using all salvaged wood. Let me show you the difference after sanding our top piece of wood.
SIDE NOTE: The wood on the left is for our DIY TV console.

The board on the left is the unsanded board – see how dirty the wood looks. And, although you cannot see it in the picture, the board is rough, which makes it difficult to stain or finish properly.
The board on the right is the sanded wood. Sanding the wood allows the character of the wood to show though and gives it a smooth finish.
After all the wood is sanded, you can start to put the bench together.
ASSEMBLE THE BENCH
First, you will assemble the legs, taking one of the 4″ x 4″ and the 3-1/2″ piece of 2″ x 4″.
Place the 3-1/2″ piece exactly 1/4″ away from the back edge of the 4″ x 4″ and screw into place (you need to have it close to the edge to be able to put the screw into the wood because the piece is so small).
Complete this step by adding all the legs to 3-1/2″ side pieces.

After, you then attach the longer side pieces to the legs.
TIP: Make sure your pockets are facing the right way to attach the top board.
You can either place this board closer to the edge of your 4″ x 4″ or more in the middle if you prefer. We placed ours 1/4″ away from the front edge of the board.

Add both pieces until you have your bottom frame together.

Now you will add the top board to the leg frame, using the pockets you drilled into your 2″ x 4″ wood. Place the top of your top board on the ground (we placed ours on top of an old sheet); then, place your leg frame on top of the board.
Center your frame to your top board (it will be about an inch away from 4 x 4 sides) and screw them together.

Now, your bench is fully assembled.


APPLY STAIN & PROTECTIVE FINISH
At this point, you can choose how you would like to finish your bench (stain, paint, etc…). We decided to stain our bench in Dark Walnut.
First, we used the wood conditioner, applying according to the directions. Then we added the wood stain.
SIDE NOTE: Are you wondering if wood conditioner is needed when staining? See my article about do you really need a wood conditioner before staining to answer your question.

Here is our bench after one coat of stain.

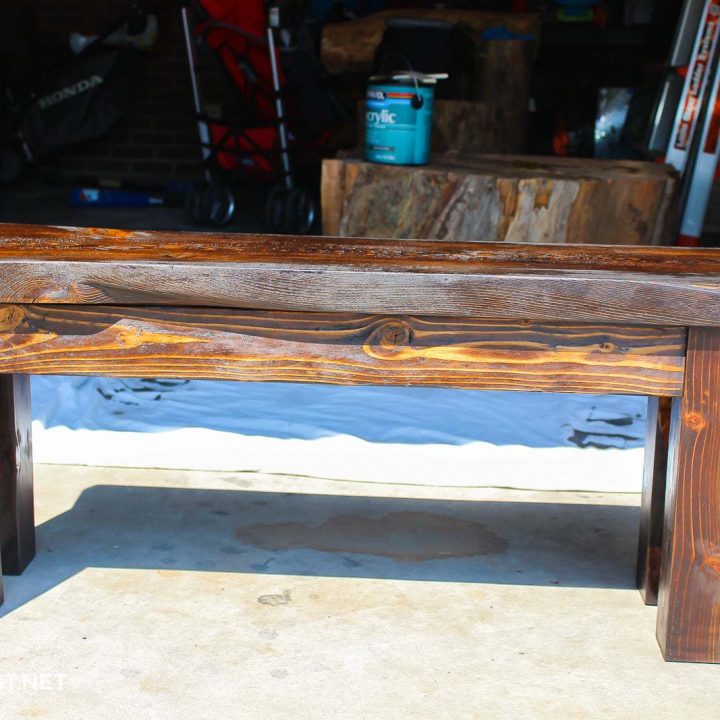
And here is the bench after two coats of Dark Walnut stain.

To protect the bench, you should add a protective finish called Polycrylic.

After adding three coats of Polycrylic finish, our bench is completed.


And that was how we DIY a wood kitchen bench. Does anyone else need to add additional seating to their table? This is a simple and affordable way to make your own bench, which can also work well in other rooms of your home.
SaveSave
DIY Wood Bench
Are you looking for kitchen table bench plans? Here is a DIY wooden bench tutorial that will help you solve your problem.
Materials
- 4″ x 4″ x 6′ Board (legs)
- 2″ x 4″ x 6′ Board (sides)
- 2″ x 12″ x 4′ Board (top)
- 2-1/2″ Screws
- Wood Conditioner
- Stain
- Polycrylic (Varnish)
- Towels/Brushes (applying the stain/conditioner/varnish)
Tools
- Orbital Sander/Sandpaper
- Kreg Jig K5 (Optional)
- drill
- miter saw
- eye protection
- ear protection
- face mask (for dust)
Instructions
- Cut the boards to the cut list on my website.
- Add pocket holes to the 2x4 side pieces.
- Sand the wood.
- Assemble the bench
- Apply a stain and protective finish onto the wood.
- Enjoy your bench.


This is great! I created a table the same way, never thought of making a bench ! :)
I really wanted to make a table too but we do not have room for a bigger table, so I am giving ours a little makeover…
I love your DIY bench!! I think it would also look lovely at the end of a bed! I may just have to do that! Thanks for the inspiration!
Thanks Selene! I really like your idea, I can not wait to see it…
This turned out really beautiful. The stain looks very nice on that species of wood. Great job! :D
Thanks Julie, I love the stain too! I just finished my kitchen table to match the bench and the stain looks amazing on that too.
Love how this turned out. Can’t wait to see it in the room. Pinning!
Thanks Ashley, I just finished my kitchen table and I can not wait to share because they look amazing together!!
This turned out beautiful and I love the stain you used too!
Thanks Katie, we are loving the stain too. It is now my favorite stain color…
I love the bench…very nice!
Thanks Terri! We love it too.