How to Paint a Backsplash to Look like Tile
This post may contain affiliate links. Please read our disclosure policy.
A step-by-step tutorial on how to paint a kitchen backsplash to look like tile.
Looking for an affordable way to get a simple, elegant backsplash for your kitchen?
Subway tiles are a popular choice for bathrooms and kitchens because of their classic and minimalist design.
I really wanted to have that look as my kitchen backsplash but it was out of my budget. As usual, I am looking for ways to save money, especially after redoing our mainline.
That’s when I realized I was only one paint brush (and paint can) away from creating my latest masterpiece: painting a design that resembled the subway tiles!
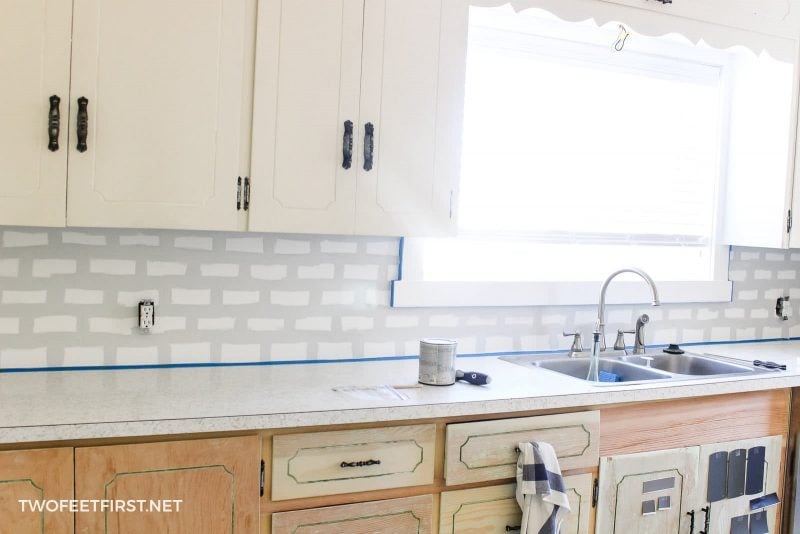
If you are renting a place, you could also do this with contact paper. Here is my tutorial on how to paint a backsplash to look like tile (Please look past the cabinets – I was still working on them during this post).

Can you guess how much it cost us to do it? It was less than $28 and that includes $6 for the sheetrock mud to refinish our walls. And I have lots of supplies left over! It’s hard to believe this look was all done with paint!
HOW TO PAINT A BACKSPLASH TO LOOK LIKE TILE
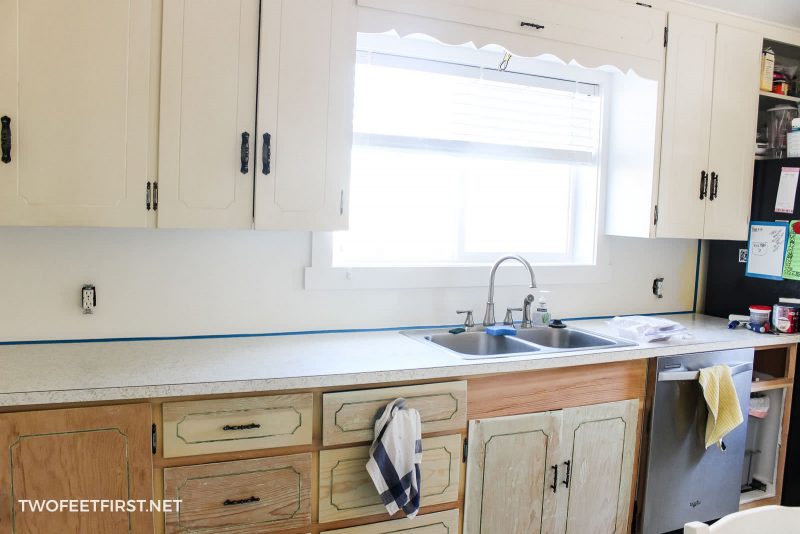
First, we decided to remove the old laminate backsplash. But you do not have to do this if yours is still in good shape – just paint on it!
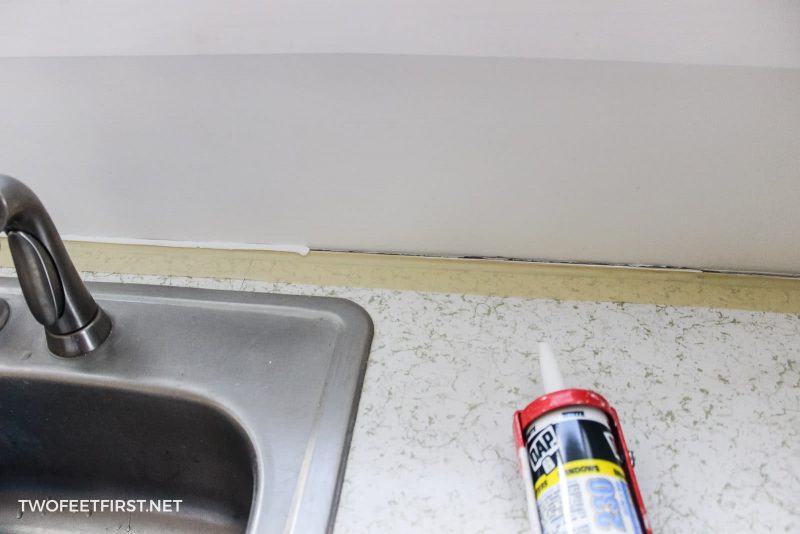
After the old backsplash was removed we had to fix the walls to make them even again.
Then, we added two coats of primer to the wall and caulked all the seams where the wall meets the countertop, cabinets, and window trim (I already did this part when I added the trim to the window).
Now, the wall is all ready for paint and a new backsplash.
Disclosure: This post contains some affiliate links or referral links for your convenience. It is a way for this site to earn advertising commissions by advertising or linking to specific products and/or services. Click here to read my full disclosure policy.
Paint a Backsplash to Look like Tile
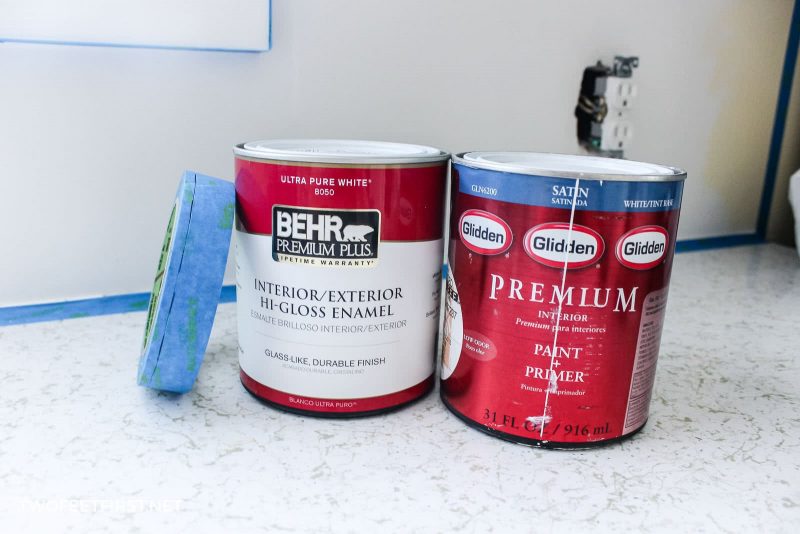
MATERIALS:
- semi-gloss or hi-gloss white paint
- light grey sample paint in satin (this will be the grout color)
- painter’s tape 3/4″-1″ (or purchase 1/4″ tape)
- paint brush & small roller
- cardboard paper cut to 3″x6″ (size of subway tile)
TOOLS:
- straight-edged knife (to cut tape)
- butter knife
- ruler & pencil
Do you want an easier way to get this same look, try using this peel and stick wallpaper!
TIP: To find the paint for your grout color, use the grout color guide to find the color of paint you want. I was lucky and found an Opps paint in just the right color for $2 (sorry, not sure what the color is called).
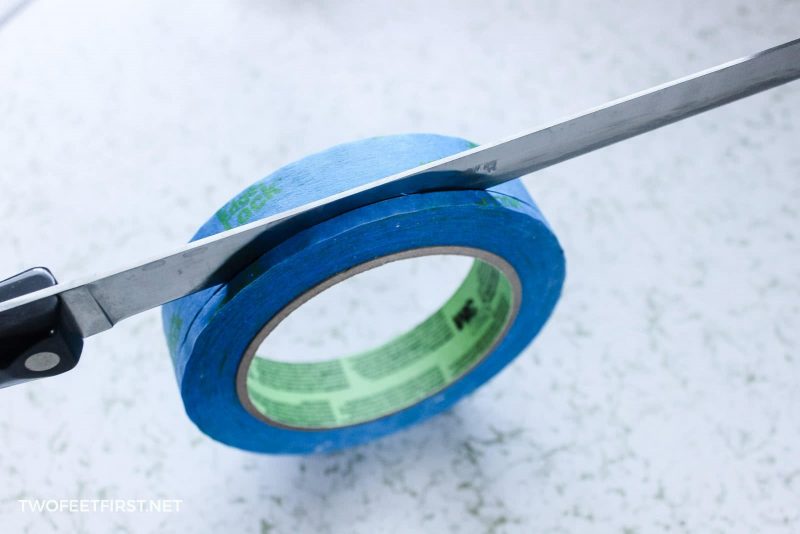
STEP 1 – CUT THE TAPE
I was going back and forth about which color to start with first but in the end, I decided to apply the grout color first. So, before you can start painting, you need to cut your tape to the size of the grout line.
To do this, I took a very sharp, straight-edged knife and marked the tape 3/16″ away from the edge. After finishing the project I wish I would have done a smaller grout line, closer to 1/8″.
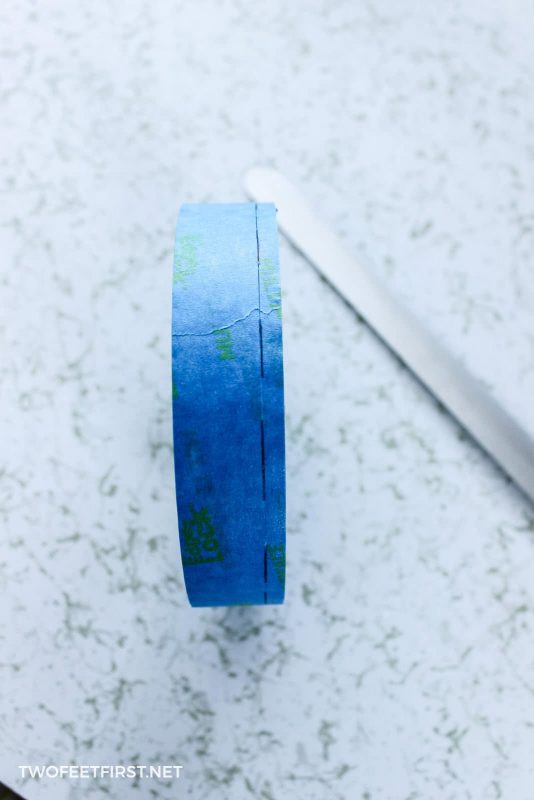
After marking the tape, I then cut the tape to my desired size.
UPDATE: There is also a pin-striping tape that is used for painting automobiles; they come in all different sizes. Also, someone used quilter’s tape but did not have good success with removing the tape from the wall.
STEP 2 – APPLY THE GROUT COLOR
Once the tape was cut, I could start painting the grey paint on the wall.
I took a ruler and measured/marked where all the grout lines would be on the wall and only painted around that marking. This is another part I would have done differently; I would have just painted the whole wall first with the grout color but this would need a bigger can of paint.

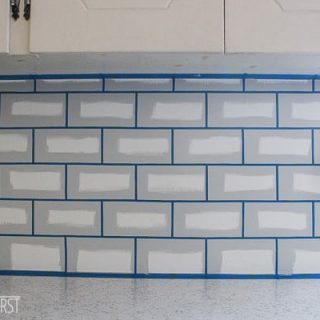
STEP 3 – CREATE THE GROUT LINES
Once the grout color was the shade I wanted and it had dried completely, I took the tape and started taping where the grout lines would be.
To do this, I used my 3″x6″ cardboard template (you could make it whatever size you wanted). Then, starting at the bottom left-hand corner, I placed the template along the edge and taped right above the template.
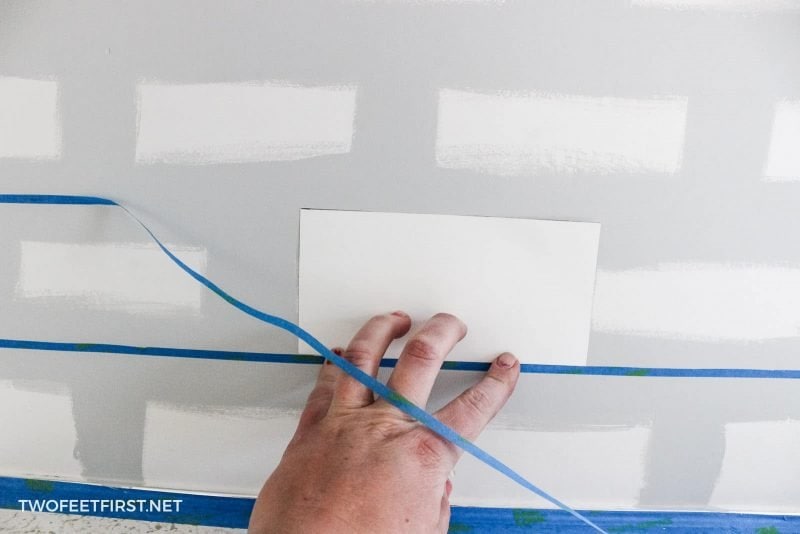
I then pressed the tape into place and moved my template down the wall about 6″-8″. I pulled my tape, making it straight, and again placing right above the template.
I continued this process for the length of the row. For the next row, I placed the template directly on top of the last row’s tape and repeated the same process for the row. I did this until I reached the top of the cabinet.
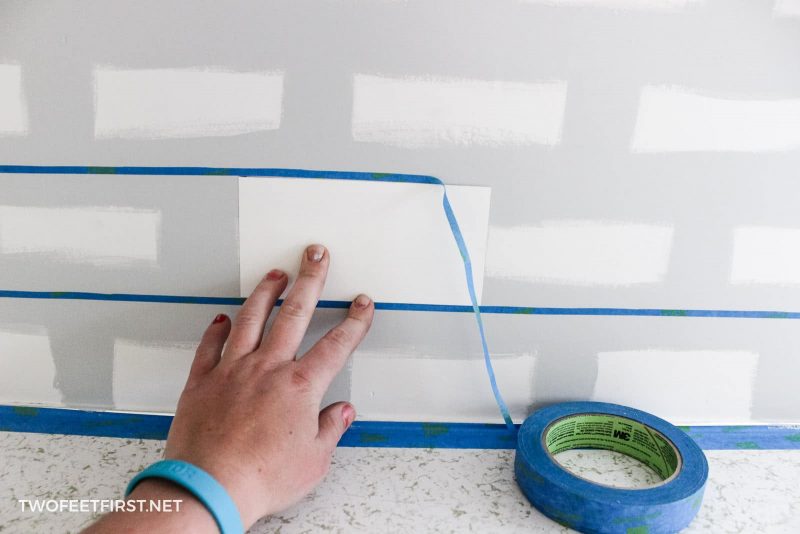
Then, I then started on the sides.
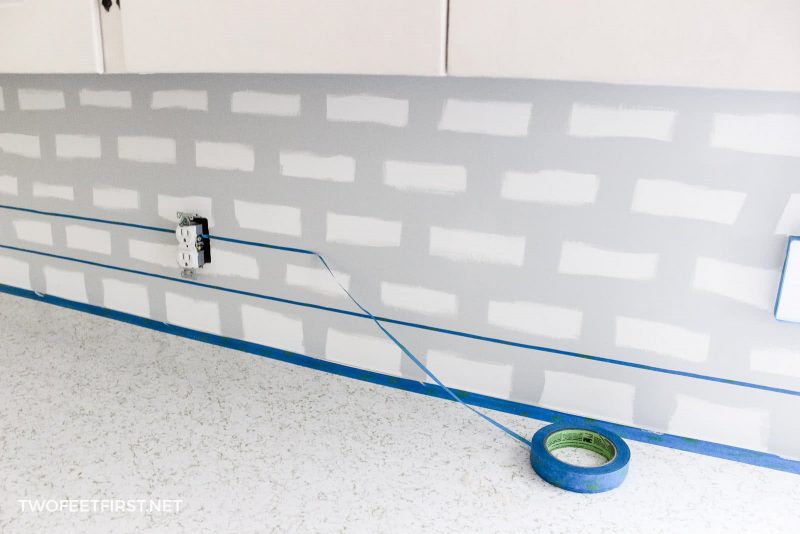
To make the sides, I again placed the template at the bottom left-hand corner. I then took the tape and placed it along the side of the template, pressing into place only where the line should be.
Then I took a butter knife, pressed the straight edge of the knife right in the middle of the row line of tape and pulled the extra tape piece (just like using a tape dispenser).
This created a straight edge on the side tape, giving me the box I wanted. I completed this for the whole length of the first row.

For the next row, I turned the template sideways to make it only 3″x3″ for the first tile, taping just like before. But for the rest of the row, I turned the template back to the 3″x6″. I continued this pattern for all of the rows.
After I finished taping, I took a credit card and ran it over the tape to make sure all the edges were sticking to the wall.

Then, to give it a very straight edge, I painted another coat of grey paint just over the tape making sure to get along the edge of the tape.

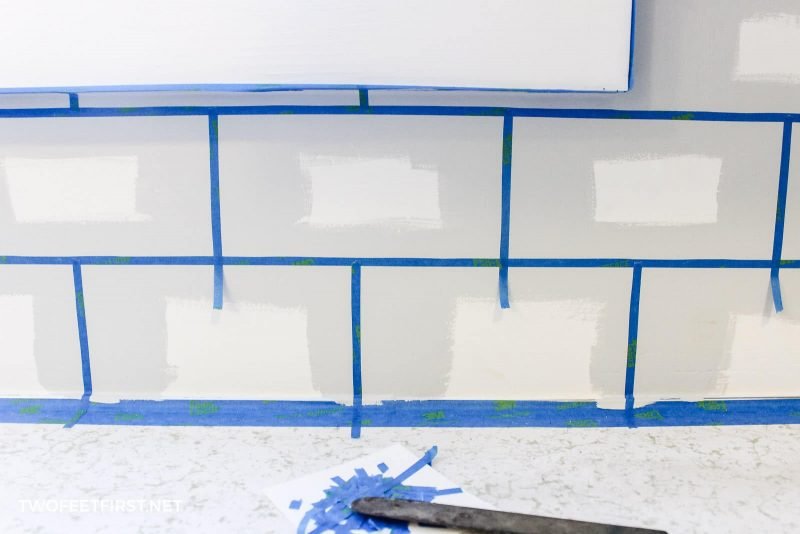
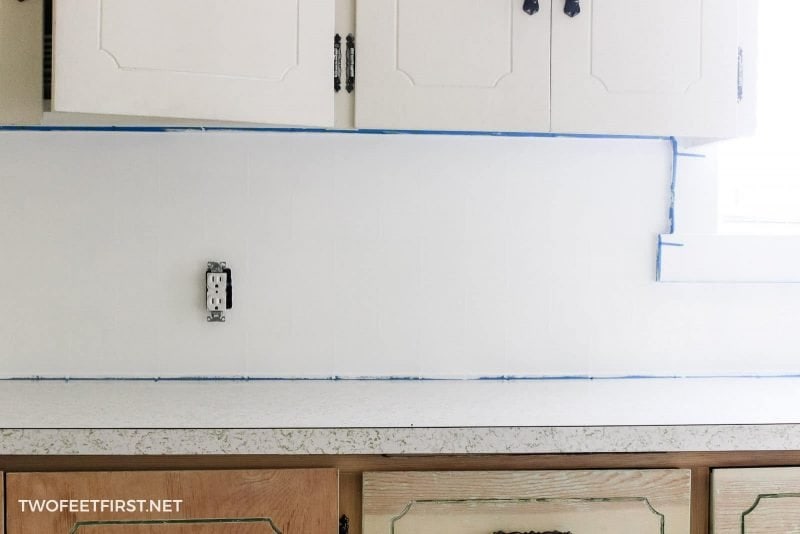
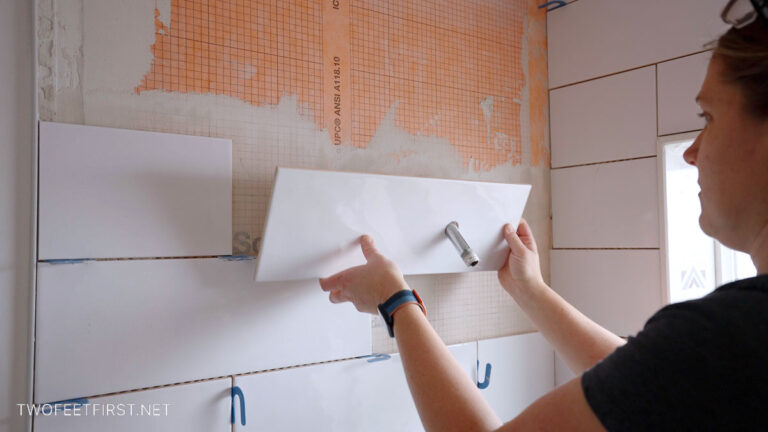
STEP 4 – PAINT THE TILE COLOR
After the grout paint dried, it was time for the white paint. I used hi-gloss paint but I felt like it was almost the same as semi-gloss paint.
After I cut in the edges with a paintbrush, I used my little roller and rolled the paint onto the wall. After a couple of coats of white paint had dried completely, it was time to remove the tape.
This is where I got a little upset. For some reason, as I was removing the tape, it made the paint under it bubble. It even happened on the wall that was previously painted that I just taped to give it a crisp line.
I had to be very careful about removing the tape (I think it was just my wall because it is brick right behind the plaster).
UPDATE: I talked to my dad about the paint bubbling and he suggested priming the wall before adding any new mud. Something about the new mud not being able to cure fully, sorry I did not completely understand… So give that a try!
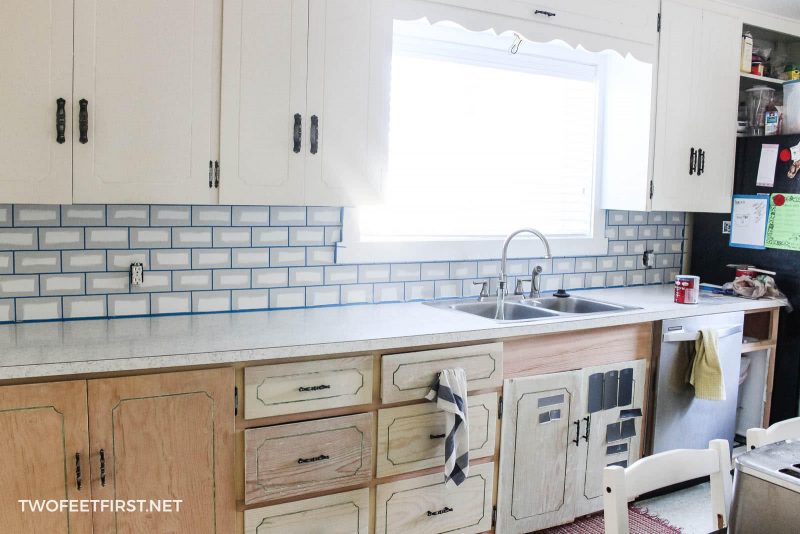
And here is my DIY subway tile backsplash for cheap!

Do you want to redo your kitchen backsplash? What is your favorite type of backsplash?
UPDATE 6/8/16: See how this project is holding up one year later!
How to Paint a Backsplash to Look like Tile
Do you like the look of subway tile? And do you want a cheap way to update your kitchen backsplash? Follow the steps below on how to paint a backsplash to look like tile.
Materials
- semi-gloss or hi-gloss white paint
- light grey sample paint in satin (this will be the grout color)
- painter’s tape 3/4″-1″ (or purchase 1/4″ tape)
- paint brush & small roller
- cardboard paper cut to 3″x6″ (size of subway tile)
Tools
- straight-edged knife (to cut tape)
- butter knife
- ruler & pencil
Instructions
- Cut the painter's tape to 1/4" or purchase tape that is already 1/4".
- Paint the backsplash the grout color.
- Create the grout lines with tape using a template.
- Paint over the tape with the grout color.
- Once the paint has dried, paint a high gloss white paint onto the wall. You might need two coats to give you the coverage you want.
- Remove the tape after the white paint has dried.
- Enjoy your faux subway tile backsplash.


That really looks nice. Thanks for a great tutorial. Stopping over from Something To Talk About @2beesinapod link party.
I am always amazed at how attractive these inexpensive improvements look after they are finished. I wish I had been this imaginative when my husband and I were newly weds 54 years ago. I loved doing things like this. Great job. Keep sending posts.
Thanks Jane!
great job!
Thanks Julia, I am loving the new look!
This looks Awesome I love it just might steal this idea ! Thanks
Thanks Dee! I hope you do!!!
Megan, what a great tutorial! It looks Awesome and Imlove that you are able to work on a budget!
Thank you so very much for sharing with me for Something to Talk About!
Karen
Thanks Karen! And thank you for hosting a great party!!
It turned out great! Actually I thought it looked really cool with the “grout” paint and the blue tape but the finished project looks awesome.
Thanks Bonnie! Guess what?? I thought the same thing when I was doing the project and when I was looking back at the pictures. This project gives people the option to do a completely different grout color and tile then what you could find in a store. I just love that!!!
Thanks for a great tutorial!
Thanks for stopping by Kathy!
This is awesome. Definitely doing this. Please tell me how to get to your cabinet tutorial. I have the same style and newer corian counters so donot buy new. Looking into painting and want to follow your tutorial.
Thank you, Chris
Thanks Chris! Here is the tutorial on updating the doors for cheap and here is the tutorial on painting the cabinets. Hope this helps!!!